
Blog
The 20 best online coaching platforms I recommend in 2026
Best online coaching platforms: 1. Easytools 2. Satori app 3. Coach Vantage 4. Canva 5. Notion 6. Zencal 7. Zoom

The International Coaching Federation (ICF) reported an estimated 109,200 professional coaches worldwide. This represented a 54% increase between 2019 and 2022.

The coaching industry is expanding. That’s why many coaches will deliver their programs online.
In the next few paragraphs, I’ll discuss the online coaching platforms and the tools I mentioned earlier.
If you’re new to online coaching platforms or want to move from tedious tools to ones that grow easily with you, this guide is for you.
Keep reading.
Key Takeaways
- The best online coaching platforms are: 1. Easytools, 2. Satori app, 3. CoachVantage, 4. Canva, 5. Notion, 6. Zencal, and 7. Zoom.
- To choose the right online coaching platform, match the platform to your coaching style, check community features, assess pricing, and factor in integration.
Online coaching platforms compared
7 Best online coaching platforms
The best online coaching tools are:
- Easytools — Best for selling coaching programs and other digital products
- Satori app — Best for running your coaching practice with scheduling and billing
- CoachVantage — Best for managing coaching clients, programs, and delivery
- Canva — Best for designing coaching materials and marketing assets
- Notion — Best for organizing coaching curriculum, resources, and client work
- Zencal — Best for scheduling and selling paid coaching sessions
- Zoom — Best for hosting live coaching calls and workshops
Let’s take some time to review each tool.
1. Easytools
Easytools is first on my list of the best online coaching platforms. It has all-in-one tools for creating, marketing, automating, and scaling coaching businesses at any stage.
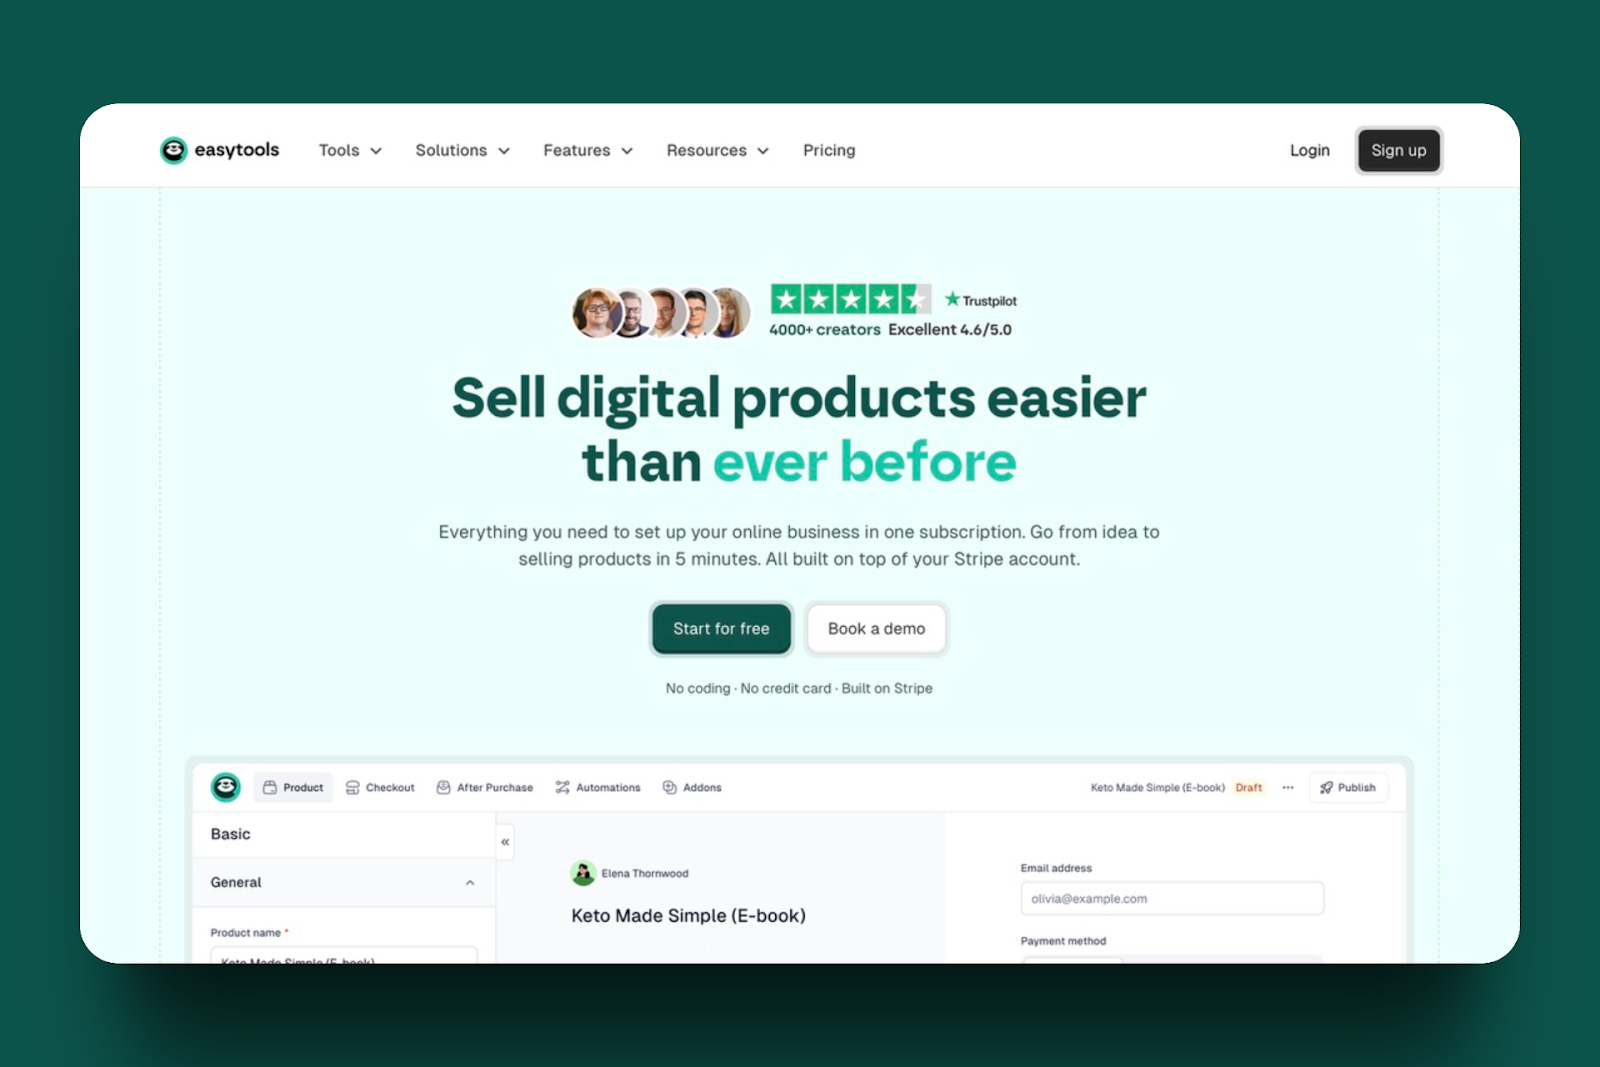
The course feature in Easytools enables you to create, market, and sell online courses and coaching programs using the high-conversion checkout: Easycart.
Your course can consist of various file types and formats, such as videos, audio, and PDFs, for lessons.
You can also enable and customize certificates so that students can receive them upon completion.

The store features display products, affiliates, customers, and more. Thanks to this feature, you can also check analytics reports and all your Easycart sessions.
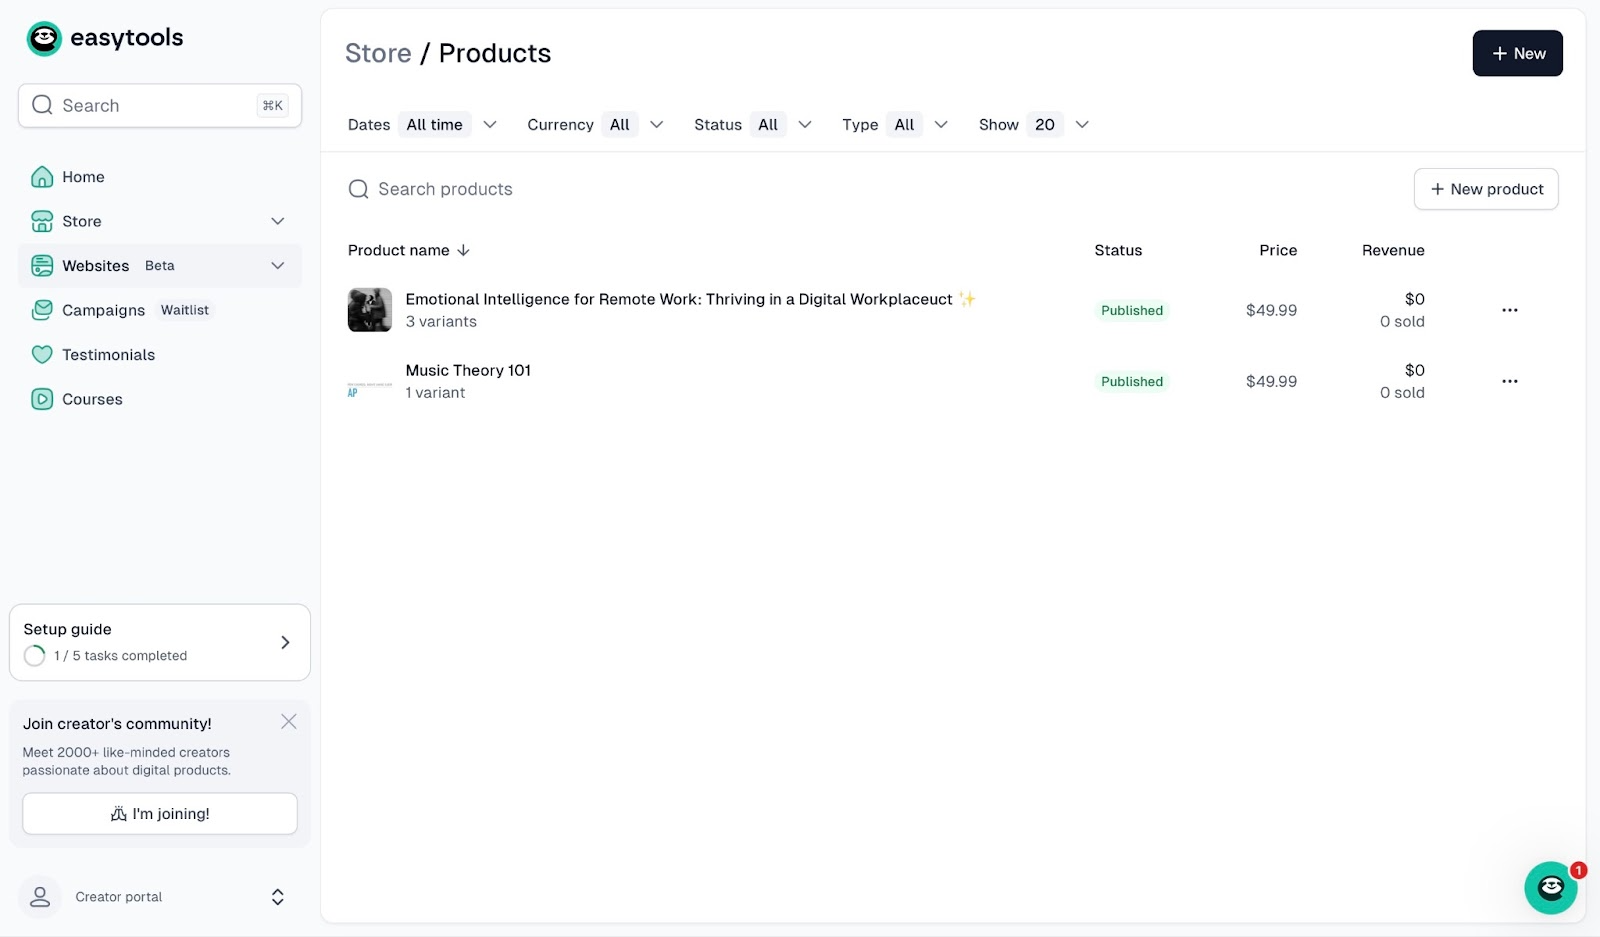
Moreover, Easytools’ website tool allows you to create and design landing pages, pricing sections, legal pages, social proof, and more.

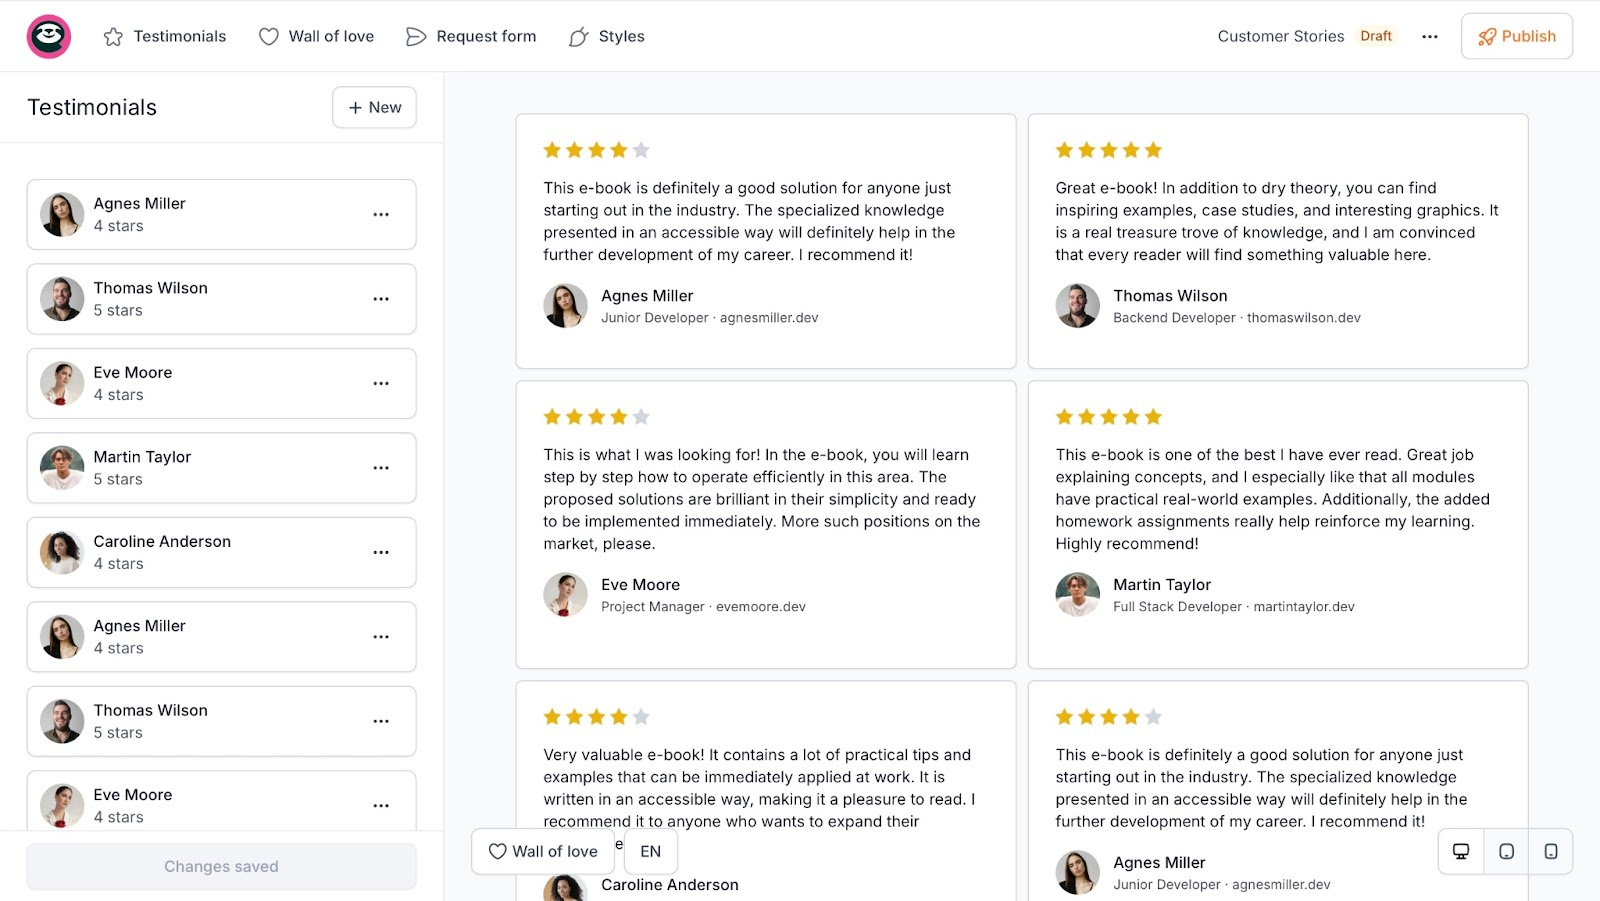
Furthermore, the testimonials feature lets you create review sections and integrate them directly into your storefront. It displays customer names, comments, pictures, and the ratings they gave you.
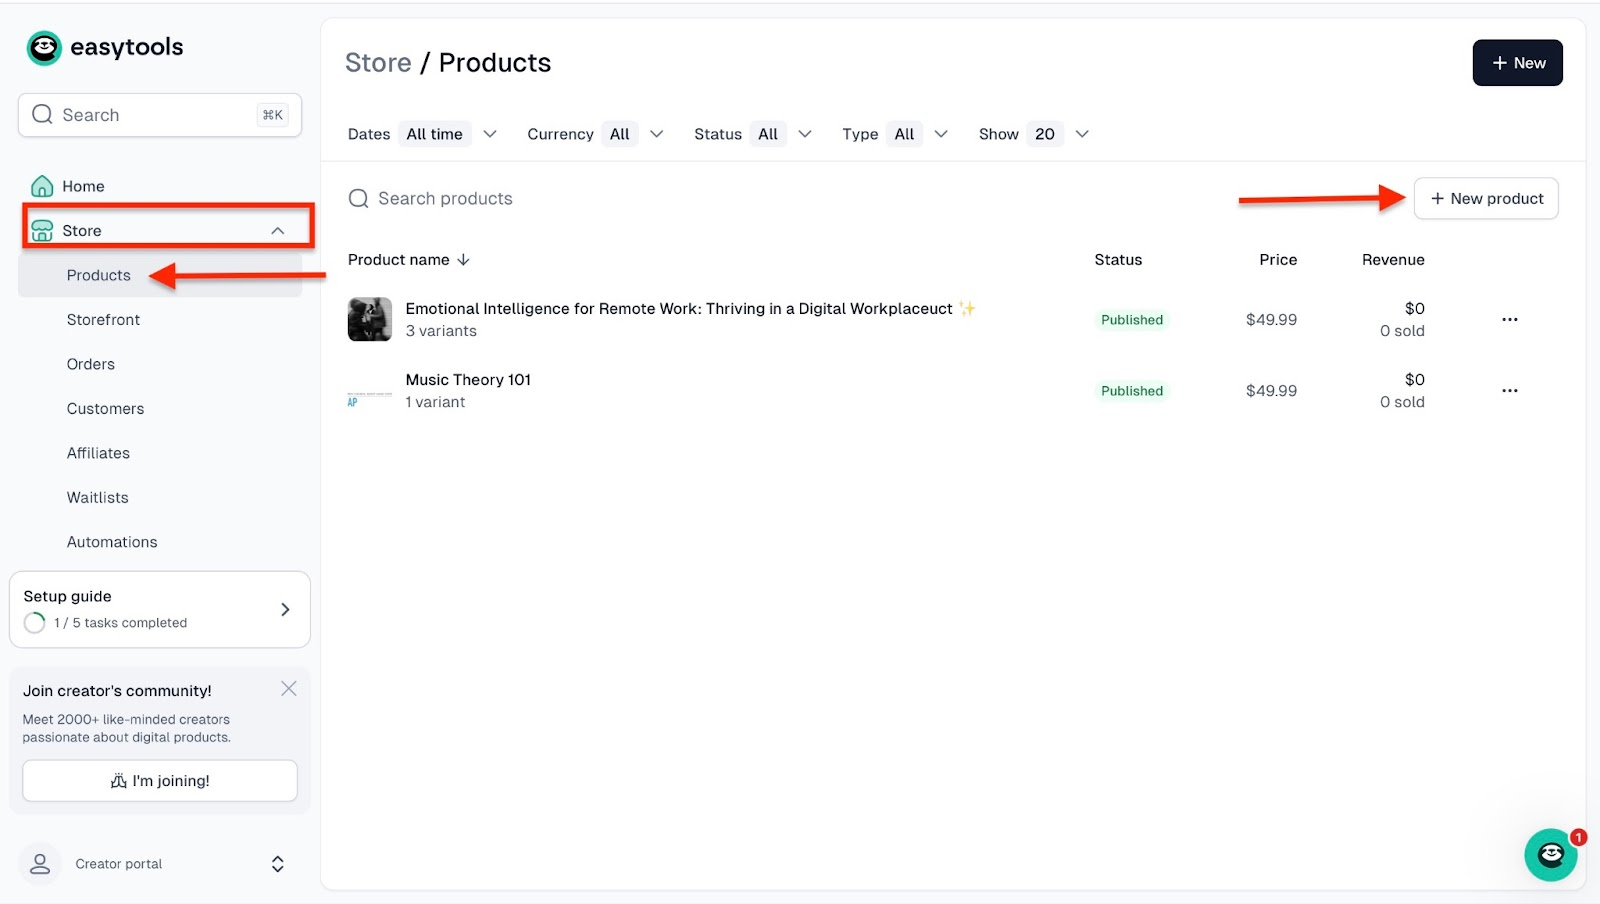
Let me show you how to create coaching sessions on Easytools.
To begin, select “Store” in the sidebar, then click **“**Products.” In the product interface, click “+ New Product” on the right side of the window.
In the new window, enter the product name and description. Next, click the upload area to add an image. From here, select your choice of currency.

Then, scroll down and select the price type. Since I want to sell the coaching sessions as subscriptions, I’ll choose subscriptions. After that, enter the price.

Once you’ve done this, click “Save” at the bottom of the window.

Now, if you want to offer several different options, e.g., monthly and yearly subscriptions, scroll further down to “Price variants.” This is where you will create your different coaching session options. Next, click “+ New variant.”
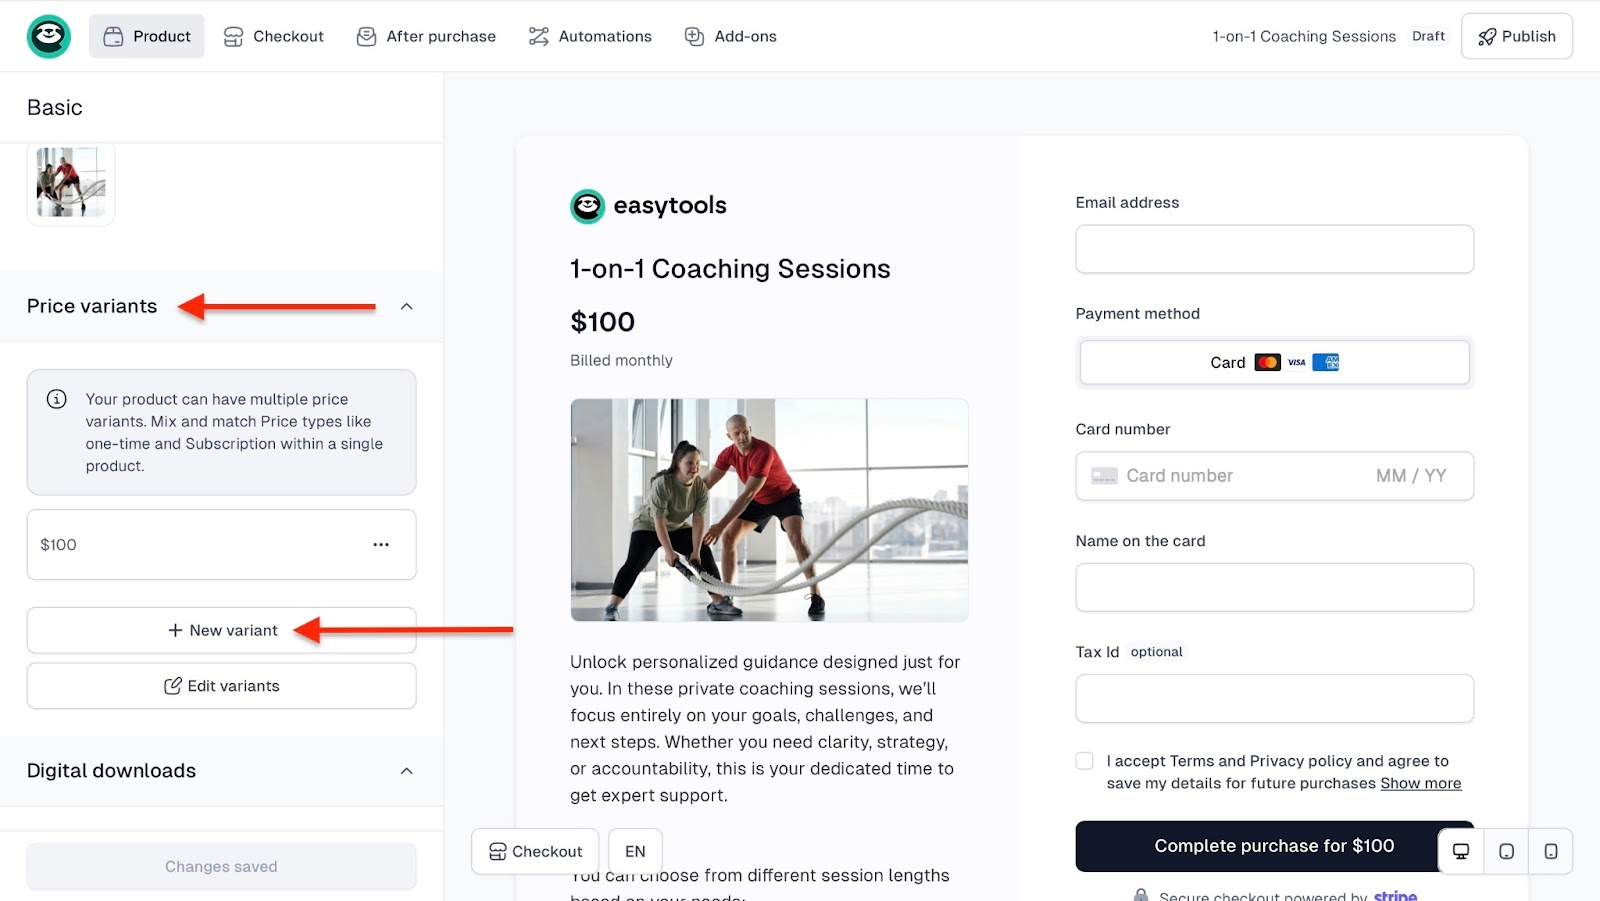
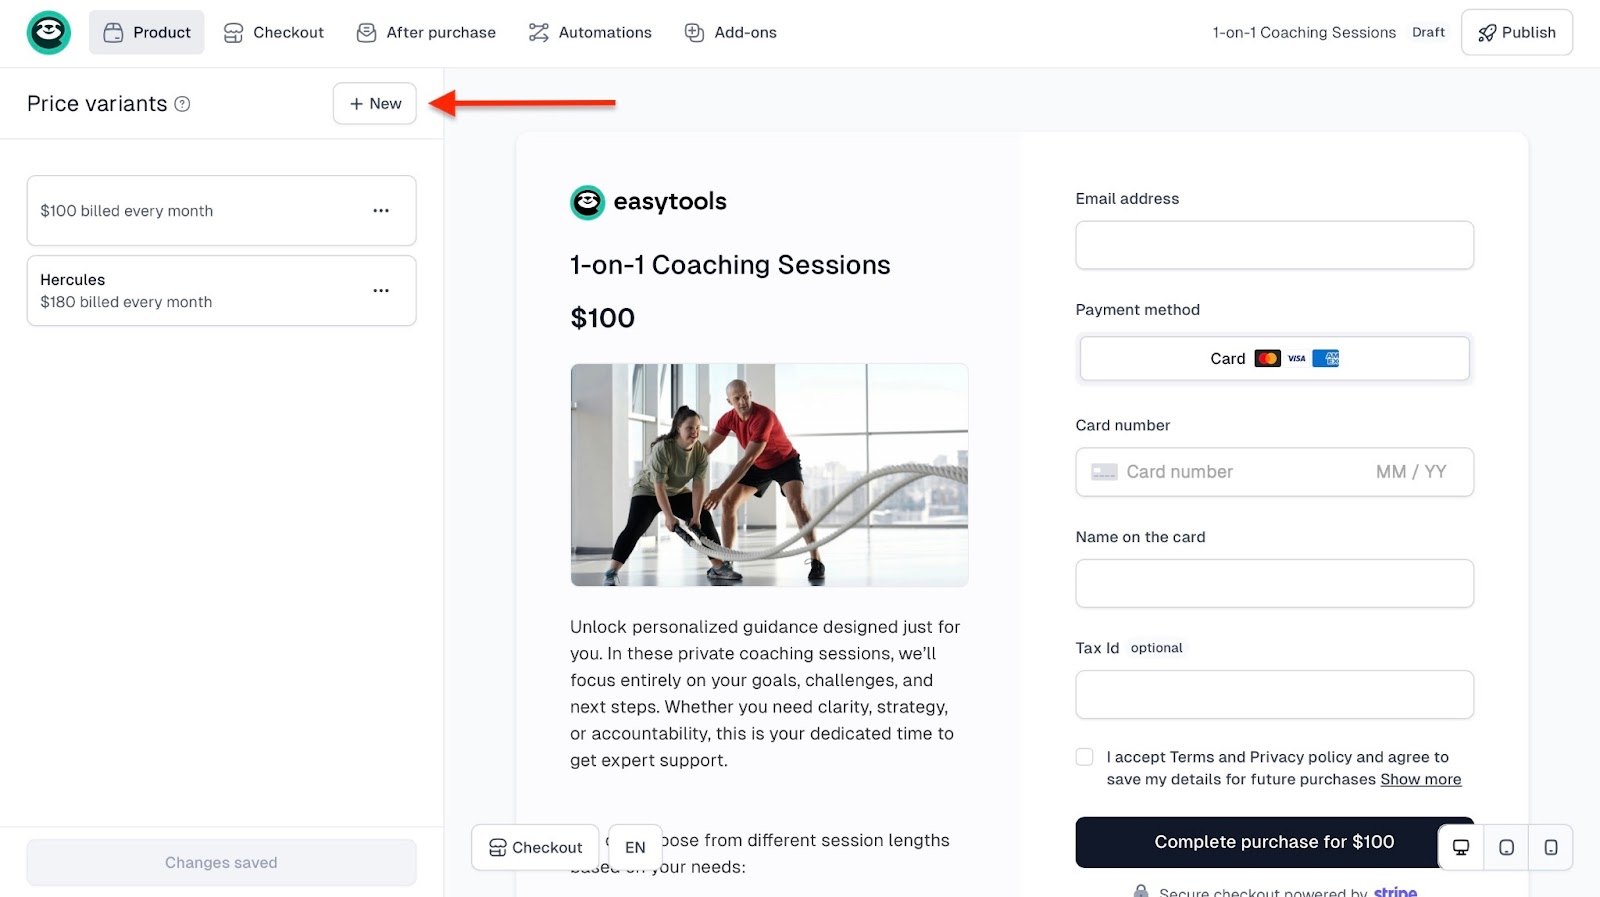
Enter the price variant name, choose pricing, and click “Save.” In the new window, click “+ New” to add a third coaching session/variant.
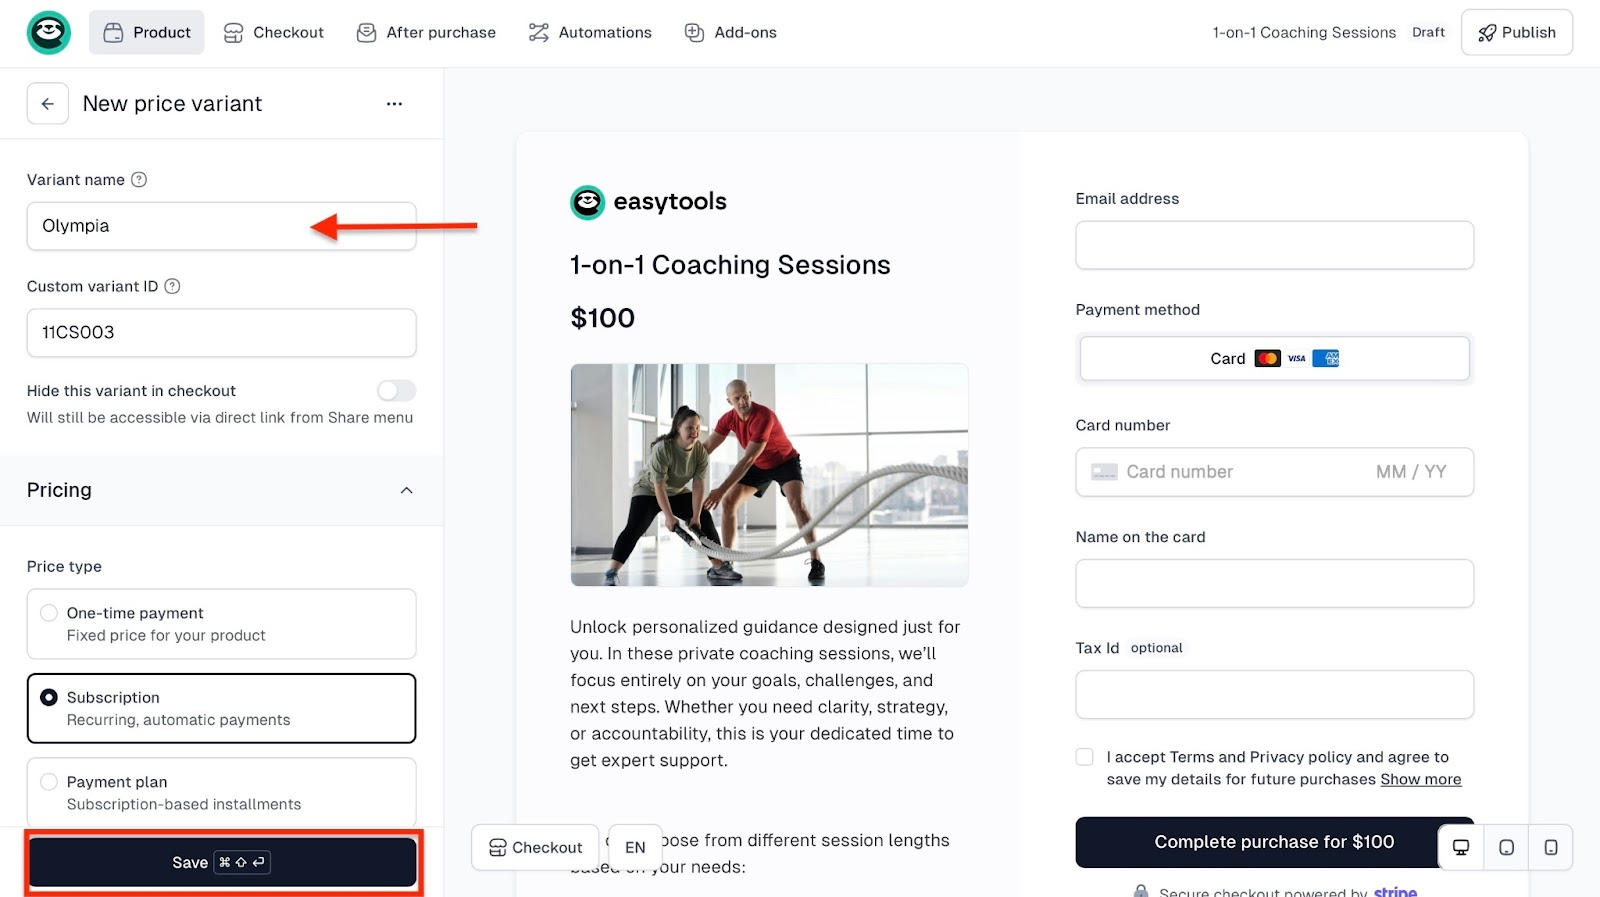
Fill out the form like you did for the second price variant and click “Save.”
You may return to the Basic product and hit “Publish” at the top right corner of the window to finish.

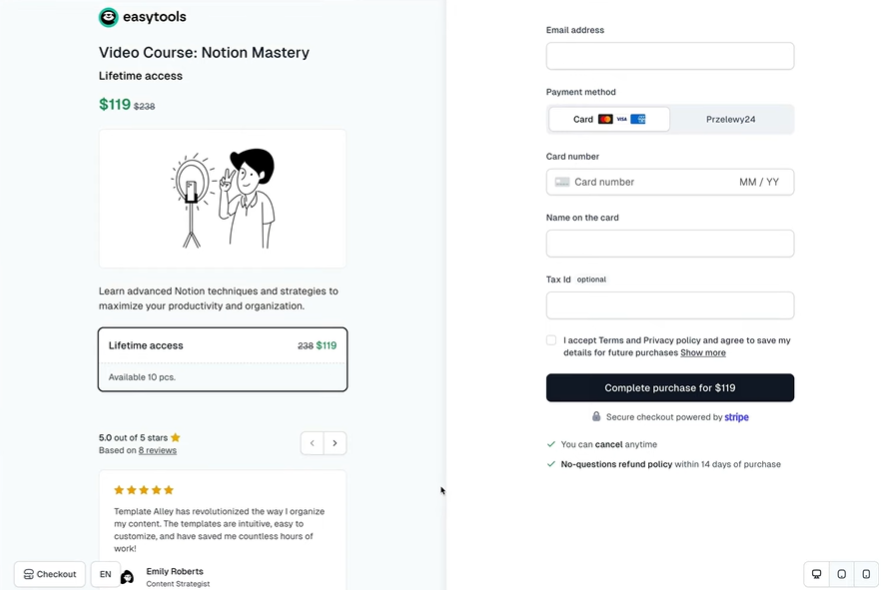
And that’s how your checkout will look. Your customers will be able to view details of different coaching variants and pick the one that best suits their needs.

Also, you can decide to limit the number of available sessions or highlight specific coaching variants to draw more attention to them. You can do it, for instance, by adding a time-limited offer with a discount.

To add a promo with a timer to your checkout, go to your cart editor, open the selected variant, and use the cross-price option.
Then scroll down to Availability section, toggle the option to end selling at certain date and to show a countdown timer. Then save your changes and hit Publish. That’s how your checkout will now display.
These steps will help you create your first coaching sessions on Easytools. If you’re already an online coach, you can bundle your coaching programs with e-books and online courses just like Piotr Tomaszewski did.
He is a successful fitness coach who realized he had reached his maximum capacity for coaching slots and could no longer take on any more customers.

So, he thought about creating e-books, which would serve as a fitness guide to help his customers train without his physical presence. At first, he was selling them on WordPress, but he soon found out that many potential customers were abandoning their carts.
He turned to Easytools and started marketing his e-books and online courses through Easycart. It was a massive success. His conversion rate rose from 15 to 20%.
The features I loved
1. Websites
With Easytools’ websites, you can create or add landing pages with testimonials, legal disclaimers, donation sections, and FAQs about your coaching business.
Now, let me show you how to create a landing page using the websites feature.
Begin by clicking “Websites” on the sidebar. Then select “Landing pages.” Next, click the “+ New landing page” button.

In the pop-up window, add a project name. After that, click “Create” to set up your landing page.

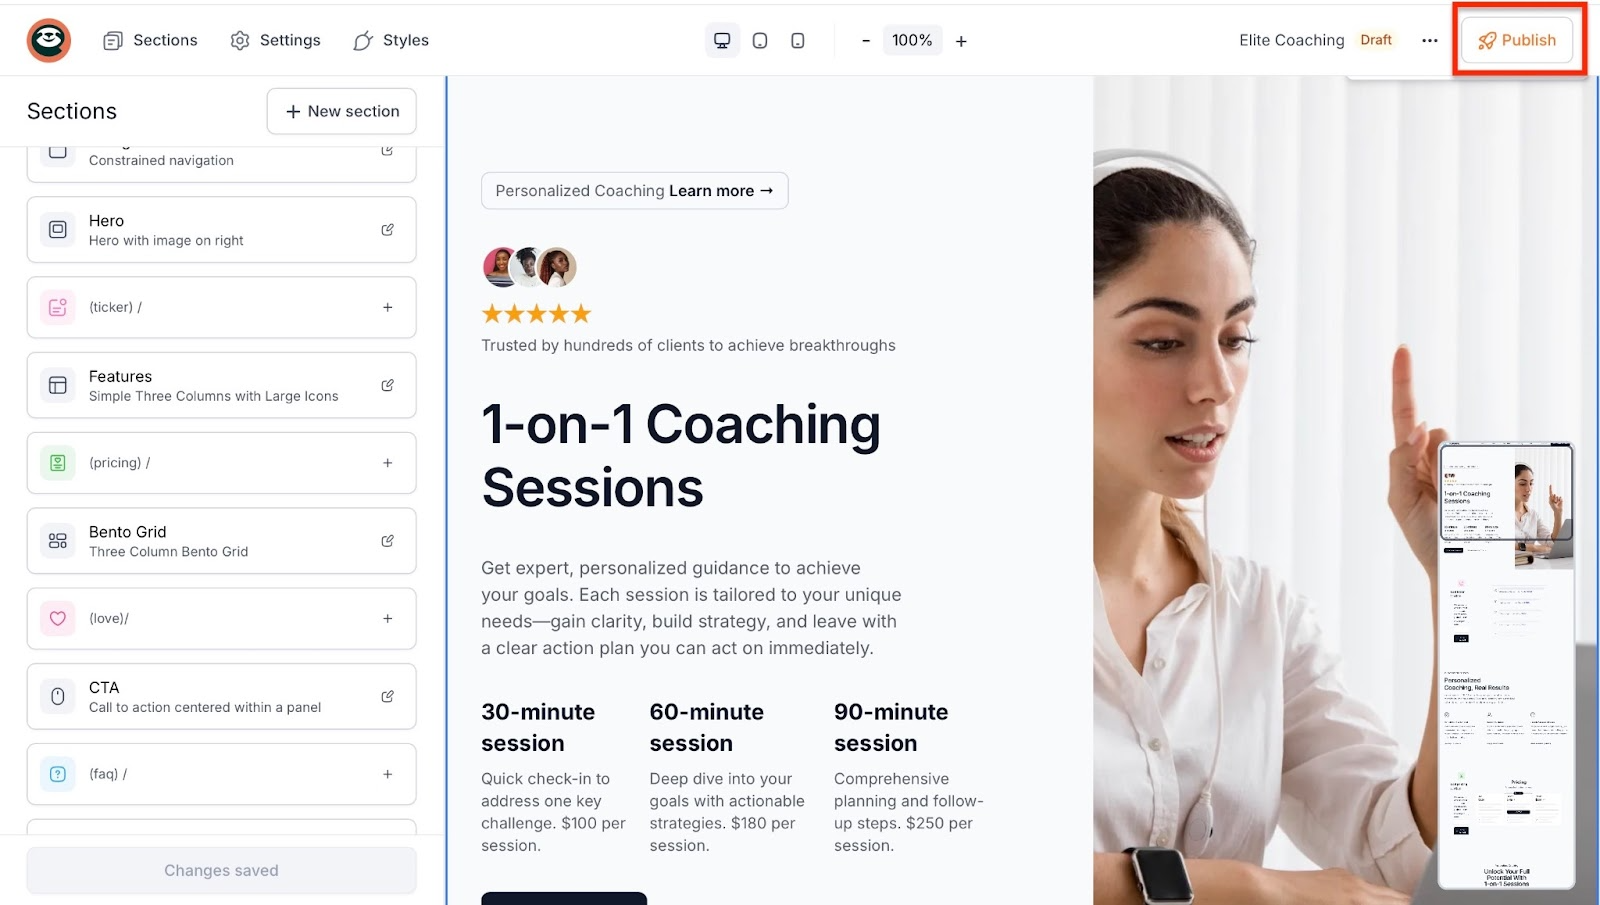
In the new window, select “Easycart” and choose a product you already have on Easytools. Then, choose a color palette and click “Generate.”
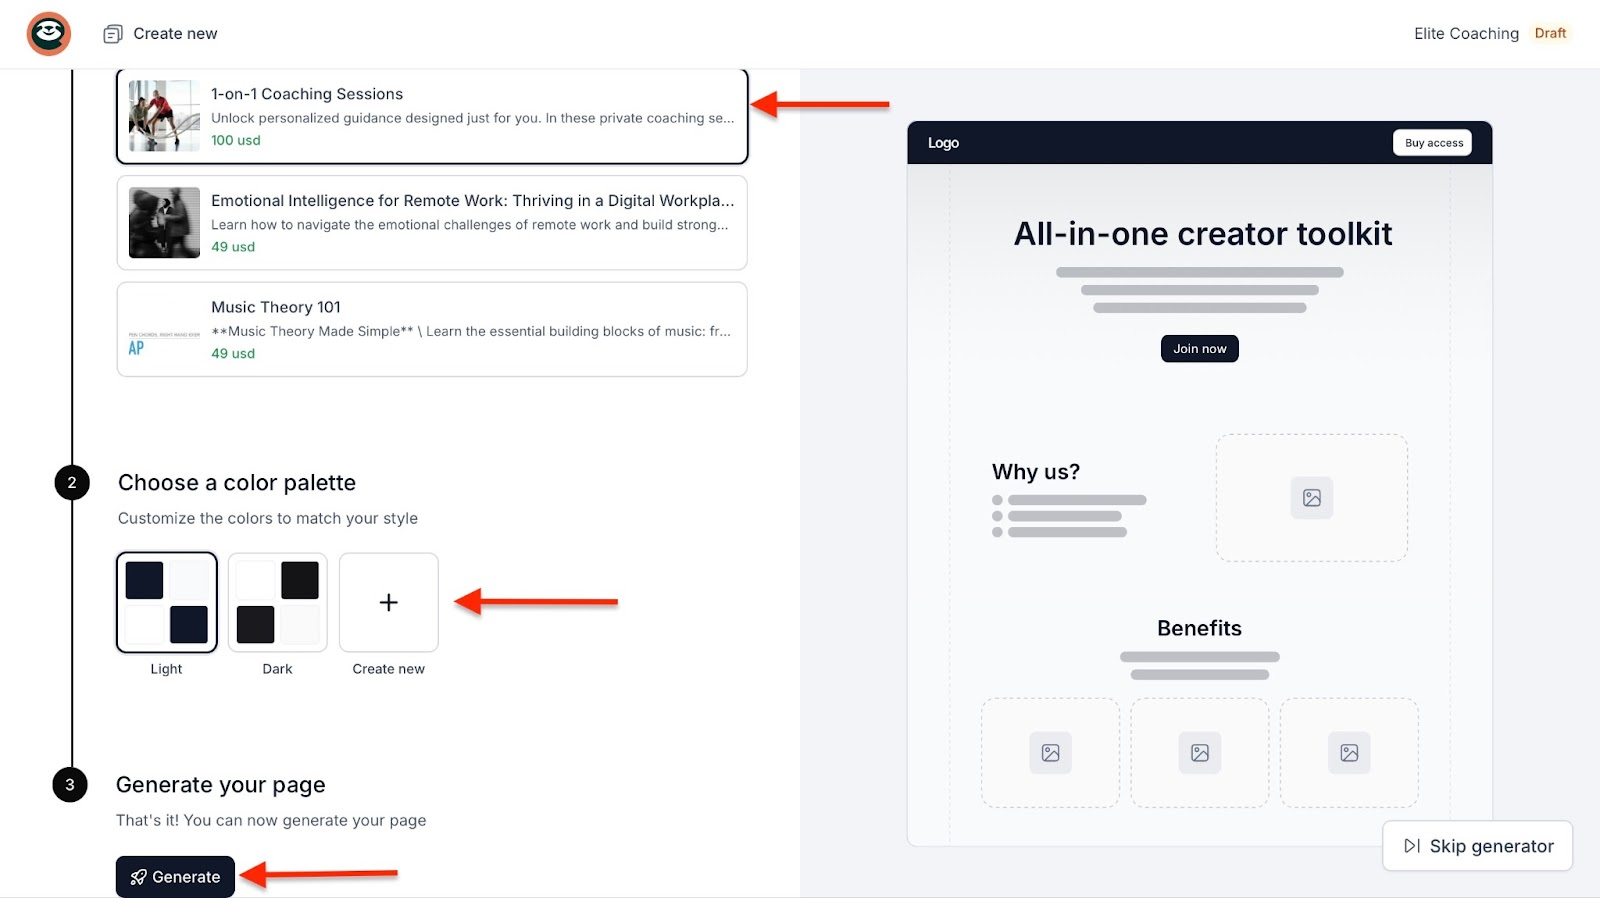
Right away, Easytools will generate a landing page and fill it with AI-generated content about your specific product. You can then click on the Sections, Settings, and Styles tabs to edit your page. Once you’ve done that, hit “Publish”.
2. Testimonials
Easytool’s testimonials are a great way to collect encouraging and positive remarks about your coaching. If you think about it, it’s like a digital word of mouth.
What’s even better is that it shows your customers’ names, what they said, and the number of stars they gave you. Let me show you how to create a “wall of love” on Easy.
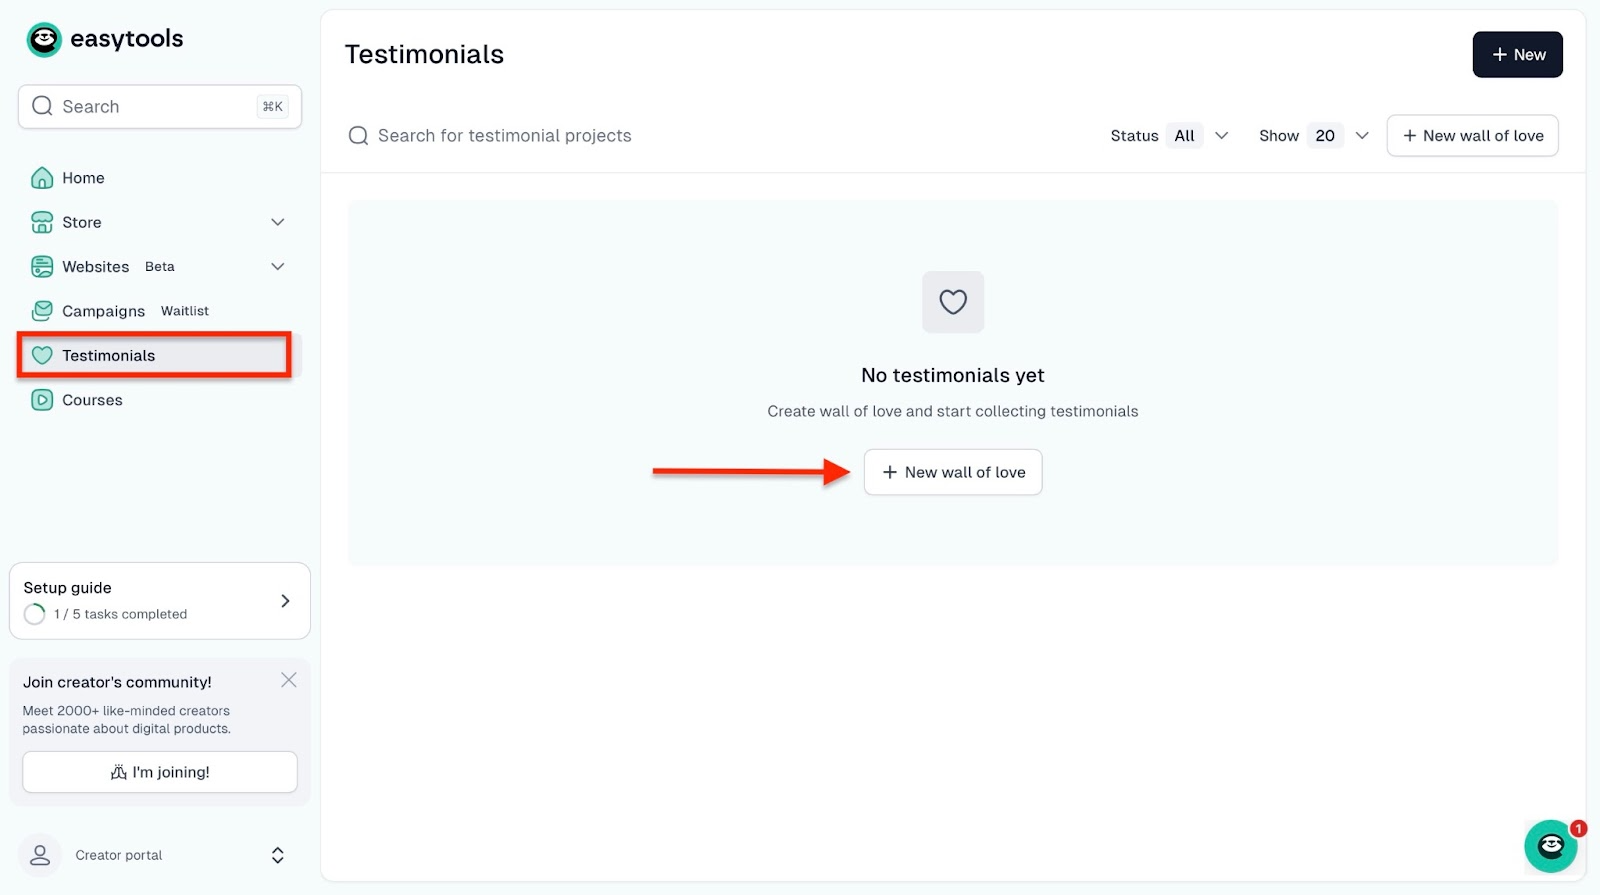
Begin by selecting “Testimonials” in the sidebar. Next, click “+ New wall of love.”
In the pop-up window, enter the new project name. Easytools considers it a project since your testimonial section will be added to your landing page. So don’t let that confuse you.
Once you’ve typed the project name, click “Create.”

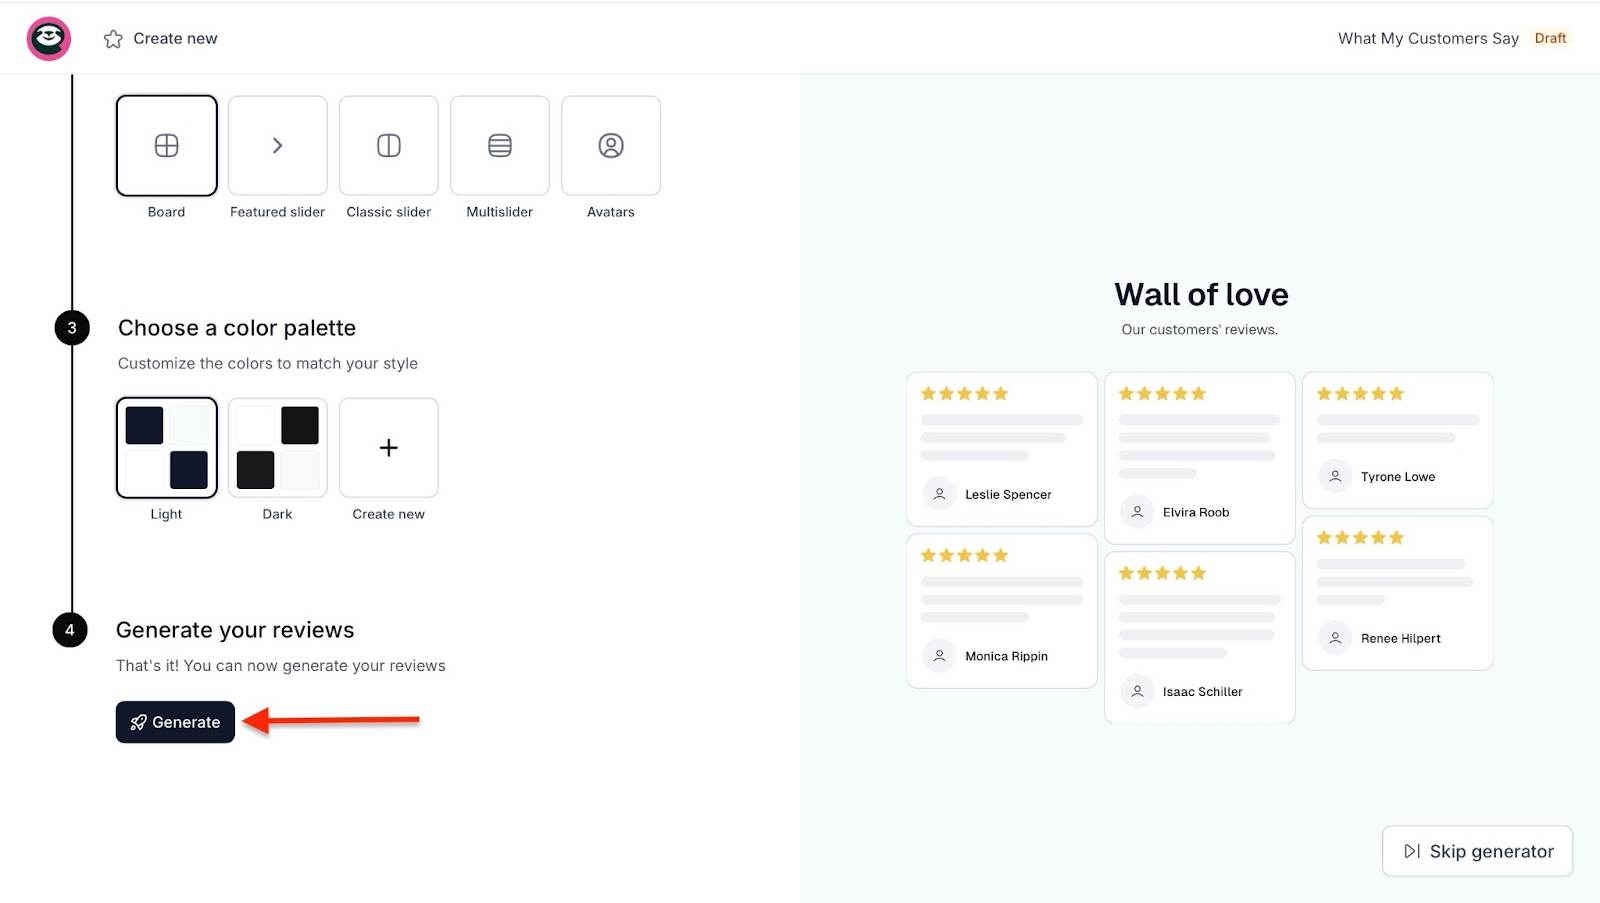
In the new window, select one of the listed templates. After that, choose the content layout. From here, select a color palette and then generate your wall of love.
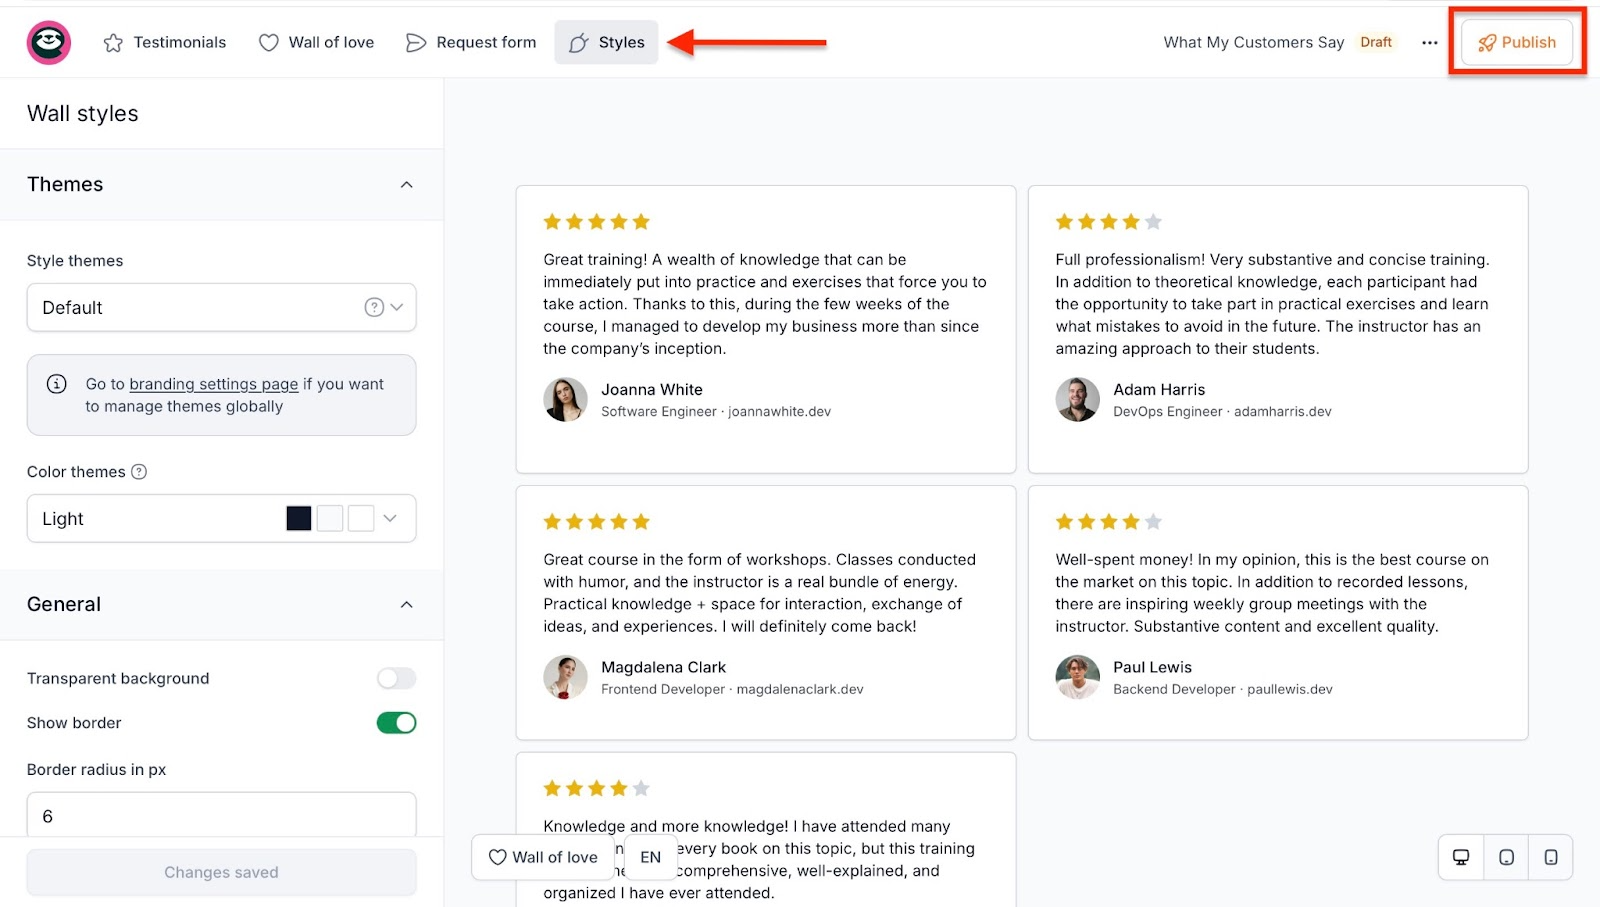
Now, in the new window, click on any of the tabs at the top left corner. Then, add your preferred edits.
Once you’ve done that, click “Publish” to complete the process.
You can choose to display your testimonials on the checkout page. Once you do, this is what it’ll look like.
What I liked:
- I can sell 1-on-1 sessions, group coaching, courses, and e-books without juggling between tools
- Once a client pays, they instantly get access to the right session or coaching material
- I can package my knowledge into courses or bundles to reach more people without burning out
What I didn’t like:
- The native mailing feature to send campaigns to my client is not yet available, but Easytools will release the beta version soon.
Best for
- Coaches seeking an all-in-one platform to manage coaching programs, create courses, manage customers, and sell memberships.
Pricing
- Starter: $0/month
- Creator: $59/month
- Professional: $99/month

2. Satori app
Second on my list of the best online coaching platforms is Satori. It’s an all-in-one coaching platform that automates administrative tasks and customer onboarding.

Satori’s clients feature lets you create automated engagements such as enrolling, tracking, and organizing customers. You can also manage customer proposals, contacts, and groups.

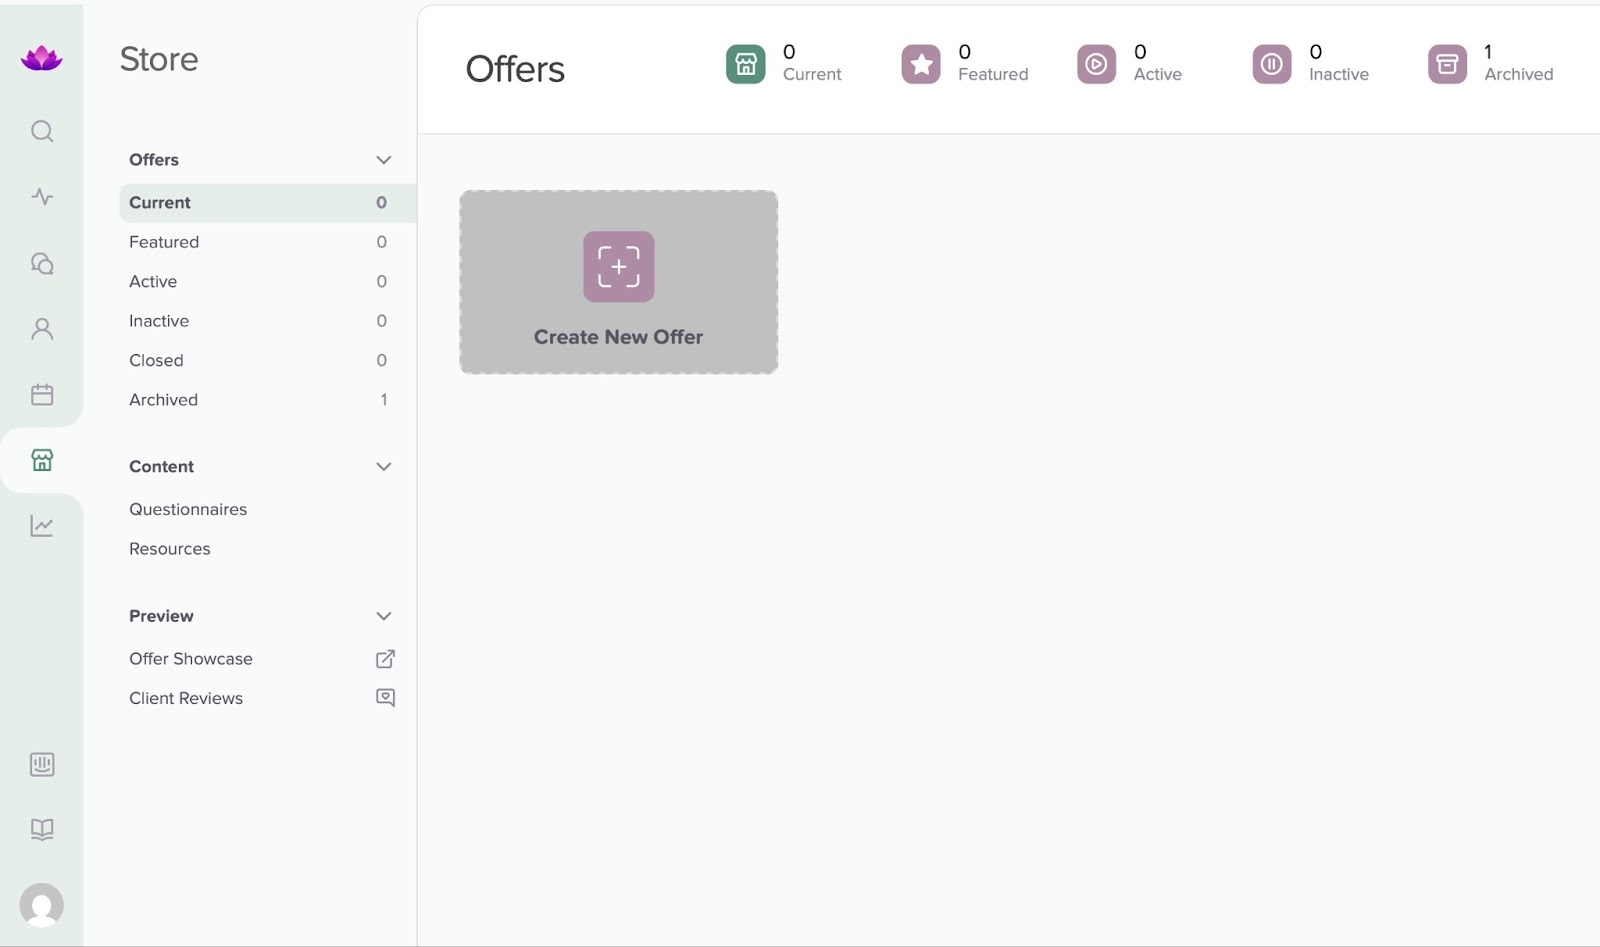
Thanks to its feature called “offers,” it’s possible to create new coaching offers and view them all in one window. You can also create questionnaires and share resources.
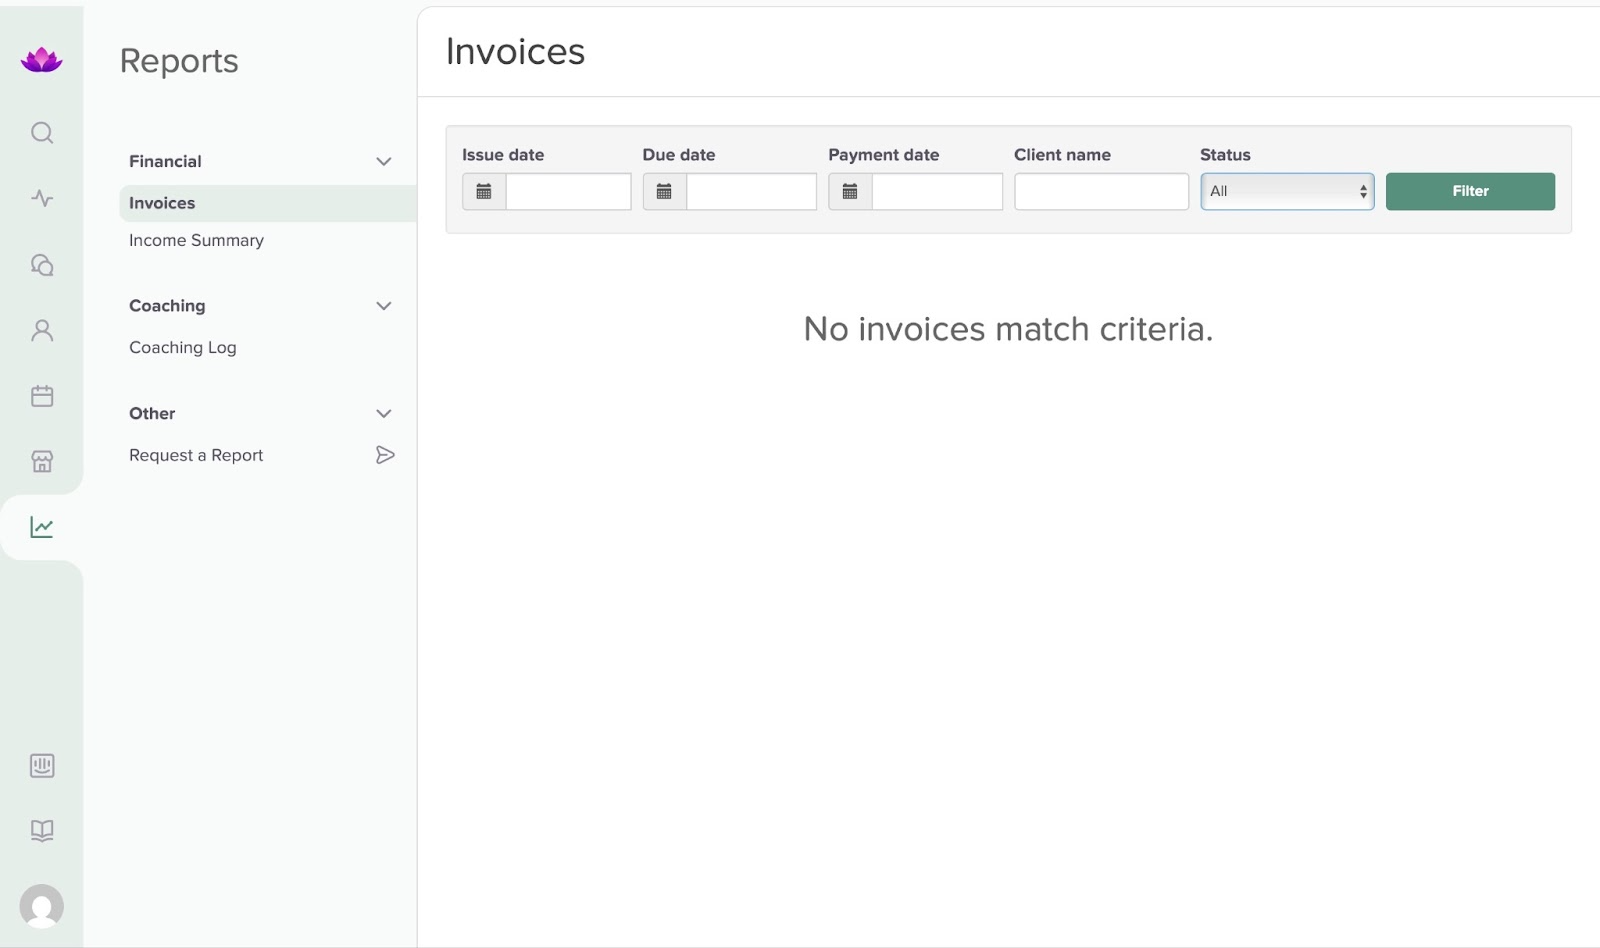
Using Satori’s reports feature, you can examine invoices, income summaries, and coaching logs. It also allows you to view the invoice’s date of issue, due date, customer’s name, and payment status.
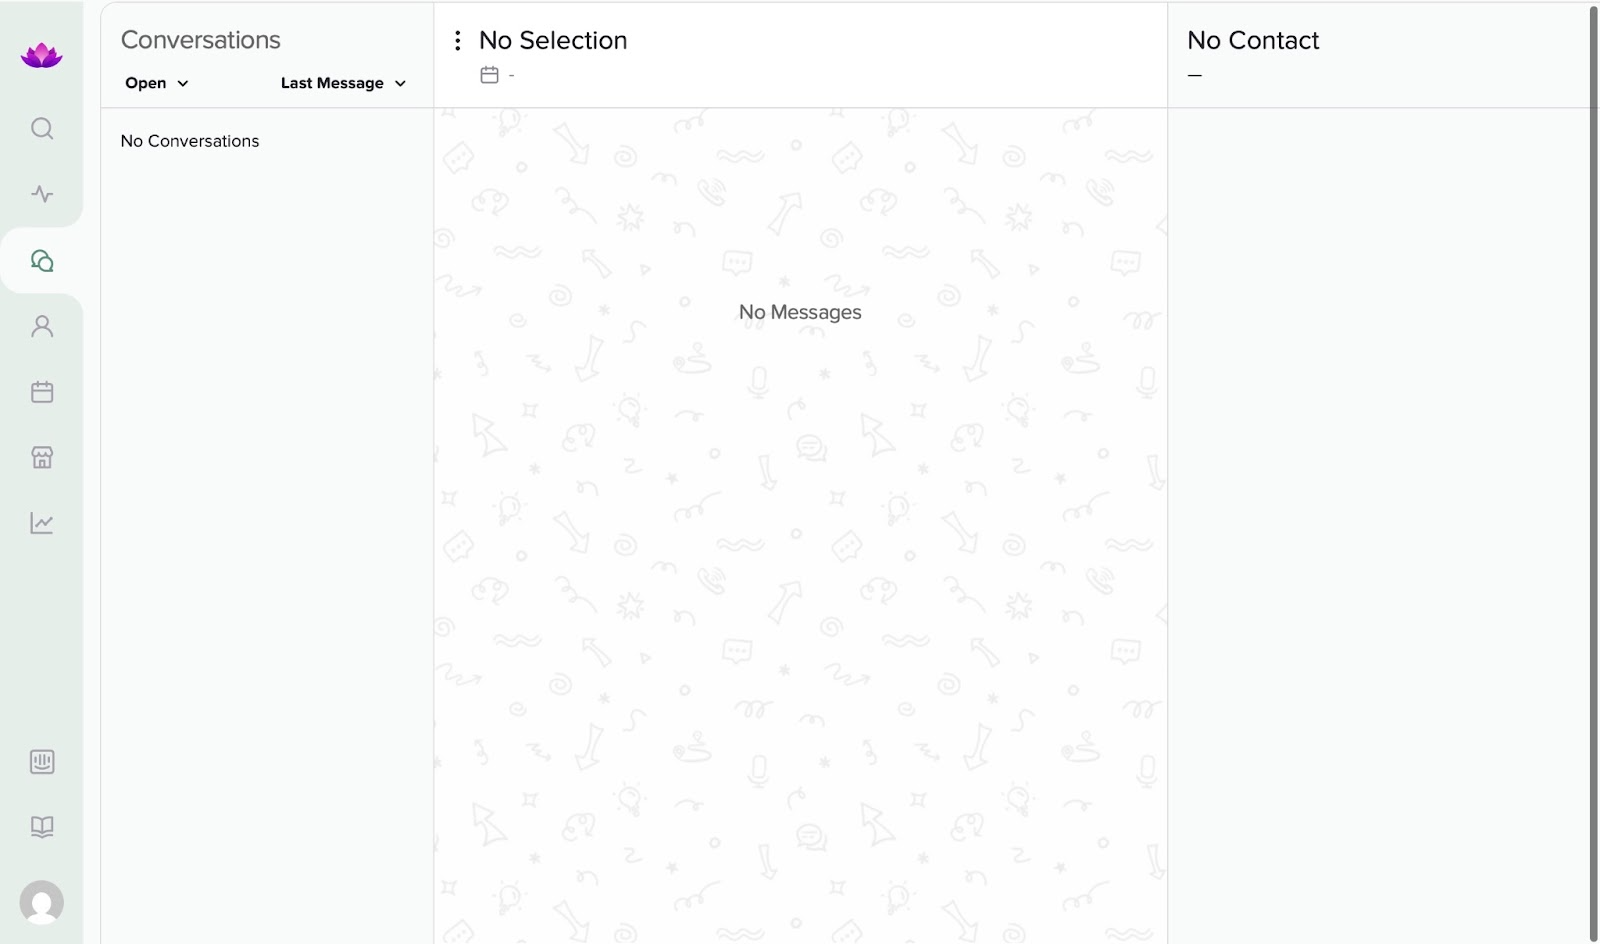
Last but not least is the conversation feature. This tool lets you converse with customers and review your recent or view past conversations.
As I mentioned earlier, the clients feature on Satori is what helps enroll and onboard customers, monitor their progress, and manage actions such as scheduling, billing, and communication.
Let me show you how to automate customer onboarding for your online coaching course with Satori.
First, click the clients feature icon in the sidebar. This opens the engagements window. Click “+ Create Engagement.”

Now, enter the customer’s name and create a new agreement.

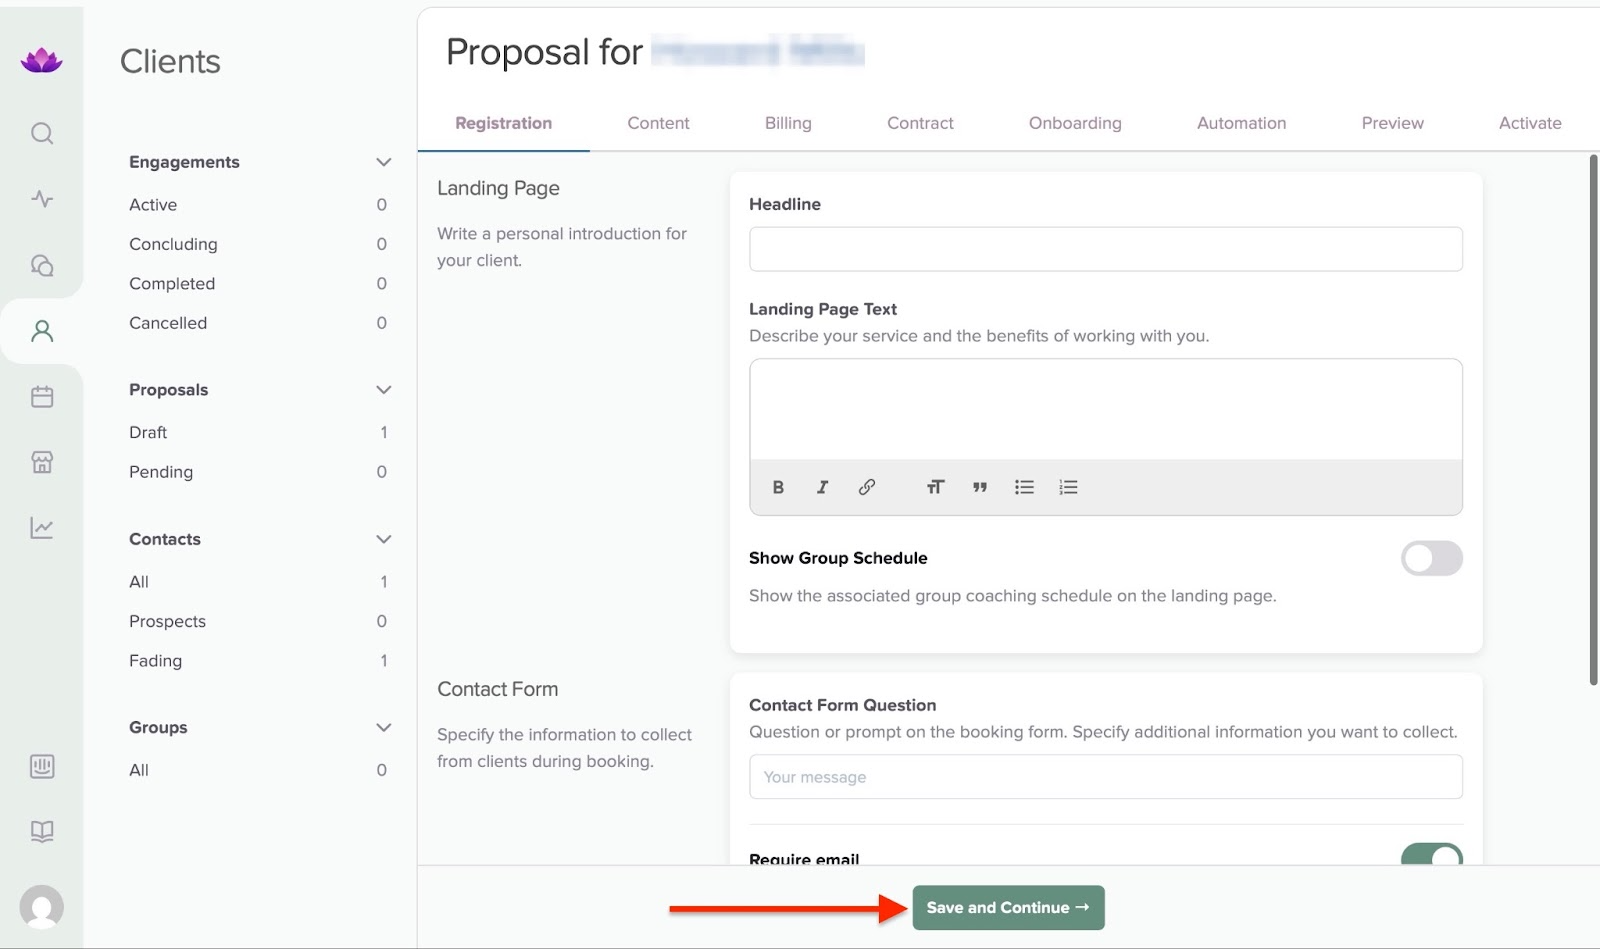
In the new window, fill out the registration form for your customer. Enter the required information and contact details. Then, click “Save and Continue.”
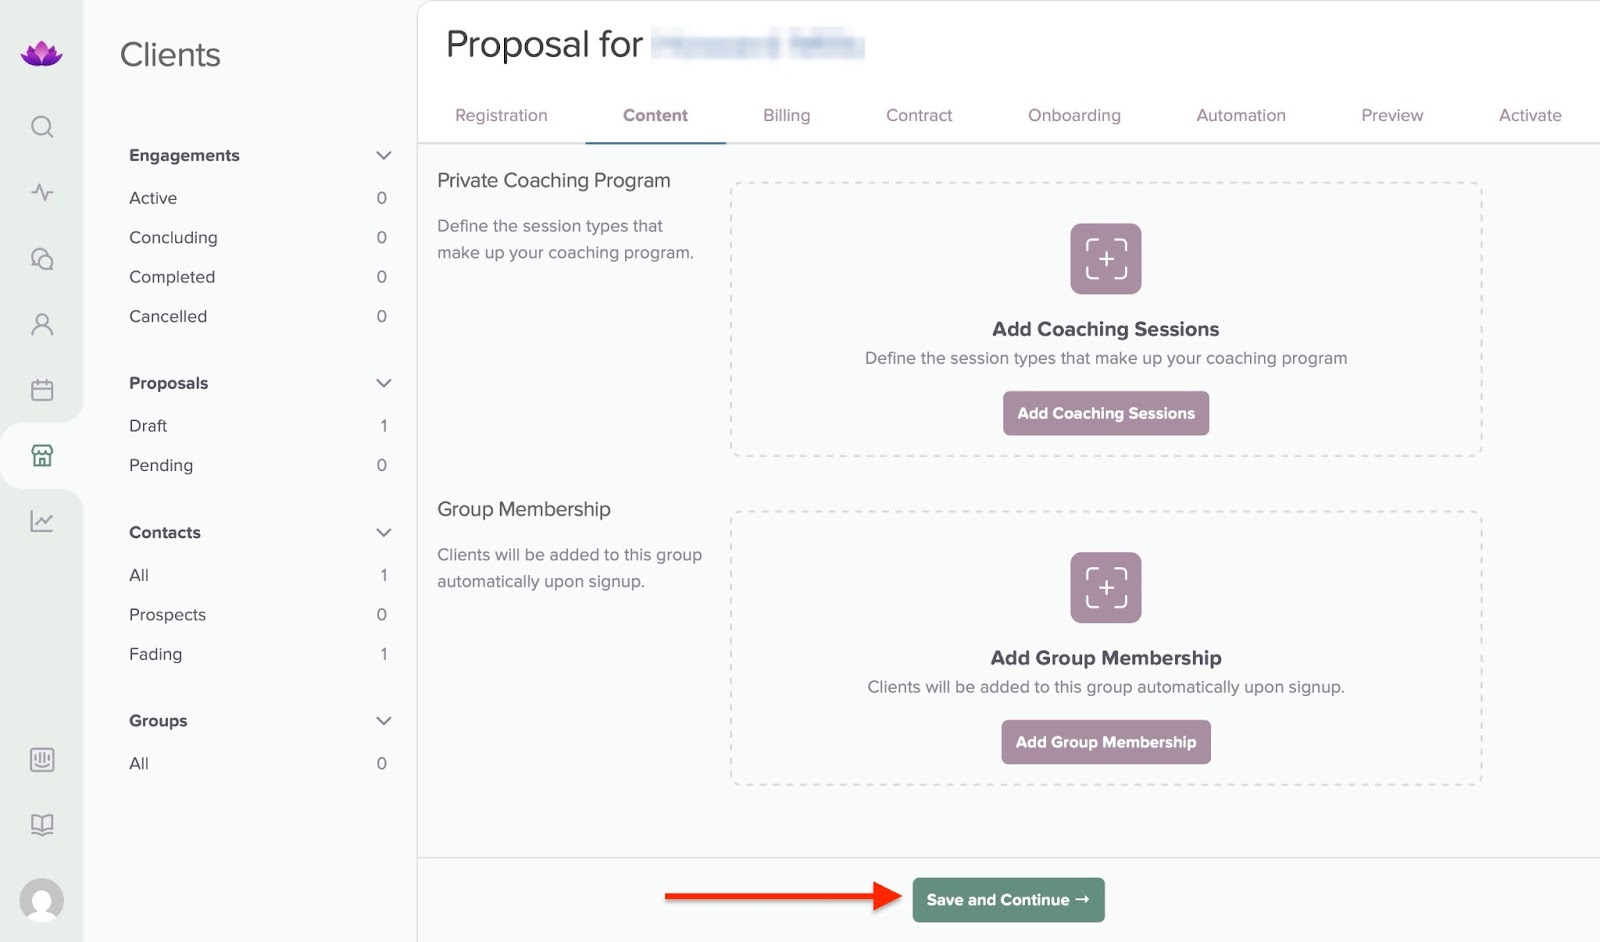
In the next section, select your preferred options: private coaching program or group membership, and click “Save and Continue.”
After that, select the offer price and billing schedule. To proceed, click “Save and Continue.”
Once you’ve done that, add your terms of service and proceed. Next, you can add a welcome email message that your new customers will receive when they enroll in your program.
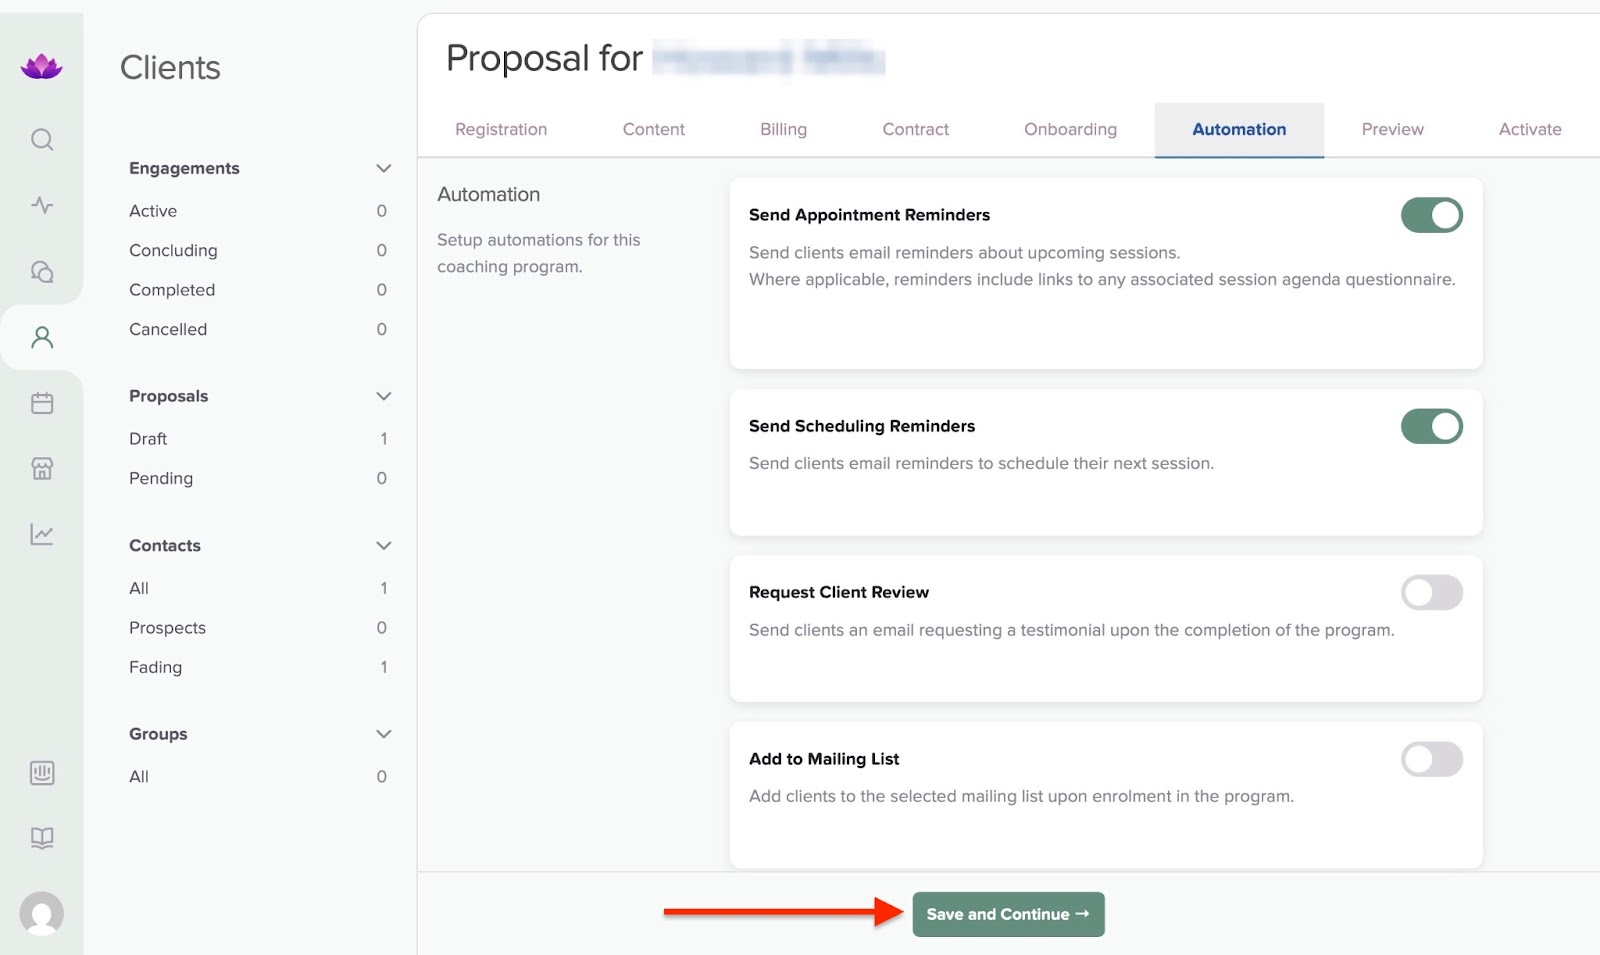
In the new window, select the tasks to automate by toggling the switch. Then, select “Save and Continue.”
The “Preview” section will allow you to view your additions and preferences. If you’re satisfied with that, go to the next step.
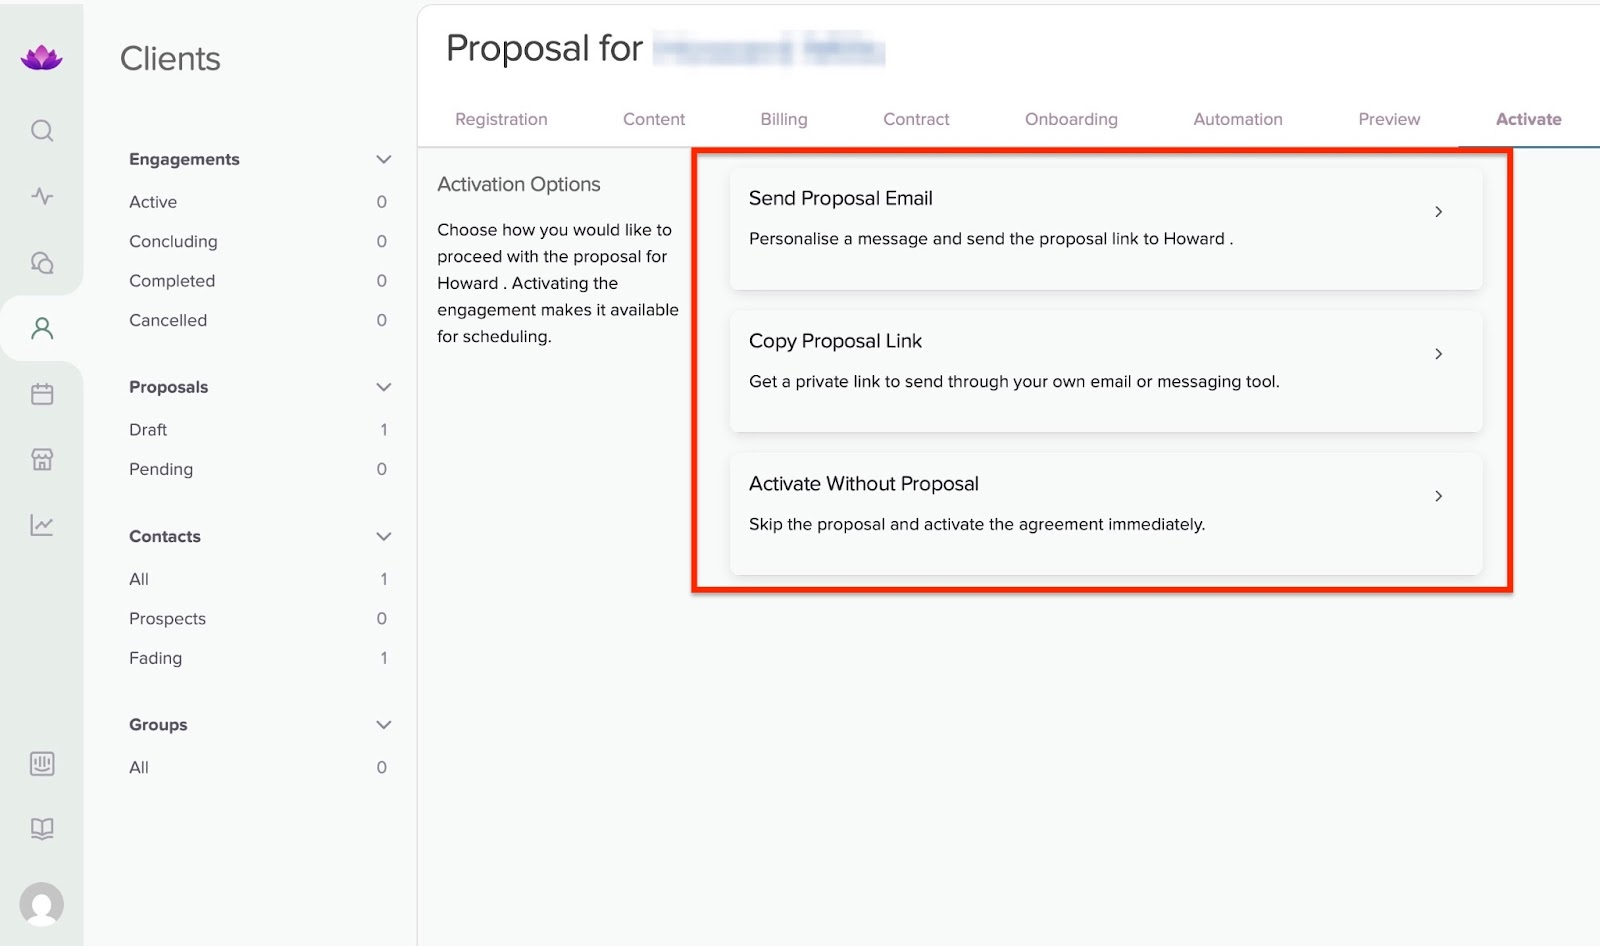
In the final section, select one of the available options to choose how you would like to activate the proposal for the customer.
The features I loved
1. Offers
As an online coach, you may want to create various coaching packages. Now, instead of explaining to your customers what’s included in the package over the phone or in the emails, you can simply create your offer and send them a link.
Your customers can then review it, sign up, and pay instantly. In a few steps, I’ll show you how to create a new offer for your customers.
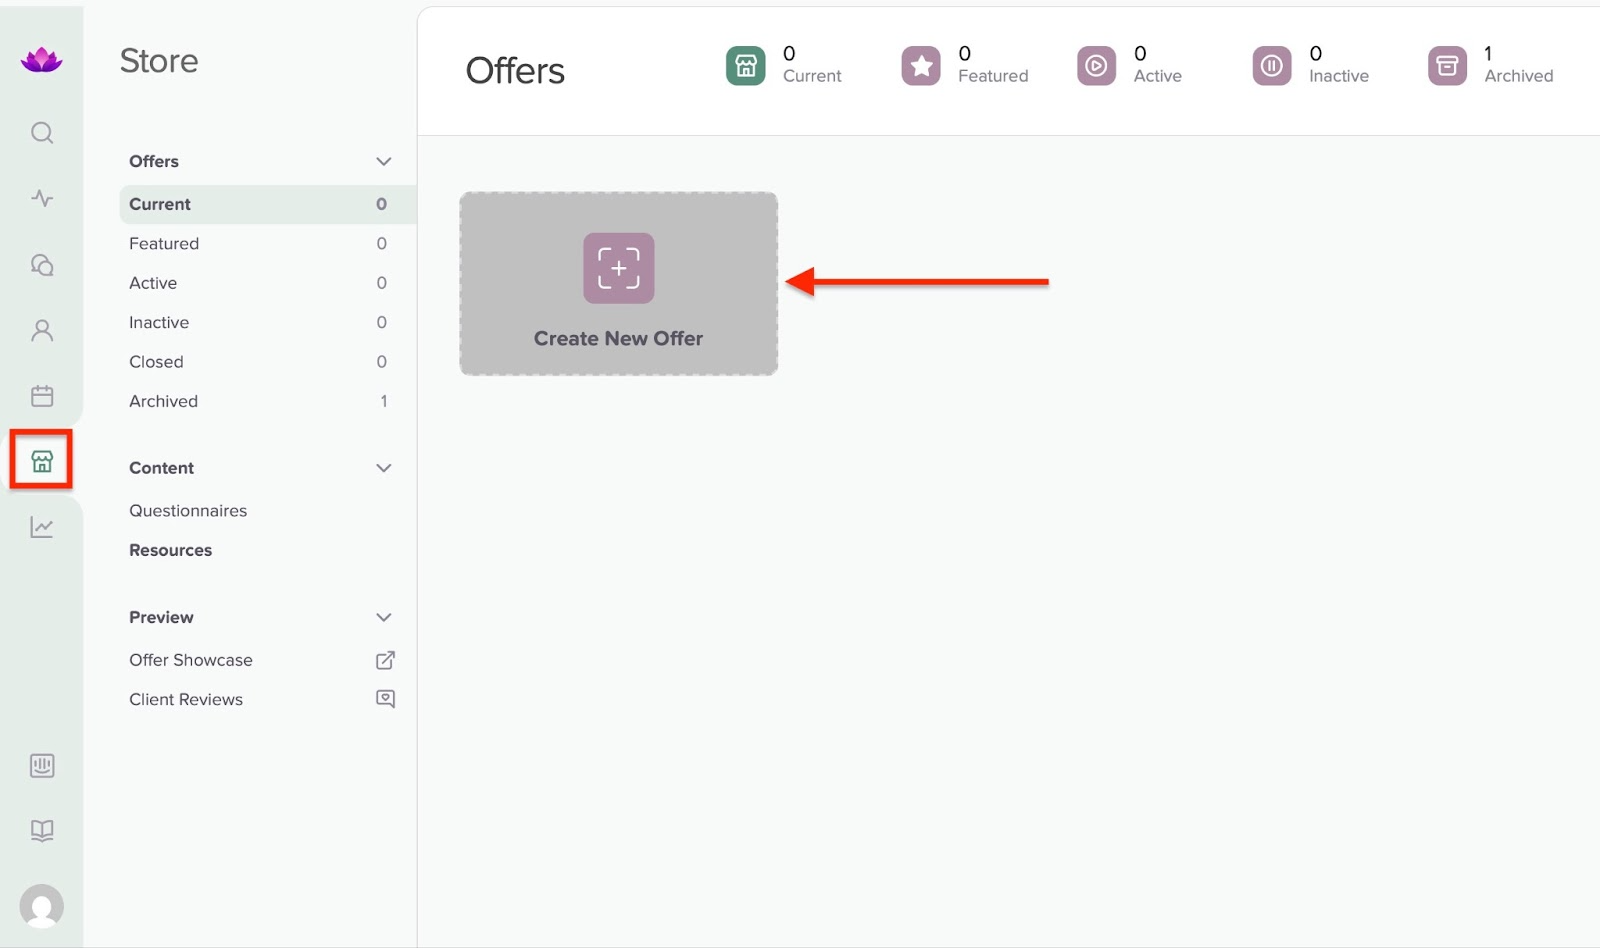
To begin, click the store icon (store feature) in the sidebar. It opens automatically to the “Offers” window. Now, click “Create New Offer.”
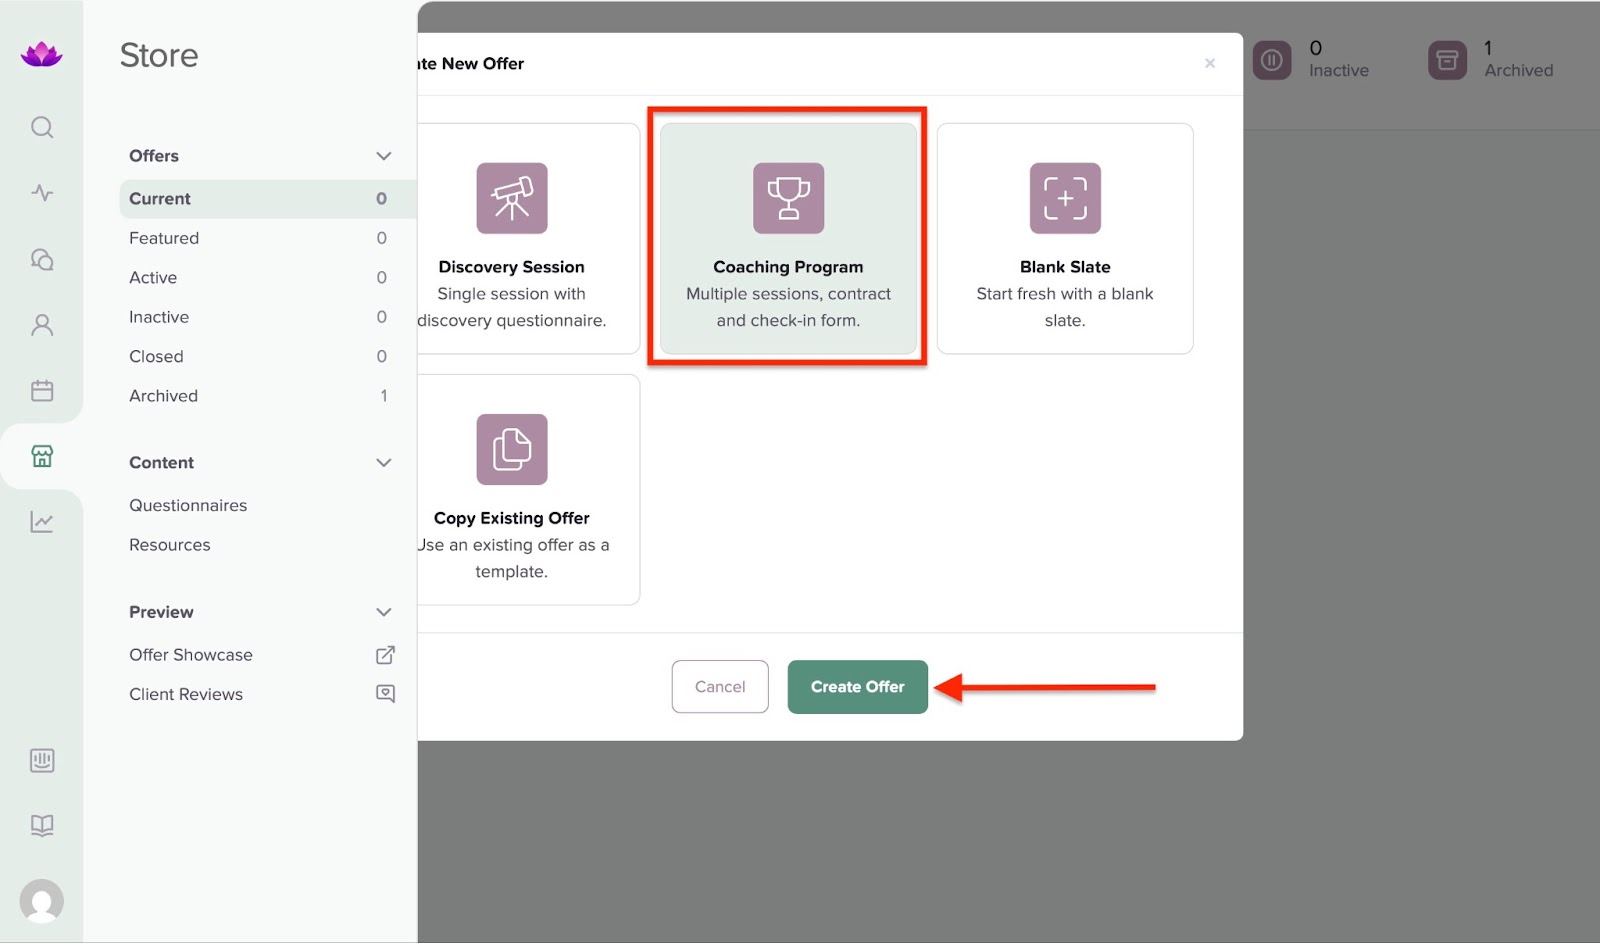
In the pop-up window, select your preferred option. Let’s choose “Coaching Program.” After that, click “Create Offer.”
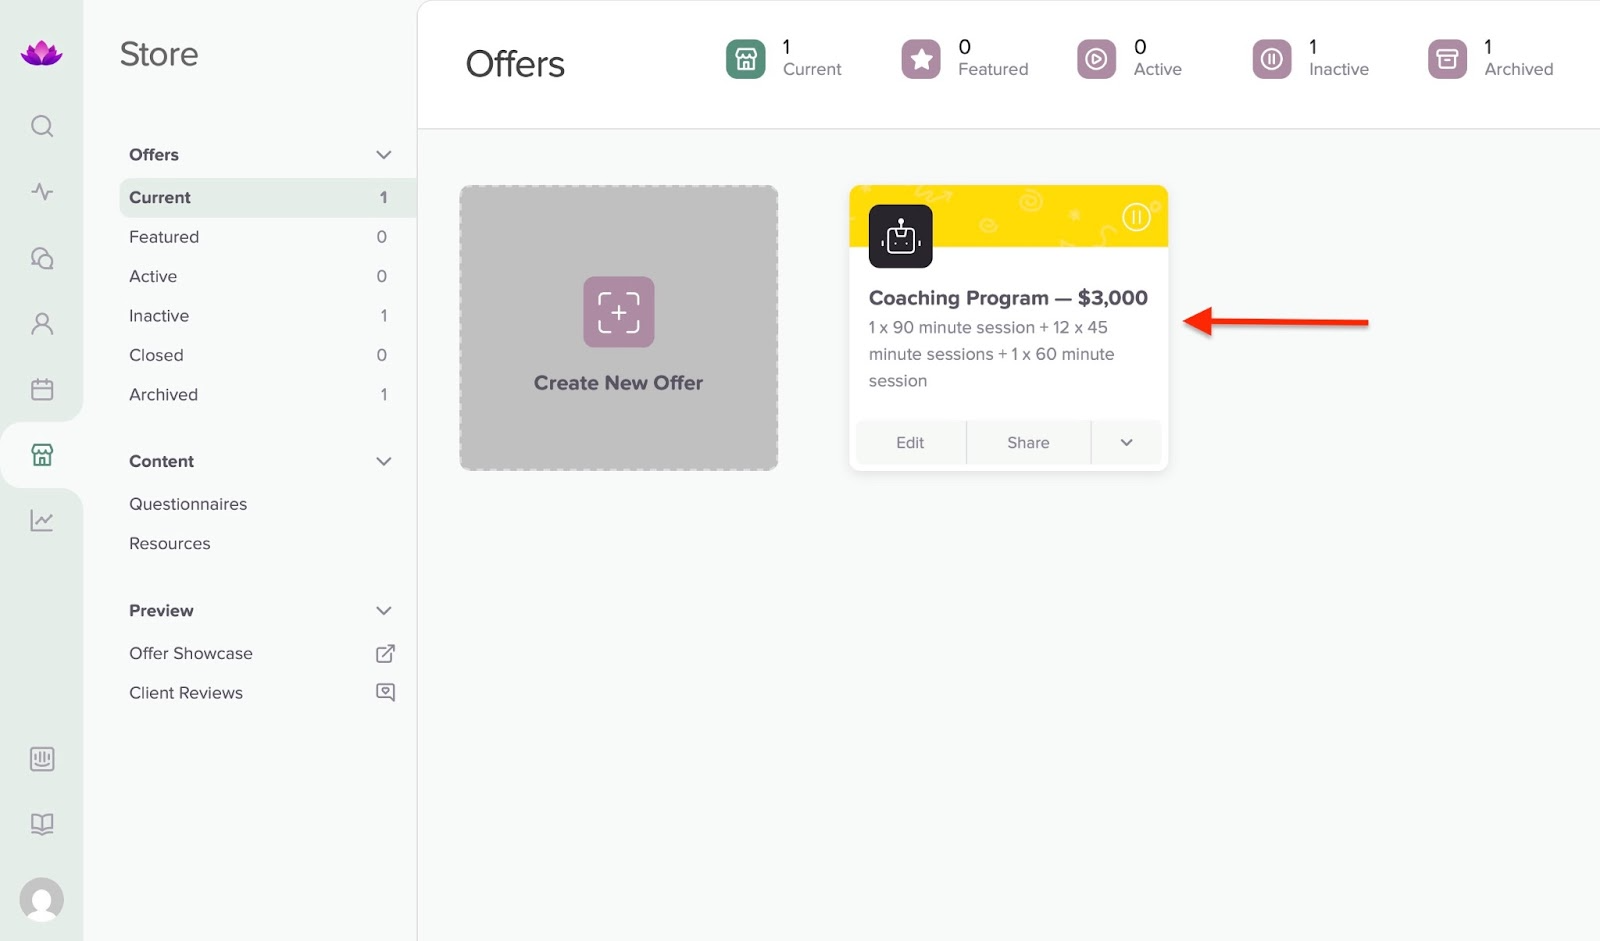
Satori creates your offer automatically. You can select the appropriate tabs to change or add information.

After that, click “Offers,” which is the first item in the store feature’s sidebar. The newly created offer will be displayed there.
2. Questionnaires
When running a business, entrepreneurs like yourself try to save as much time as possible.
With Satori’s questionnaire, you can create a list of questions for your customers to answer before a call or meeting. Their answers will help you understand them better, plan sessions, celebrate their growth, and track their progress as their coach.
This helps you save time since you don’t have to host multiple introductory sessions just to figure out who your customer is and what their goals are.
To get started creating questionnaires, select the store icon and choose “Questionnaires.” Next, click “Create New Questionnaire.”

In the pop-up window, select your preferred option and click “Create Questionnaire.”

The questionnaire should be ready at this stage. You may edit it and add further questions by selecting the “Instructions” and “Questions” tabs. Once you’ve done that, click “Save Questionnaire” to add all the new changes.
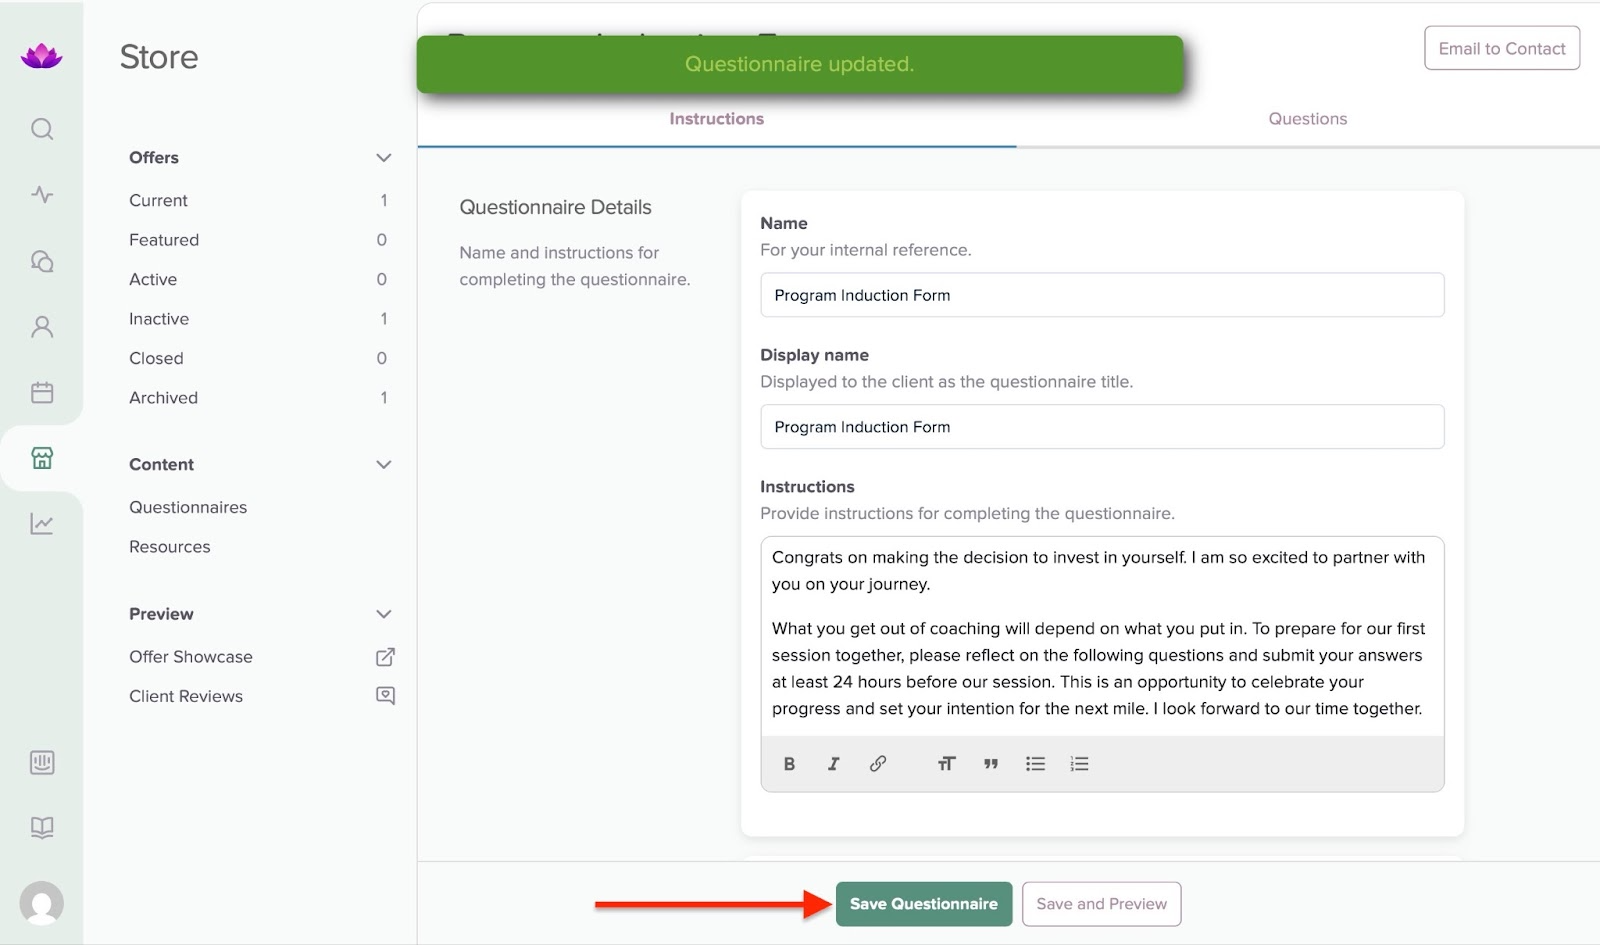
Finally, click “Email to Contact” at the top right corner of the window to select the customer to whom you want to send it. This automatically saves the questionnaire.

Search for the customer and select their contact. In the new pop-up window, add a personal message to the recipient and click “Email Questionnaire.”

What I liked:
- Has a clean and simple interface, which makes it easy to use
- Offers automation features for online coaching, such as automated scheduling, questionnaires, onboarding, and billing.
- Helpful guides and onboarding for beginners
What I didn’t like:
- Paid plans can be costly if you don’t have a large customer base.
- Setting up your coaching packages, questionnaires, offers, billing, and branding can be time-consuming, especially for first-time users.
Best for
- Career coaches desiring a streamlined customer onboarding experience.
Pricing
- Essentials: $39/month
- Pro: $59/month
- Leader: $149/month

3. CoachVantage
CoachVantage is the third on my list of the best online coaching platforms. It’s for creating 1:1 and group coaching programs.
You can also manage customer relationships with its forms, contracts, resource library, and invoice features.

With CoachVantage’s 1:1 program feature, you can create a new coaching program and view all enrollments. The programs you create are listed as active, inactive, or draft. You can view them according to these categories.

Thanks to its group coaching feature, creating new coaching groups is simple. You can check participants you’re currently managing, those you’ve drafted, and those you’ve closed.

There is more. CoachVantage’s forms feature allows you to pick template forms or create new ones from scratch. It’s possible to create folders for organizing your templates and forms. You can also search for forms or categorize them into folders, such as “All Forms” or “Active Forms.”

Using its contracts feature, you can send contracts to your customers for their signature. You can also check the date range and status of your contracts. This feature categorizes your contracts under ‘Documents’, ‘Templates’, and ‘Archived’.

To create a 1:1 coaching program on CoachVantage, first select “1:1 Programs” in the sidebar. Then, click “Create New Program.”
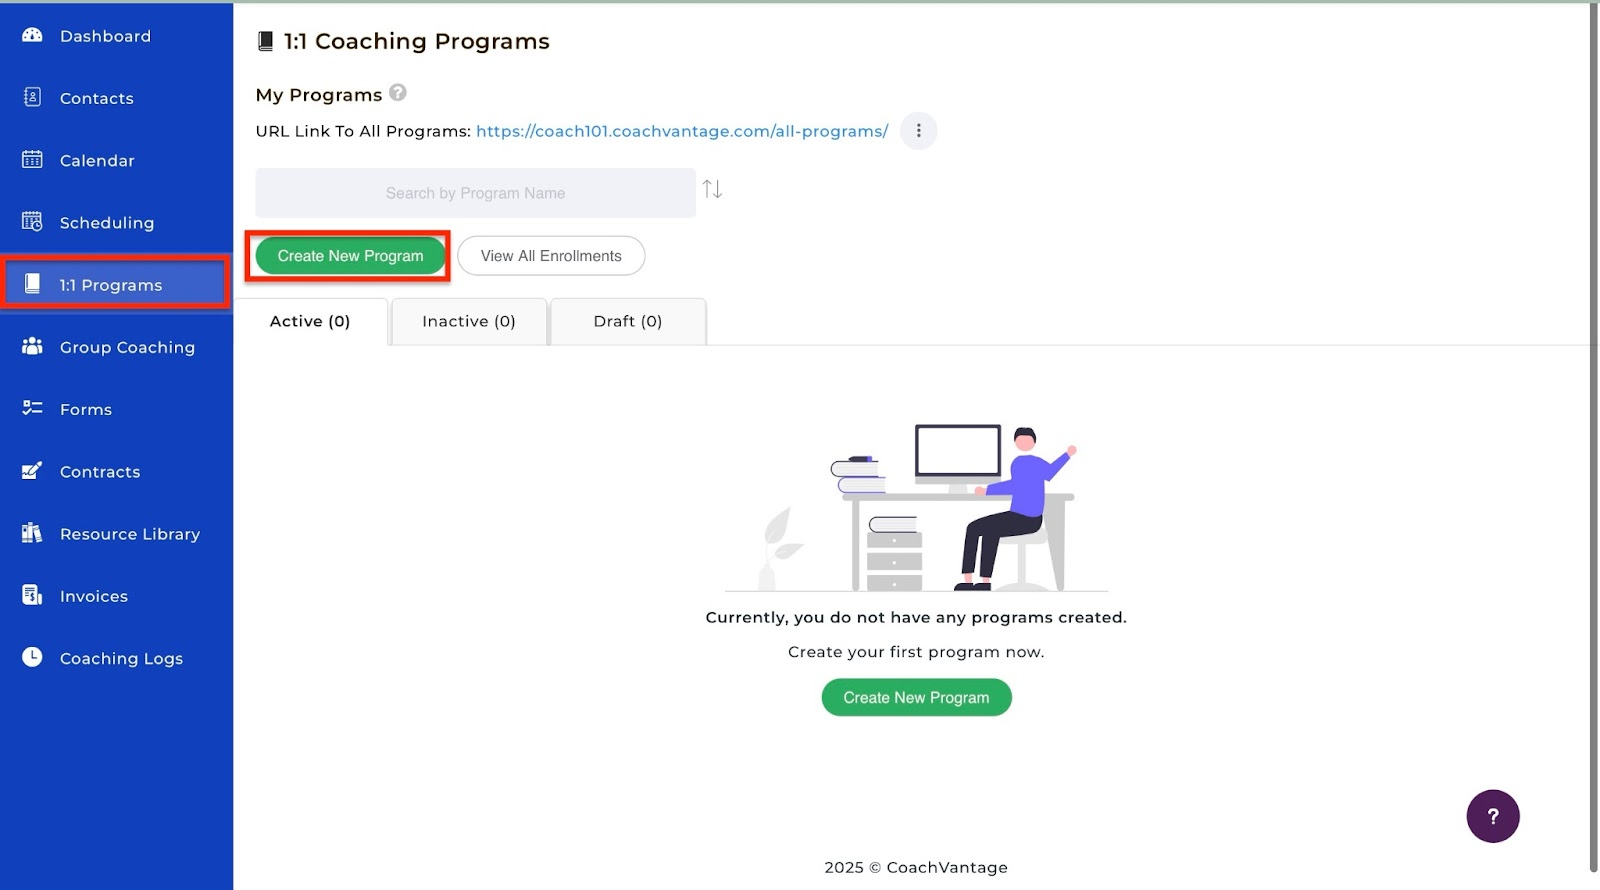
Now, enter the program name and description.
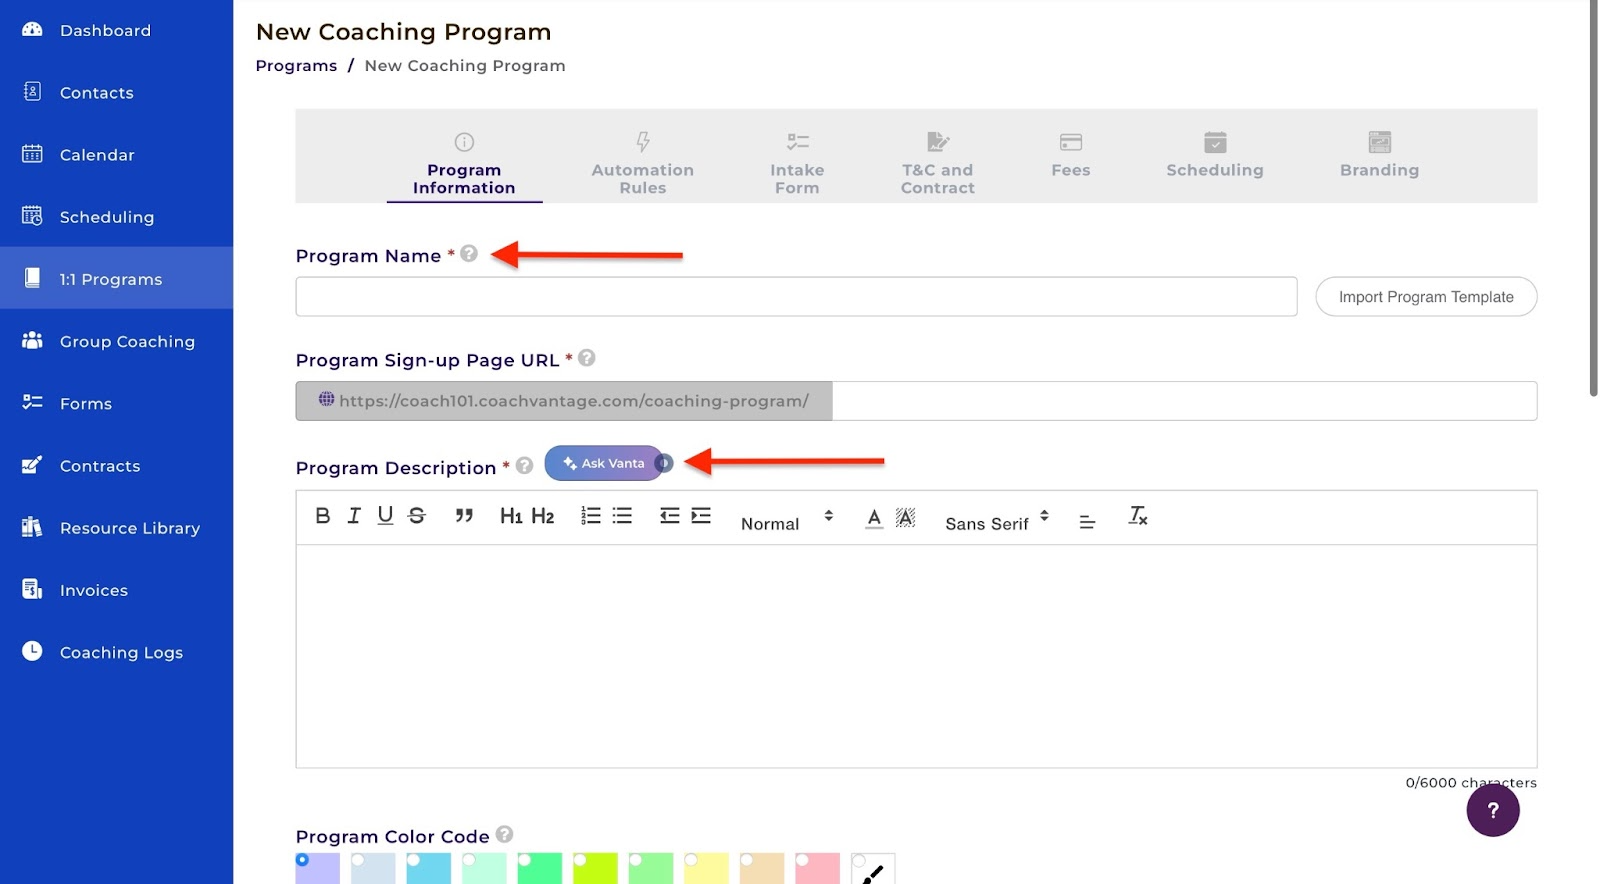
You may click on “Ask Vanta,” and the AI will automatically generate a description for you. Select the encircled green tick icon in the pop-up window to use the generated text.

Once you’ve done that, scroll down and choose your preferred options. Then click “Next.”

In the new window, select “Add New Automation” to add automations. For the next steps, add your intake form, set up your terms and conditions/contract, fees, and scheduling.

Finally, in the “Branding” column, upload a banner image by clicking the “Upload an image” area. Then scroll down to fill out all required information. Now, click “Save & Publish Program” to complete.
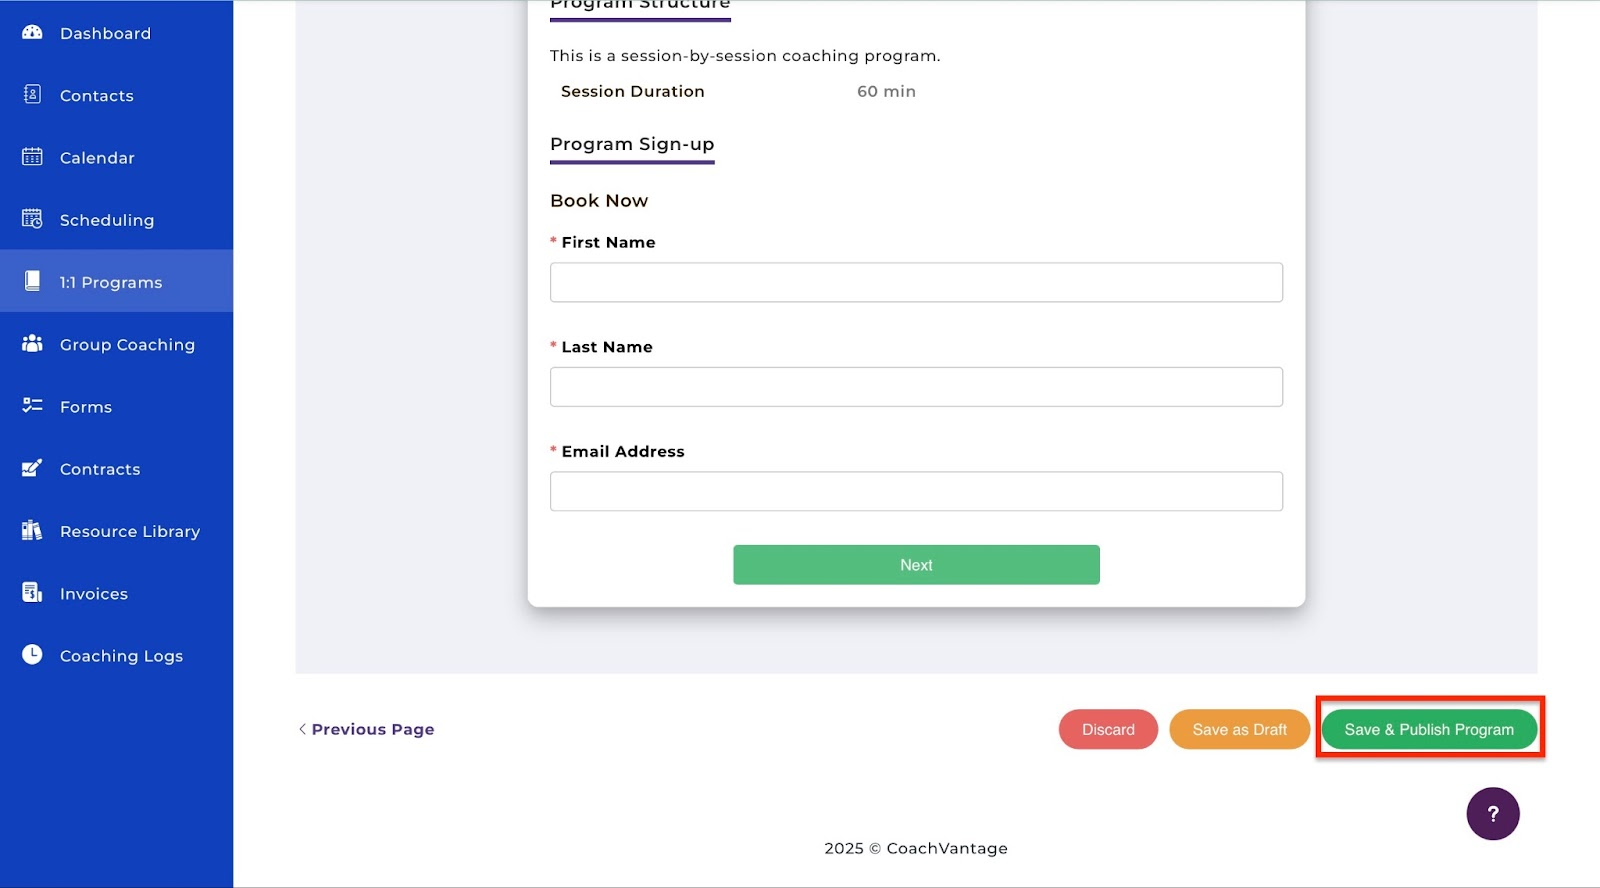
Your new coaching program will be listed in the 1:1 coaching programs feature window.
The features I loved
1. Group coaching
CoachVantage also allows you to create group coaching. You can run coaching programs with multiple customers simultaneously.
Let me guide you through the process in a few simple steps. Start by selecting “Group Coaching” in the sidebar and clicking “Create New Group.”

Now, select either “Group with Cohorts” or “Group without Cohorts” and click “Proceed.”

In the new window, add the group name and description. You can ask Vanta, the AI, to generate a description for your group. Then scroll down to choose the program’s color code and structure.
After that, click “Next.”
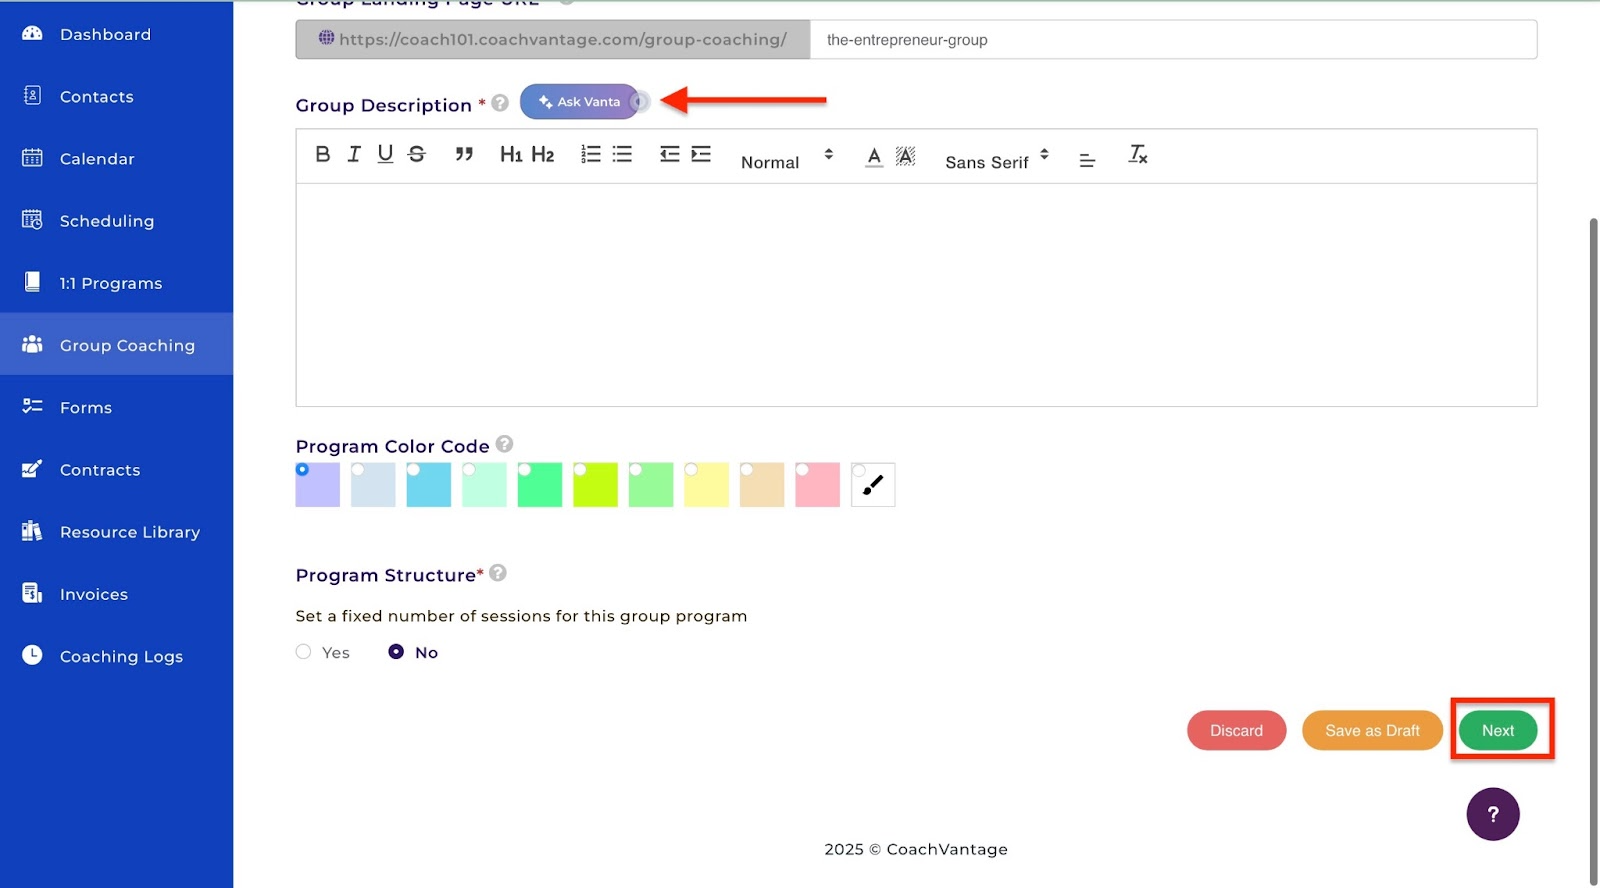
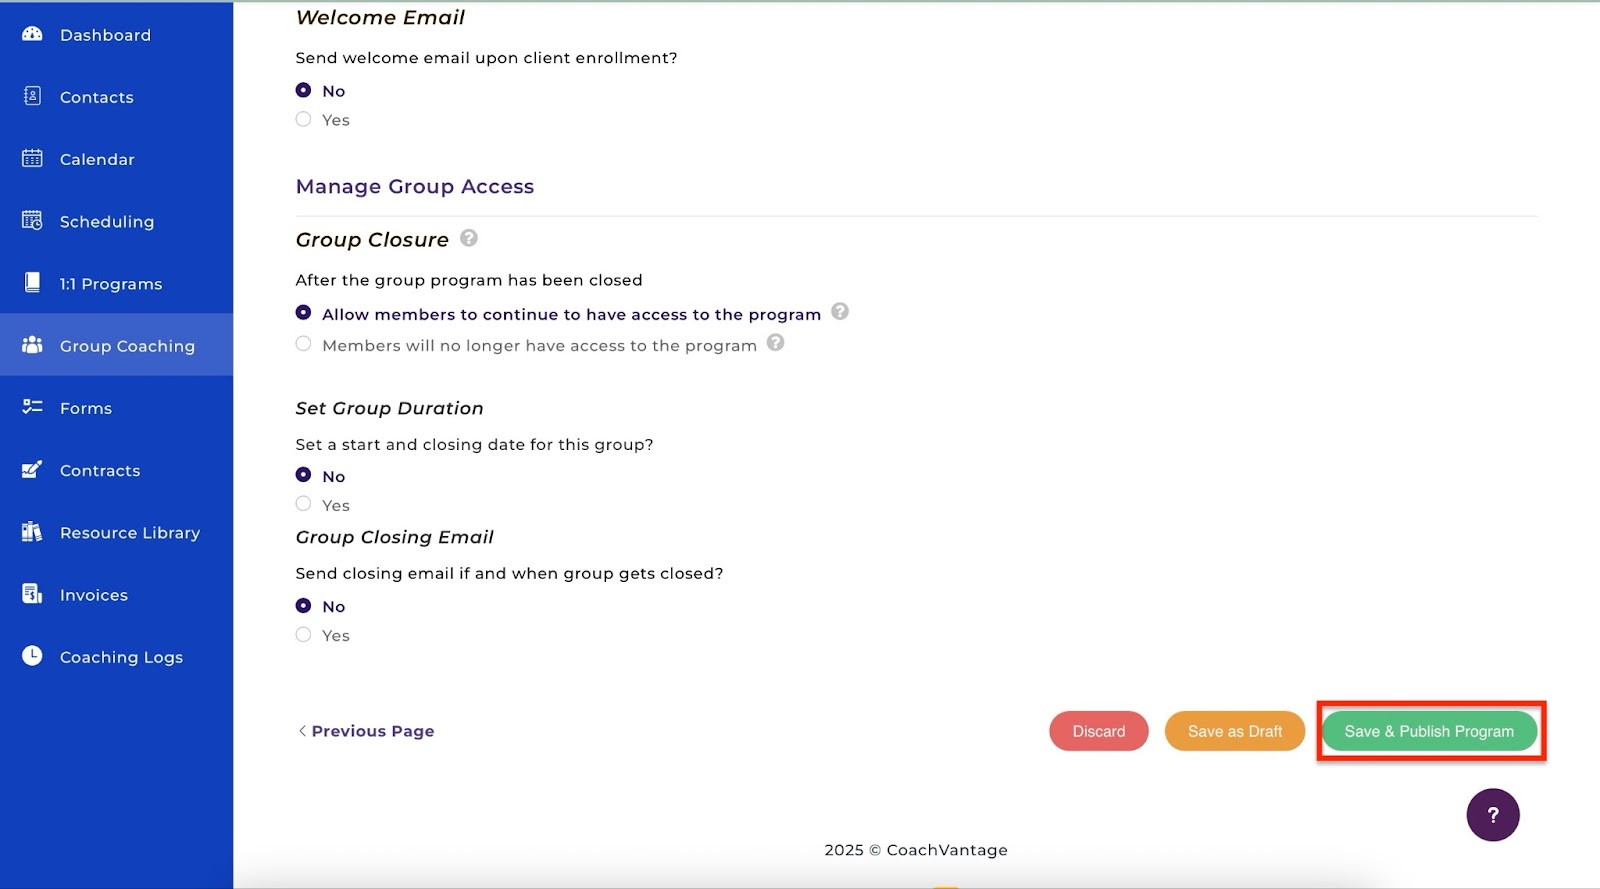
Once you’ve done that, fill out the four remaining sections and click “Save & Publish Program.”
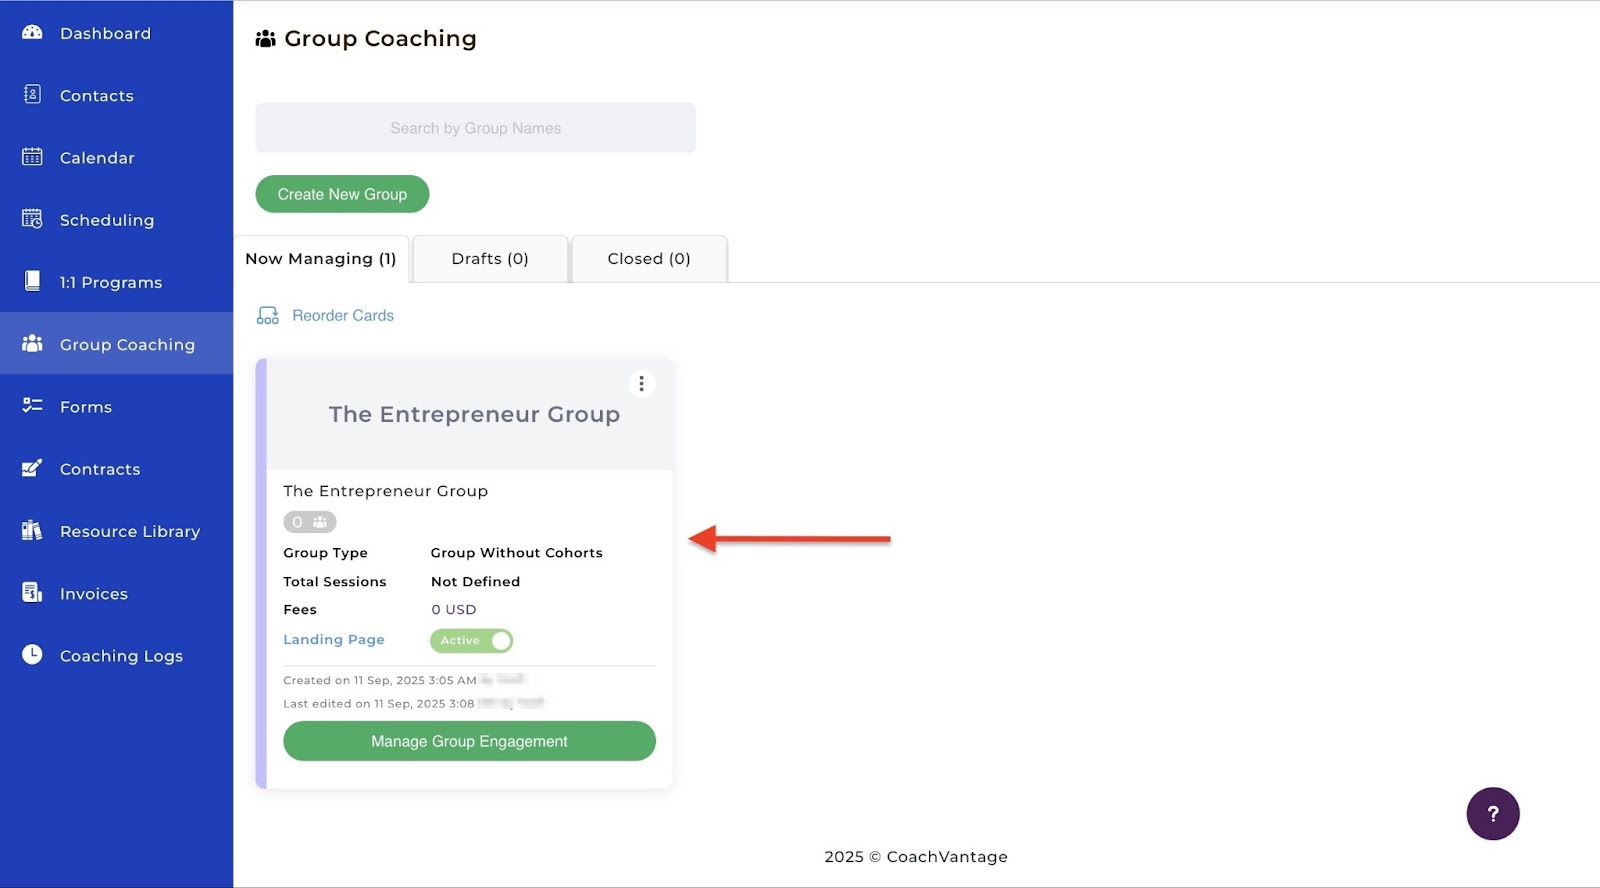
Your new group will be displayed in the “Group Coaching” window.
2. Contacts
If you decide to migrate from one coaching platform to CoachVantage, you can export or import your customers’ contacts. You can also add new ones. Let me show you how.
Start by selecting “Contacts” in the sidebar and clicking “Add Contact.”

In the pop-up window, enter the new contact’s name, email address, and phone number. Select the contact type and click “Add.”

The new contact will be displayed in the “Contacts” window.

What I liked:
- The decent interface made it easy to use the software
- CoachVantage offers useful features, including forms, invoices, coaching logs, and more.
- Vanta, the AI, guided me through the initial setup.
What I didn’t like:
- There’s a bit of a learning curve as you figure out how most of its features work
- Minimalist design may feel plain to some users
Best for
- Life coaches needing a comprehensive platform for various coaching formats.
Pricing
- Clarity Plan: $29/month
- Aha! Plan: $49/month

4. Canva
At number four on my list of the best online coaching platforms is Canva. Its ready-made templates are a great resource for reducing the time it takes to design marketing content and presentations for online coaching.

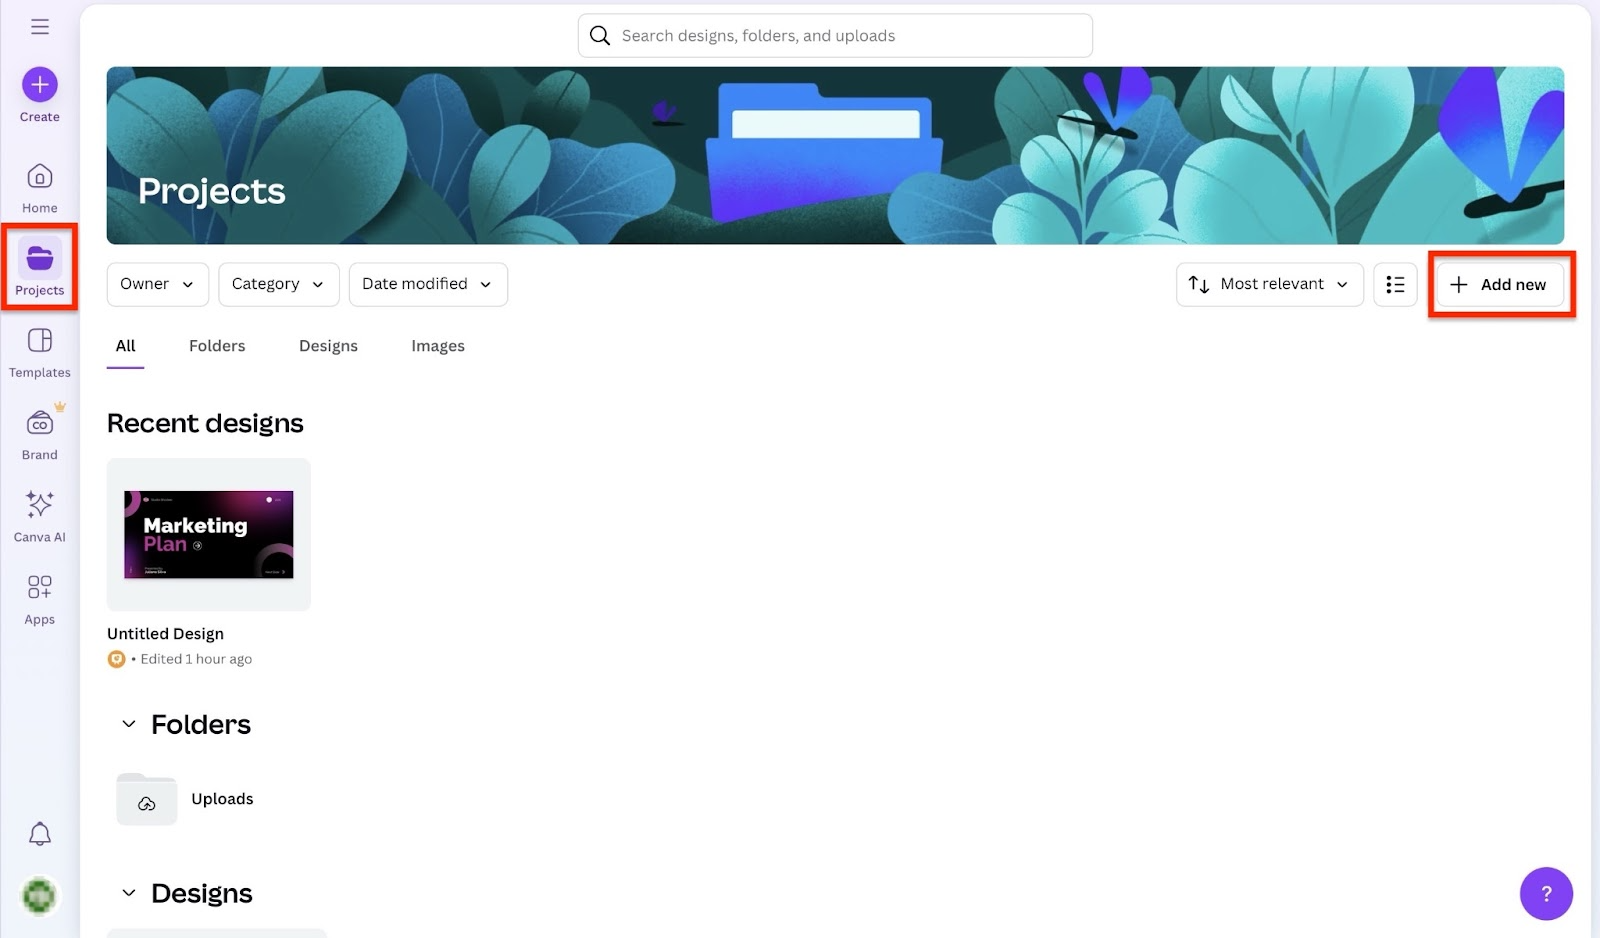
The projects feature displays all the recent designs. It lists them by date of modification, owner, and category. It also groups them by type.
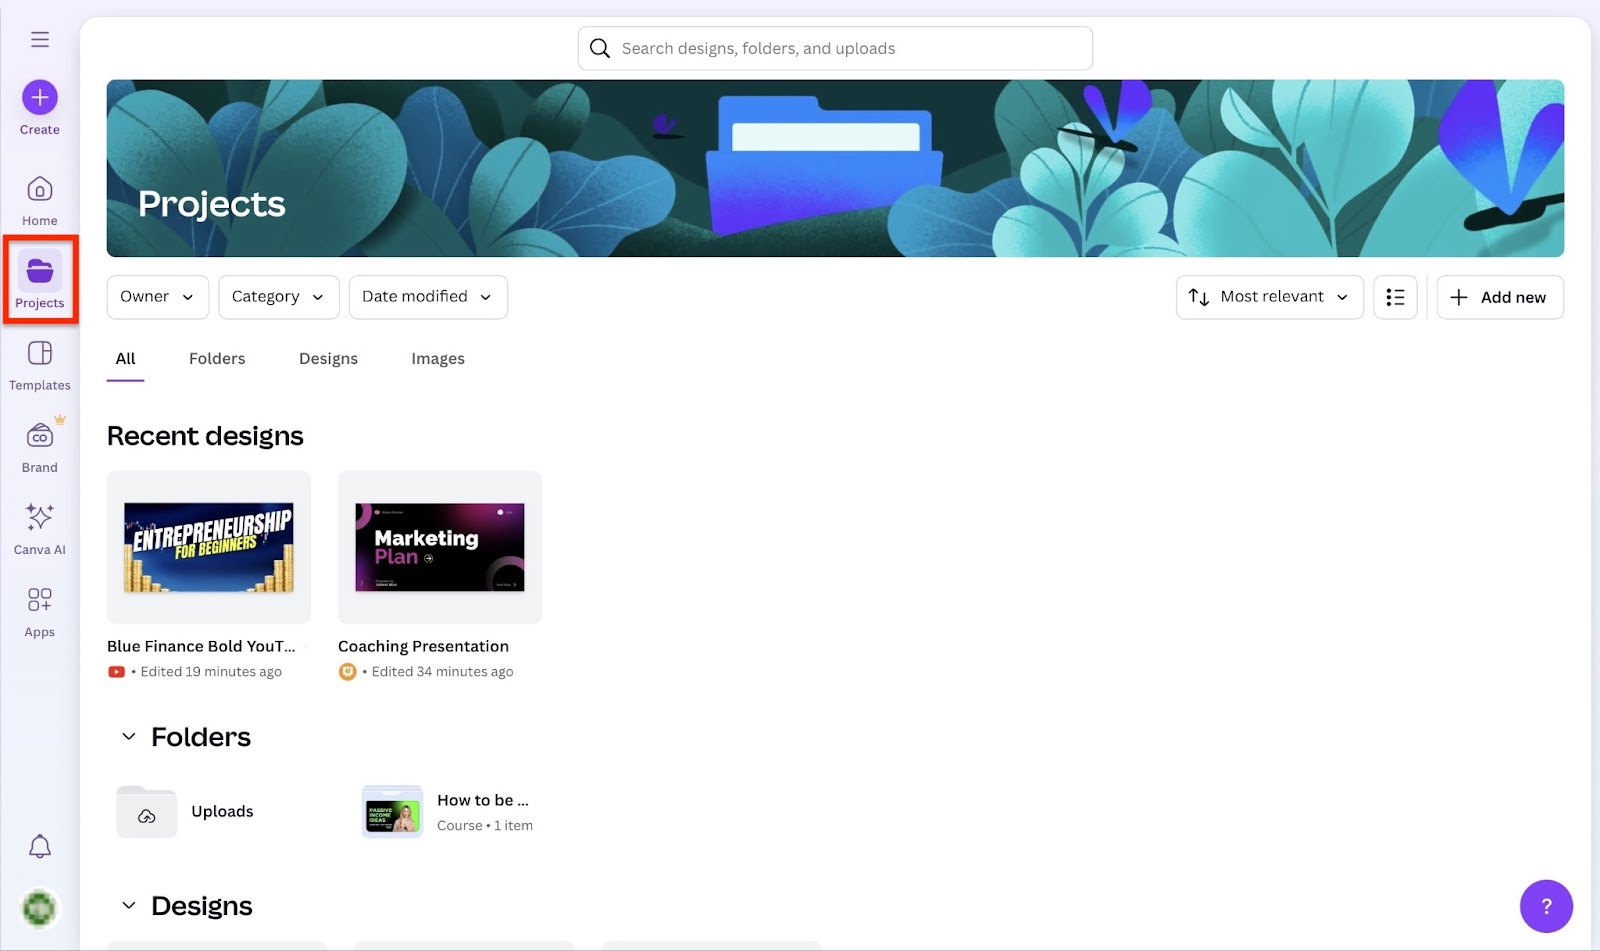
The templates feature shows pre-made designs. Select your preferred template and edit it accordingly.

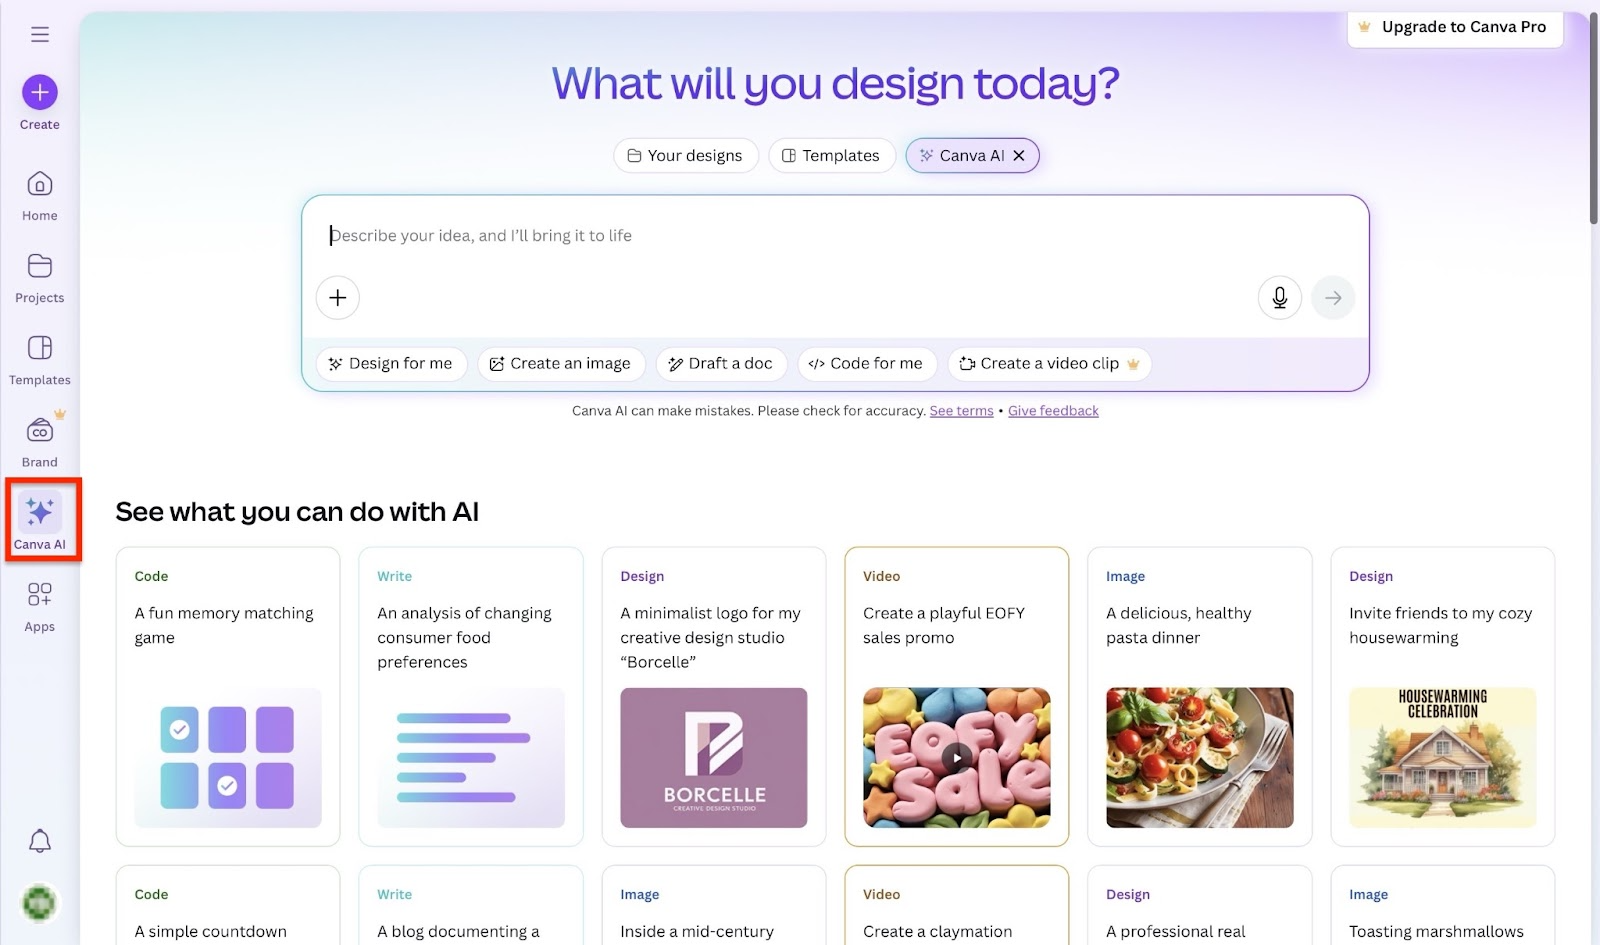
Canva AI lets you create elaborate designs using prompts. You can also choose from different template designs to edit.
Finally, Canva’s app feature provides access to various apps for use in your designs. These include apps for photo editing, creating animations for video and voiceover, and more.
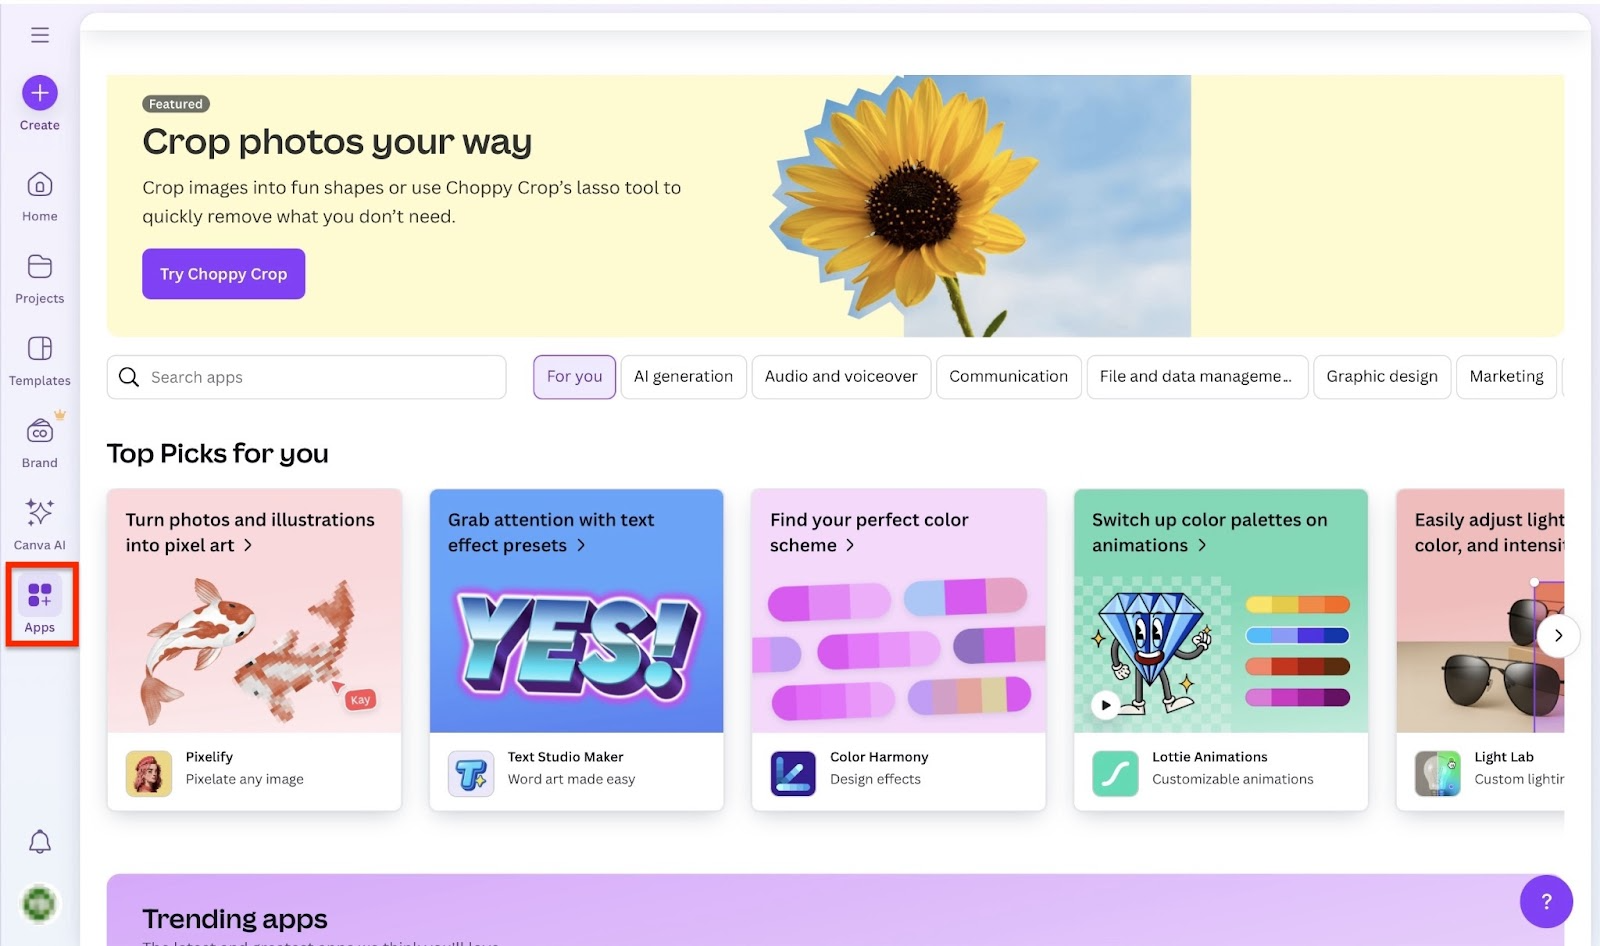
In a few simple steps, I’ll show you how to create a presentation in Canva to market your coaching services.
After you sign in, click “Create” in the left sidebar.

In the pop-up window, click “Presentations”, type “sales” in the search bar. Then select “Sales Presentation (16:9).”

In the new window, select your preferred templates from the list provided on the left. Then click on it.

The templates will load automatically. Click, drag, and drop individual slides into the design area to begin editing.

The left side of the interface displays various actions to take, such as adding text, elements, uploading images, and applying your brand colors. The top bar menu enables you to edit the design, delete elements, remove backgrounds, change colors, and even animate elements.

Once you are satisfied with everything, you can now click the “share” button. You can copy the link, manage the access level, and share it on all your various channels. You can also download the presentation.

The features I loved
1. Projects
The projects tool on Canva helps you keep track of all your designs. You can share and collaborate on an entire folder of designs instead of just one.
It all may sound like rocket science now, but no worries, I’ll show you how.
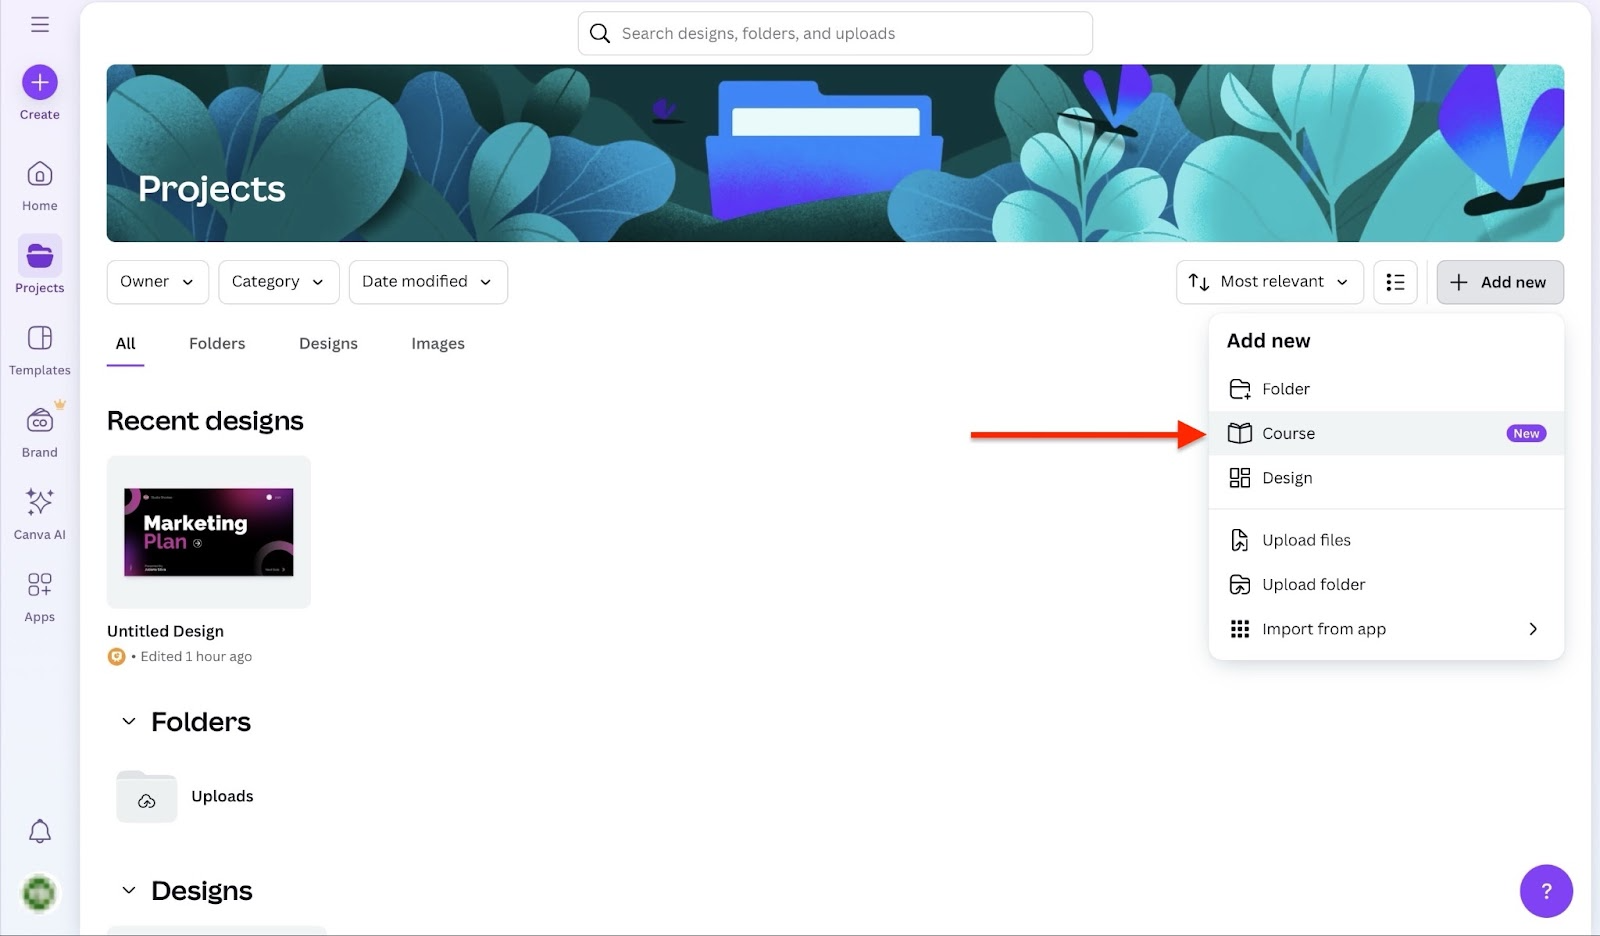
First, click “Projects” in the sidebar and select “+ Add new.”
After that, select “Course.”
In the pop-up window, click “Create your own course.”

Now, add the name and description of your course. Add as many activities as you want and click “Save.”

Click “Projects” in the sidebar to exit. You’ll find your new course displayed in the projects feature window.

**2. Templates
**Canva’s Templates is your go-to feature for ready-made designs for your social media posts and campaigns for your coaching business.
It also allows you to customize the designs you select if you think they need some personal touch.
Let me show you how.
From the homepage, click “Templates” in the sidebar.

Next, click “Customize this template.”

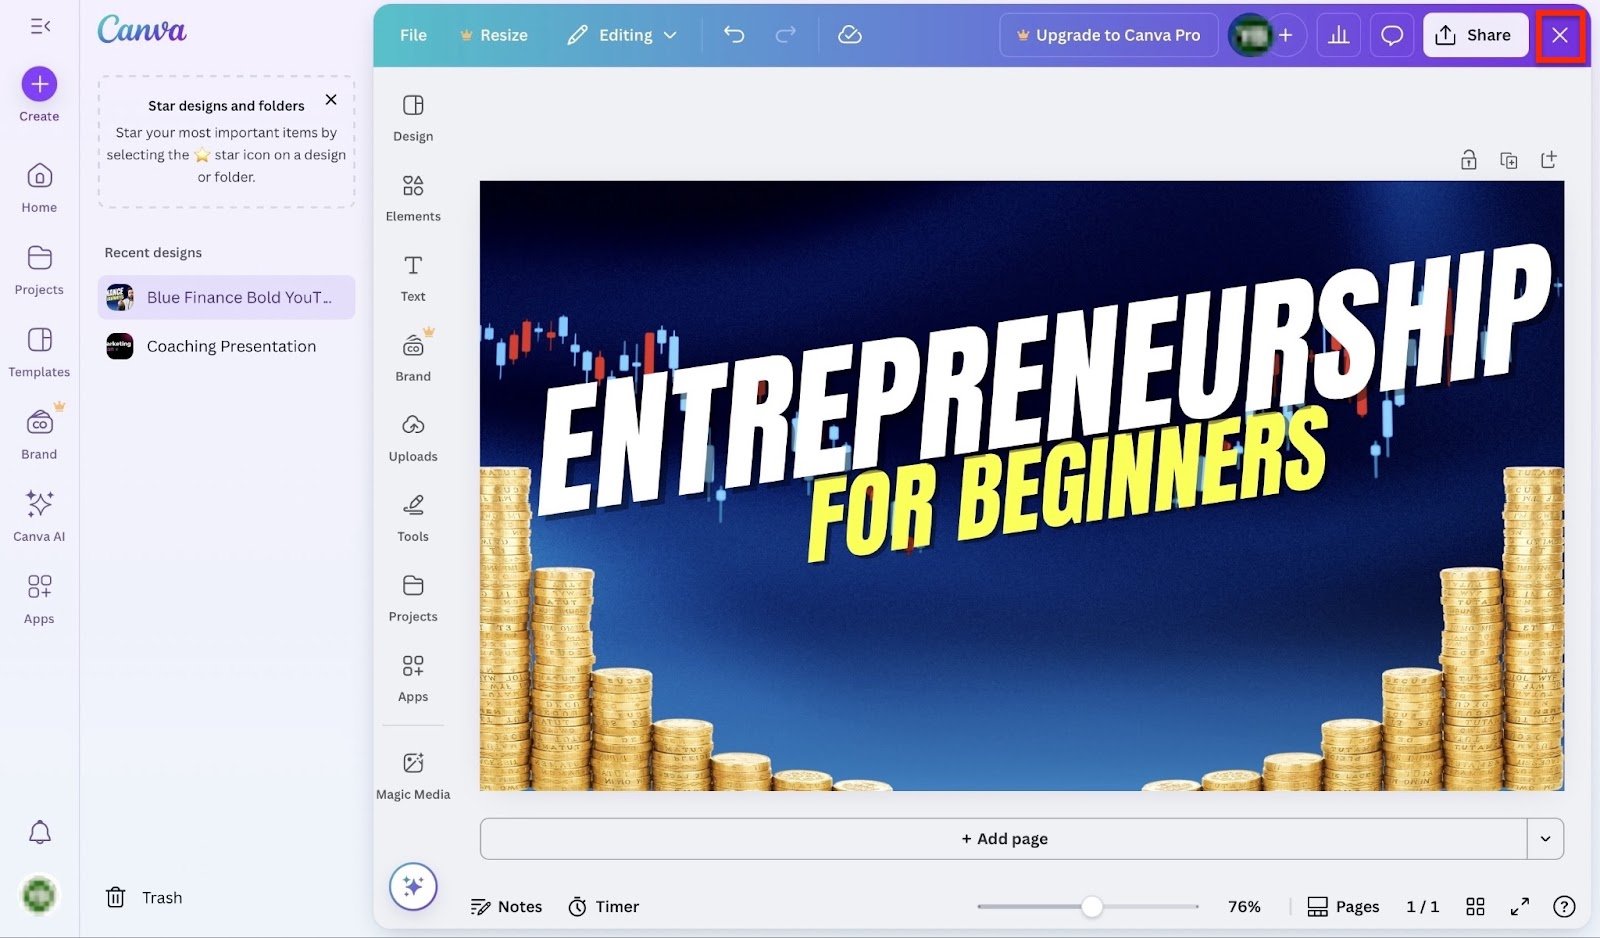
Here, edit the template. Click “+ Add page” to add more pages. Canva saves all your changes in real-time as long as there is an internet connection. To exit, click the hamburger menu in the top left corner of the window.
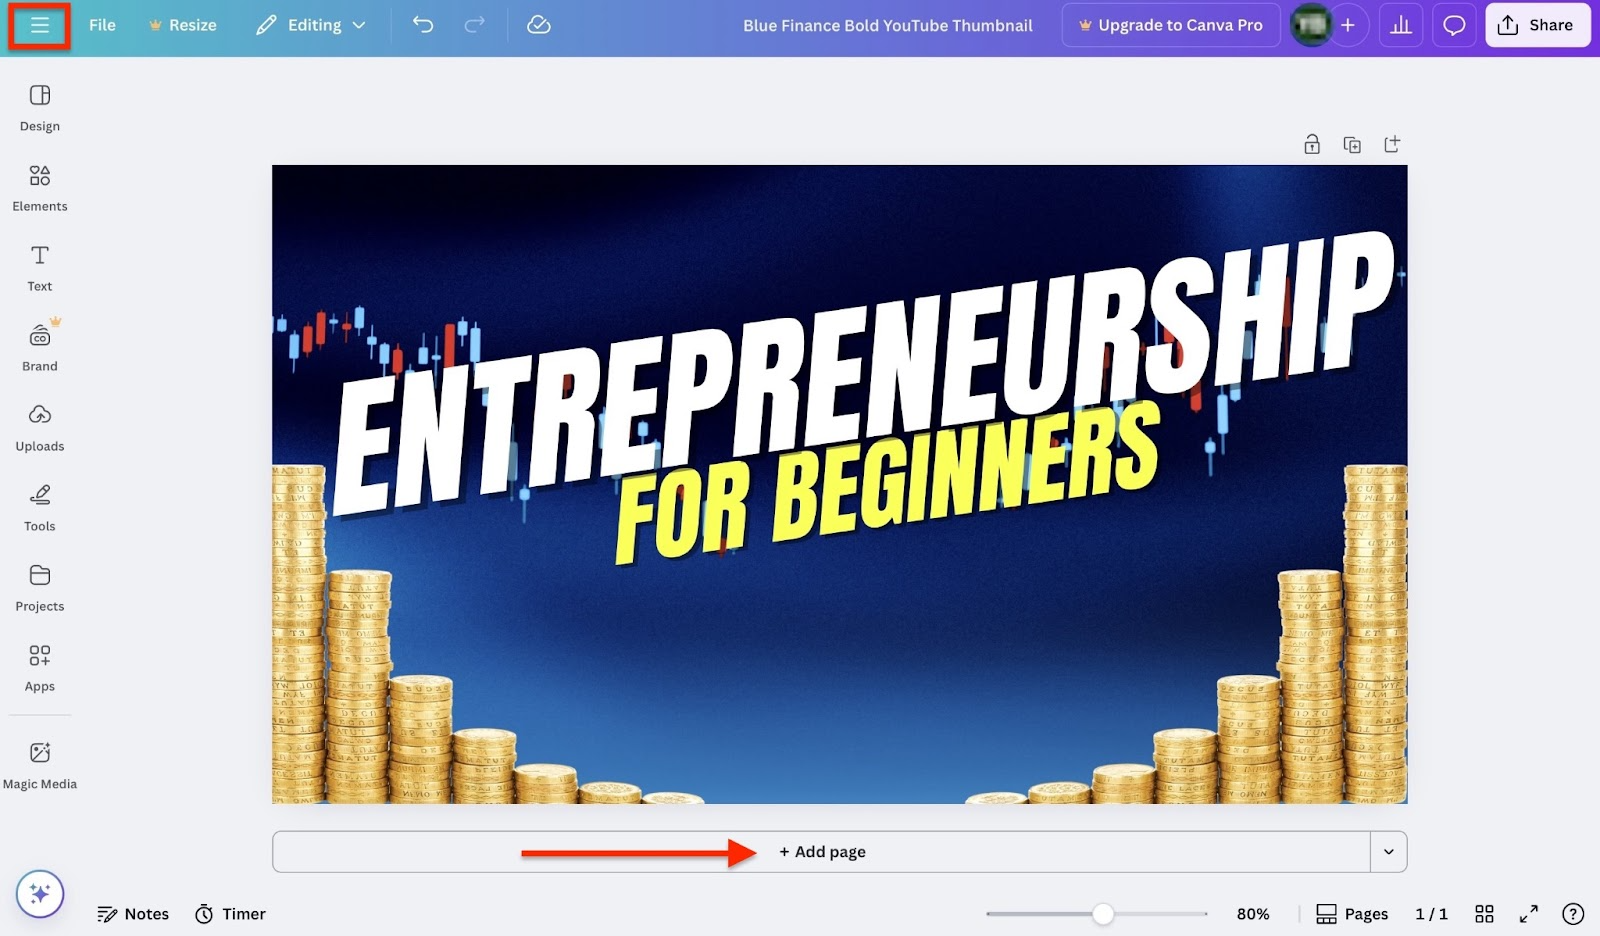
After that, click the close icon (x).
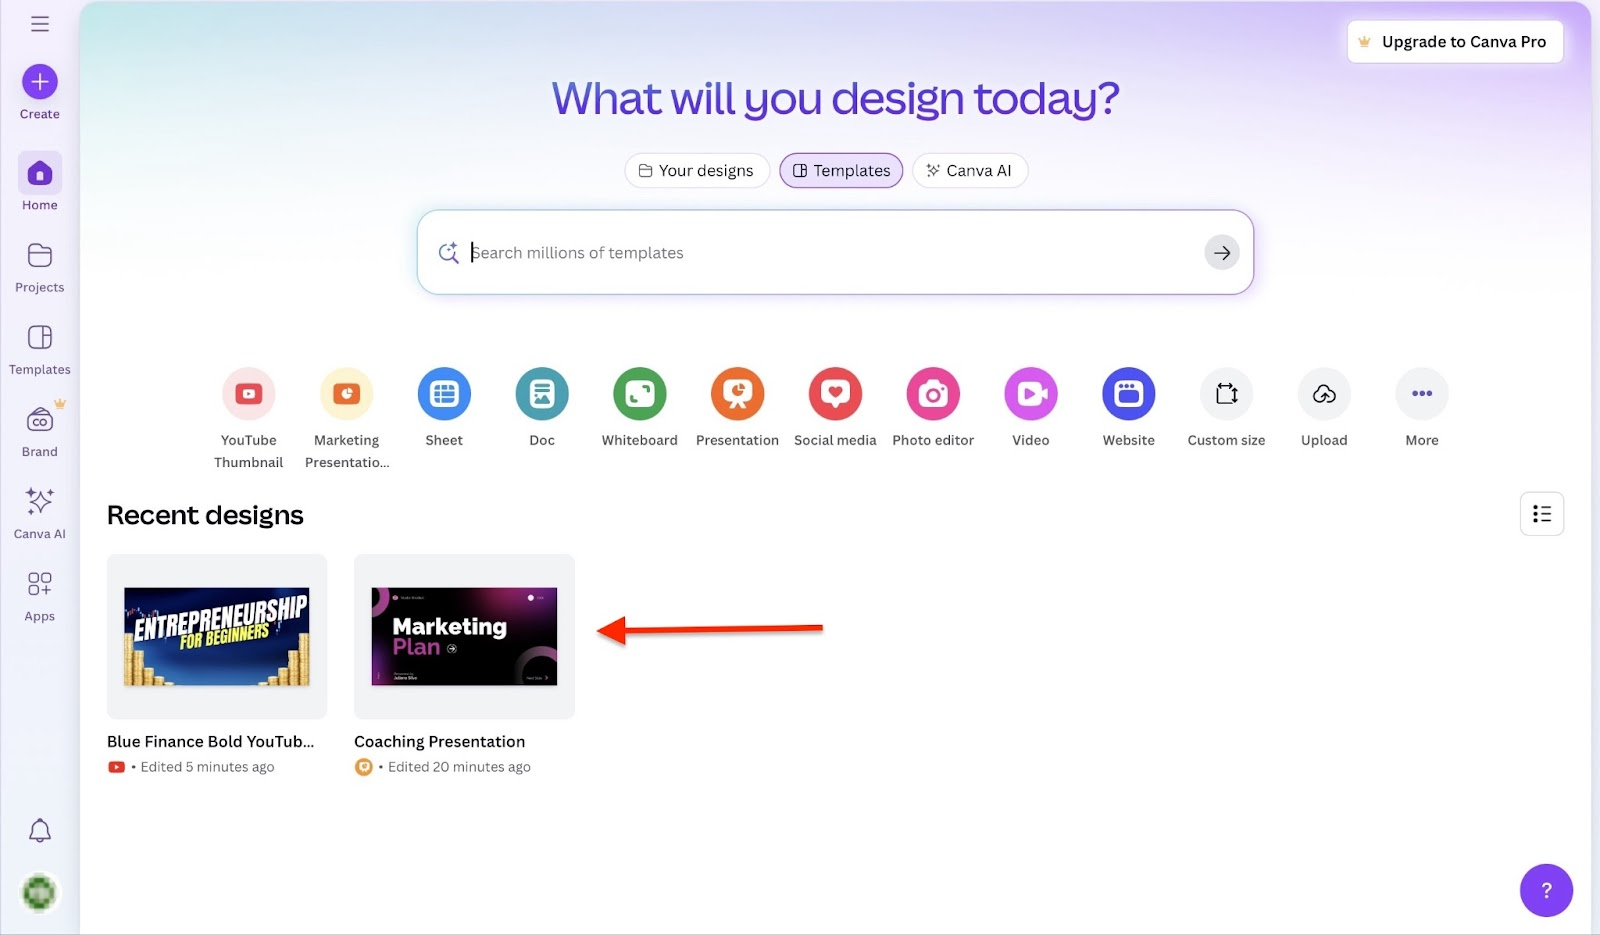
The newly created template will be listed on the homepage and in the ‘Recent Designs’ section.
What I liked:
- Has ready-made templates for different situations like social media posts, customer workbooks, and goal-tracking sheets
- It’s easy to navigate because everything is organized in a clean control panel
- Free plan starts from $0 and offers 5GB of cloud storage and 1000+ design types
What I didn’t like:
- Some features, such as documents and whiteboards, can serve the same purpose.
- Canva’s templates can be overused and thus may look generic
Best for
- Coaches focusing on content creation and branding.
Pricing
- Canva Free: $0/month
- Canva Pro: $15/month
- Canva Teams: $10/month

5. Notion
Coming in at number five on my list of the best online coaching platforms is Notion. It helps online career coaches reduce administrative workload by keeping all their coaching resources neatly connected.

With the page feature on Notion, you can add text, images, to-do lists, databases, and embedded files. It is also possible to add sub-pages within other pages.

The database feature allows you to store and organize items. You can view them in a table, gallery, list, or timeline.

Notion’s marketplace feature has templates for meeting notes, coaching logs, content calendars, and more. You can search for, purchase, and sell template designs for various purposes.

That’s not all. With Notion’s teamspaces feature, you can organize workspaces by teams or coaching projects.
You can arrange the sidebar to display only the important information relevant to your team or project. You can also decide which members have access to your teamspace.

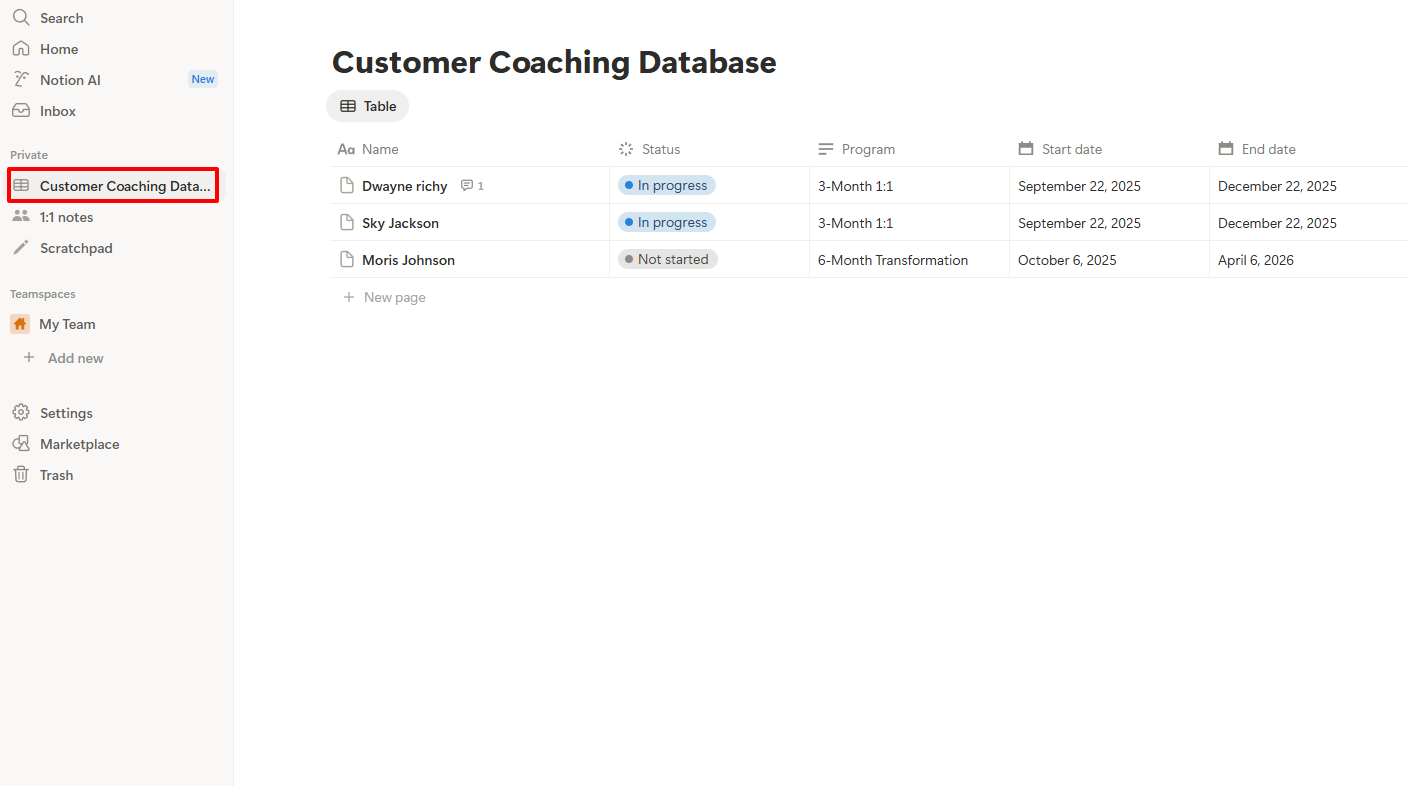
As a coach, you should track your customers. To do so on Notion, you could use the database feature. I will walk you through the creation of a customer coaching database.
After signing in, select the drop-down menu and click “Database.”

You can name your new database and add the different properties you want included in it. On the right, you build with Notion AI or import a CSV.

You can also add an icon, cover, and description above your new database. After creating your database, you can still add as many properties as you want.

By clicking on a customer’s name, you can access their details, add comments and emojis, attach files, and even tag someone.

The comment icon will be displayed next to the customer’s name; to view its content, simply click on it.

That’s it! You have created your customer coaching database. Locate it on the sidebar under the private section.
That’s not the only feature I loved on Notion.
The features I loved
1. Pages
As a coach, taking personal notes or writing guidelines for your team is a common practice.
Notion’s page feature helps you do that and keeps all your information organized. Let me show you how to create one.
From the homepage, click on the drop-down menu icon. Then, select “Page.”

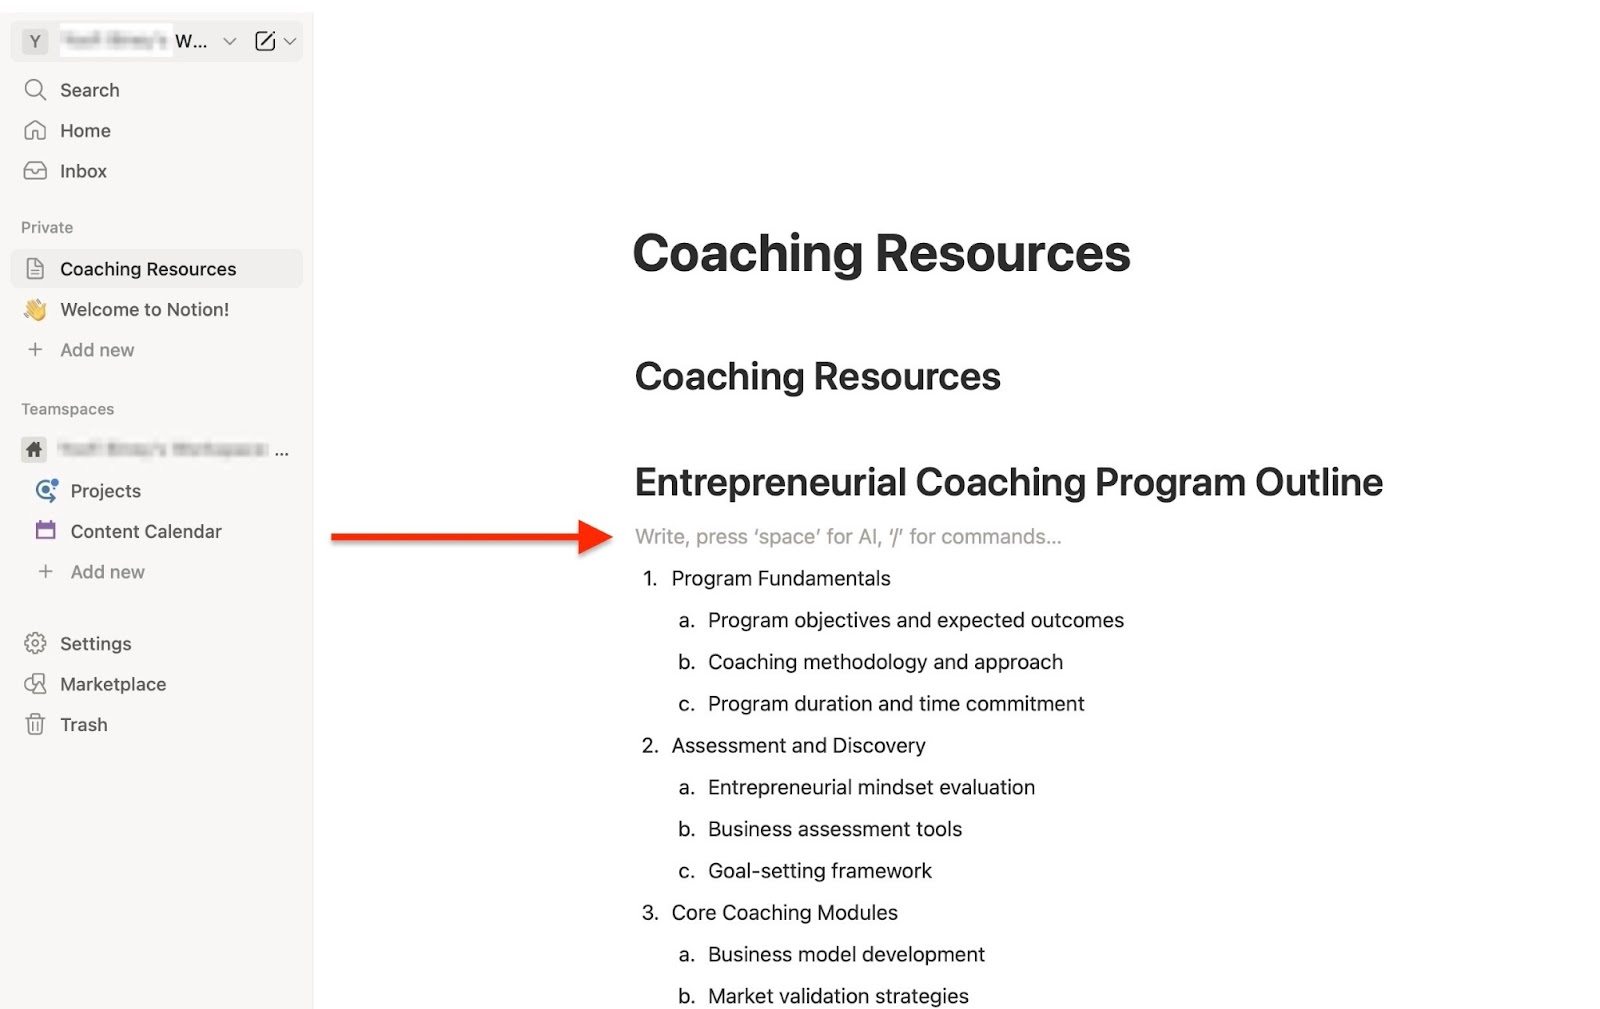
A new page is automatically created. Click the “New Page” input area to enter the page name. You can also add an icon, cover image, or comment.

After that, select any of the tabs at the bottom of the window. You can also click on the horizontal three-dot menu for additional options.

Then, use Notion AI to create the content you want. Click on the three-dot icon for more options.

You can press “space” for AI and “/” for commands.
2. Notion Calendar
The Notion calendar is a standalone app that works with your Notion workspace. You can view all your events and databases in the calendar and edit them directly from there.
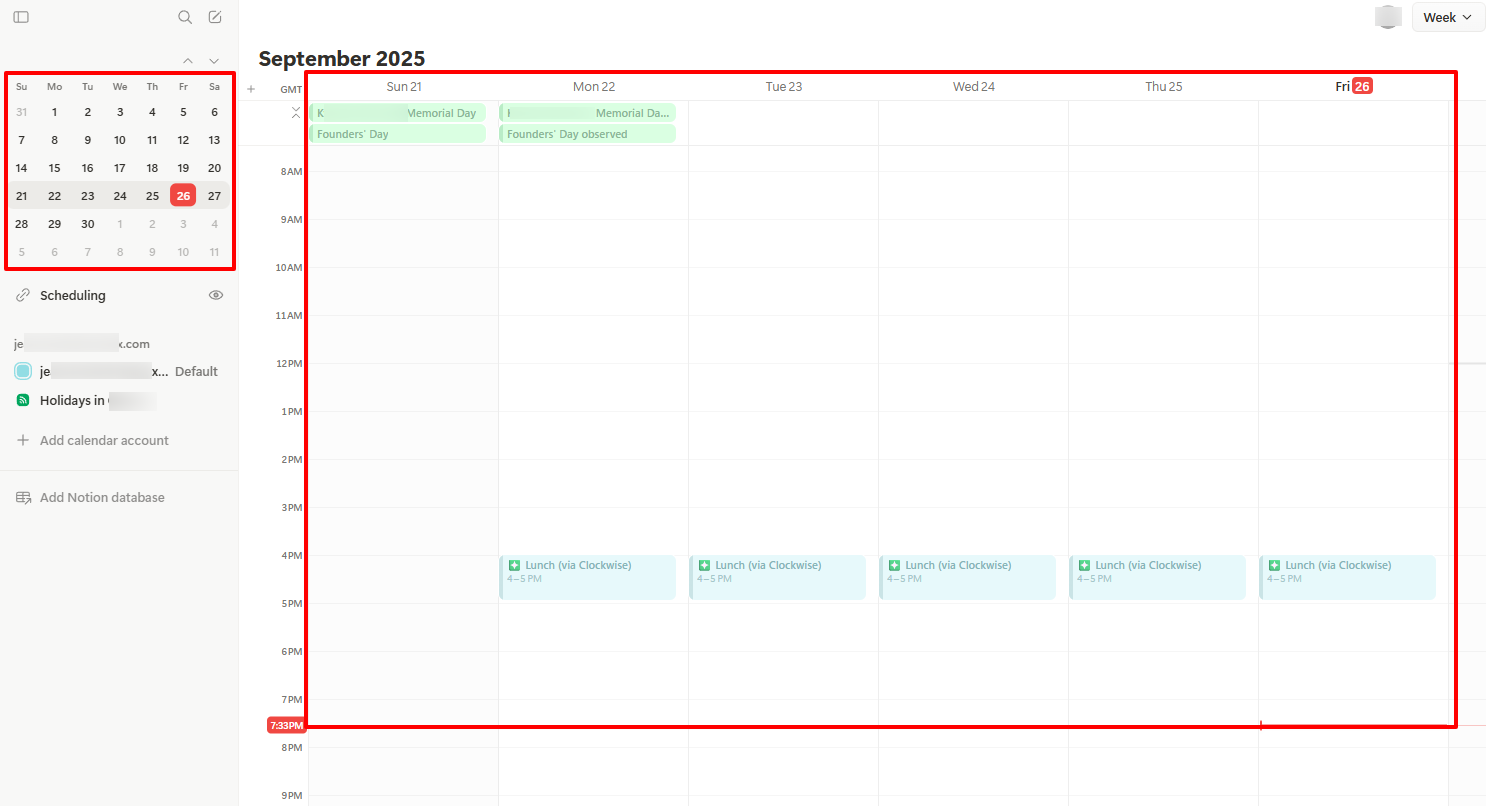
On the left side of the interface, you can add a Notion database and choose your preferred workspace.

Your database will automatically appear in the calendar.
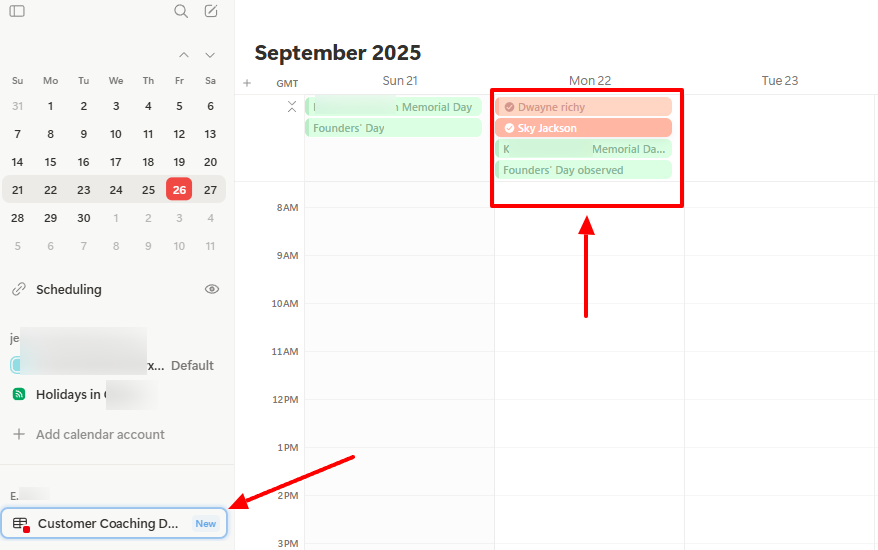
By clicking on a customer’s name in the calendar, their details from the database will pop up on the right side of the interface. This way, you don’t need to log into Notion to access it.

What I liked:
- Has a minimalist interface, which makes it easy to focus
- Let’s users add more context, such as people, date, or page, when using its Notion AI for research
- Offers a wide collection of templates in the Notion marketplace
- Can connect users’ databases to Notion calendar
What I didn’t like:
- Some features, such as teamspace, are not beginner-friendly.
Best for
- Coaches requiring a customizable workspace for planning and collaboration.
Pricing
- Free: $0/month
- Plus: $12/month
- Business: $24/month
- Enterprise: Contact for pricing

6. Zencal
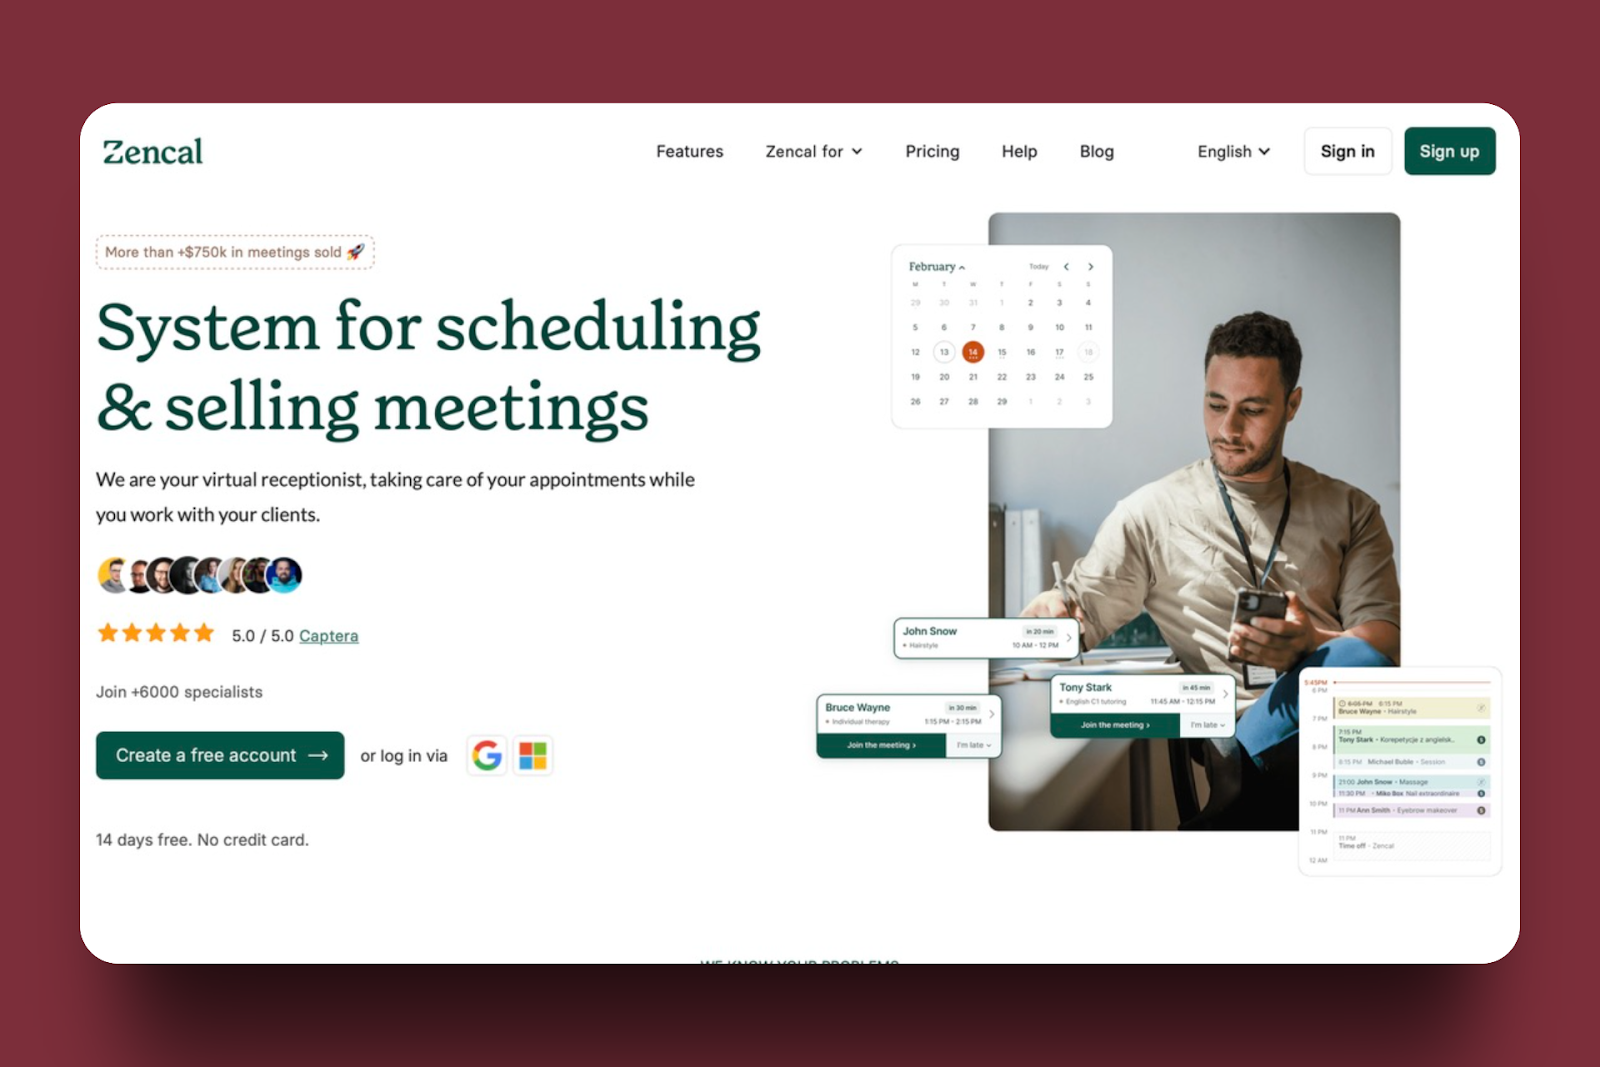
Sixth on my list of the best online coaching platforms is Zencal. It is an online scheduling and client management platform that handles scheduling well and supports APIs and webhooks.
Online coaches can create booking pages with it and integrate their favorite tools.
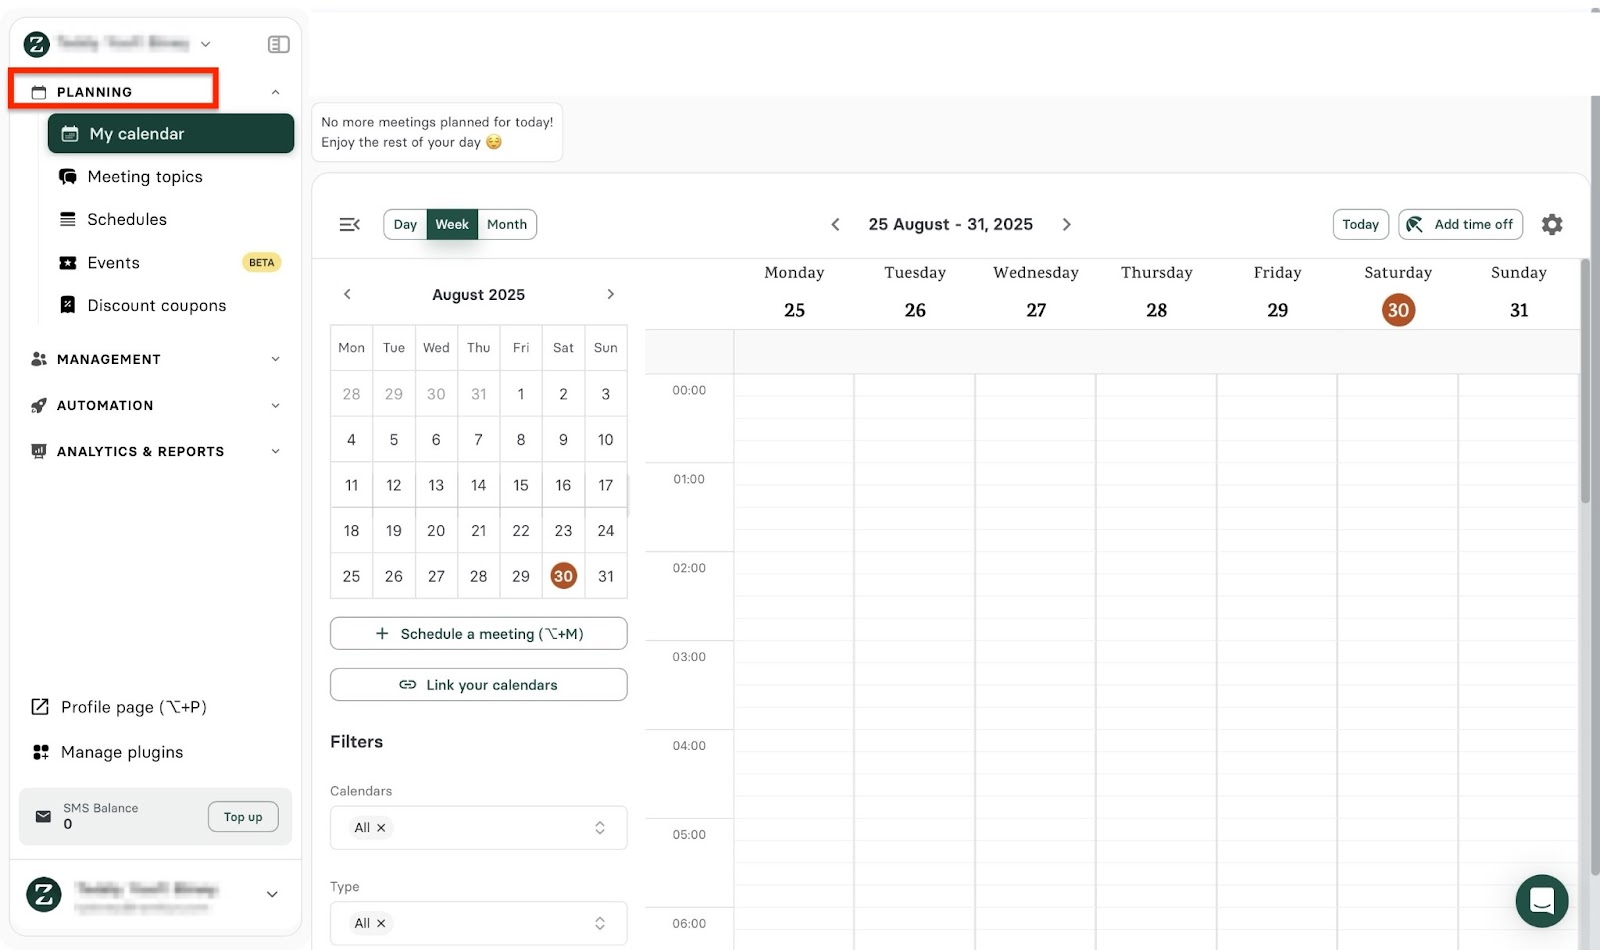
Zencal’s planning feature allows you to create and add meeting topics. You can include a form with questions and use AI to set up automated tasks for your events.
With its management feature, you can customize your Zencal landing page to match your brand. The feature also enables you to add and manage new customers.
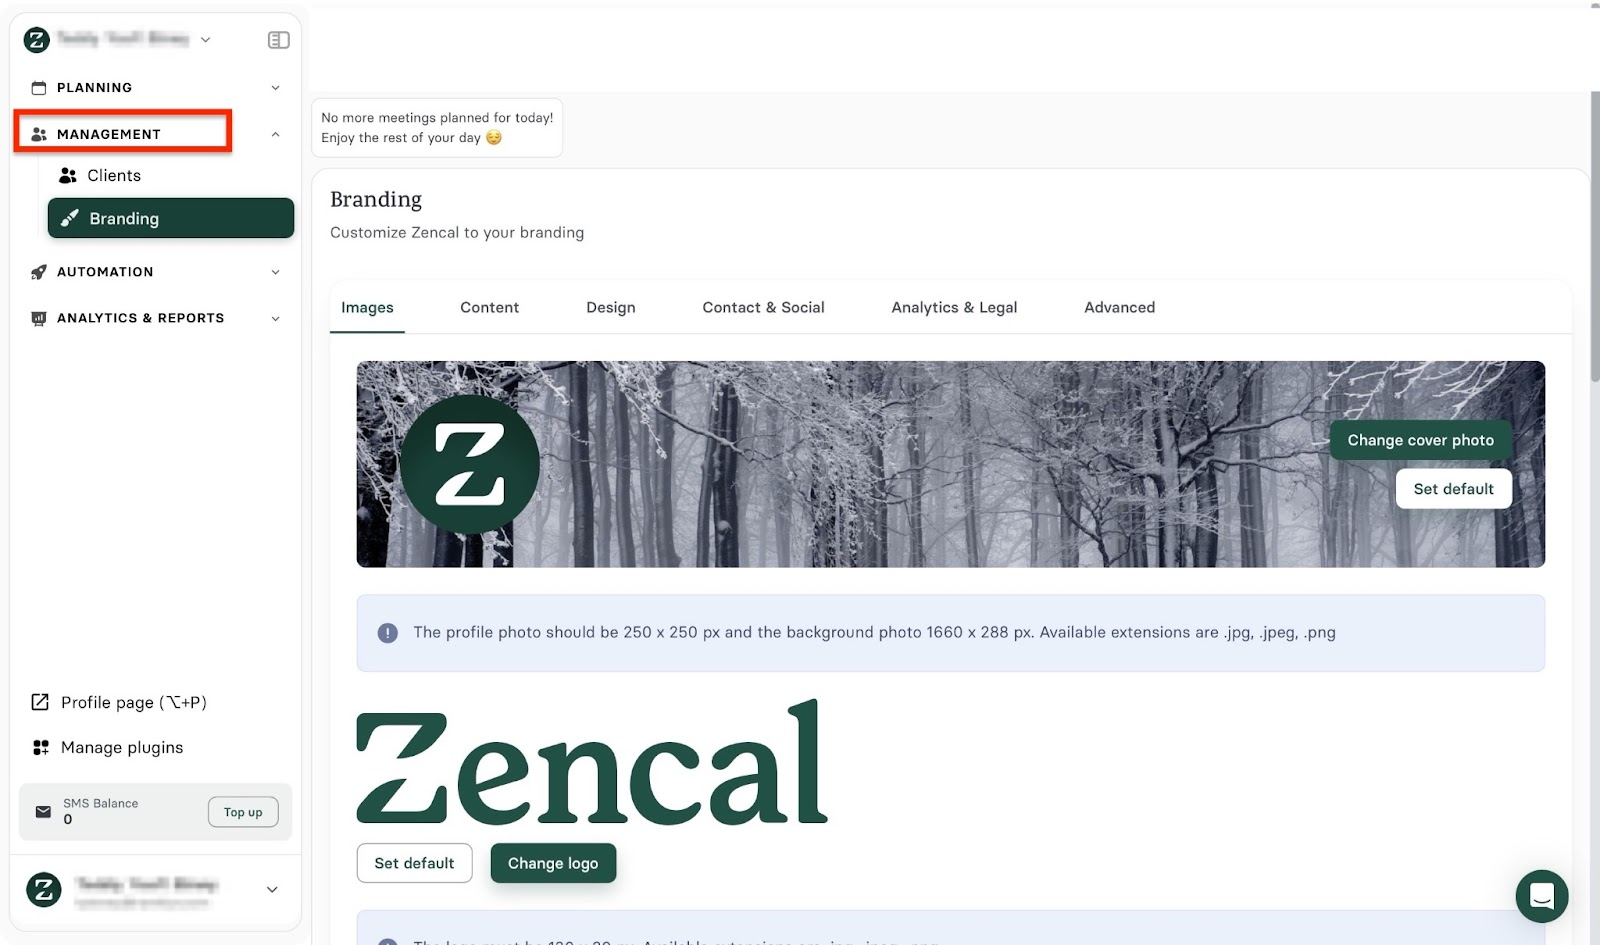
Additionally, Zencal’s automation feature allows you to connect calendars such as Google Calendar, Outlook Calendar, and iCloud Calendar. You can also integrate with industry-leading tools such as Zapier, Easytools, HubSpot, and more.

Thanks to its analytics & reports feature, you can track and view meeting summaries and reports. More so, you can monitor meetings and subscriptions.
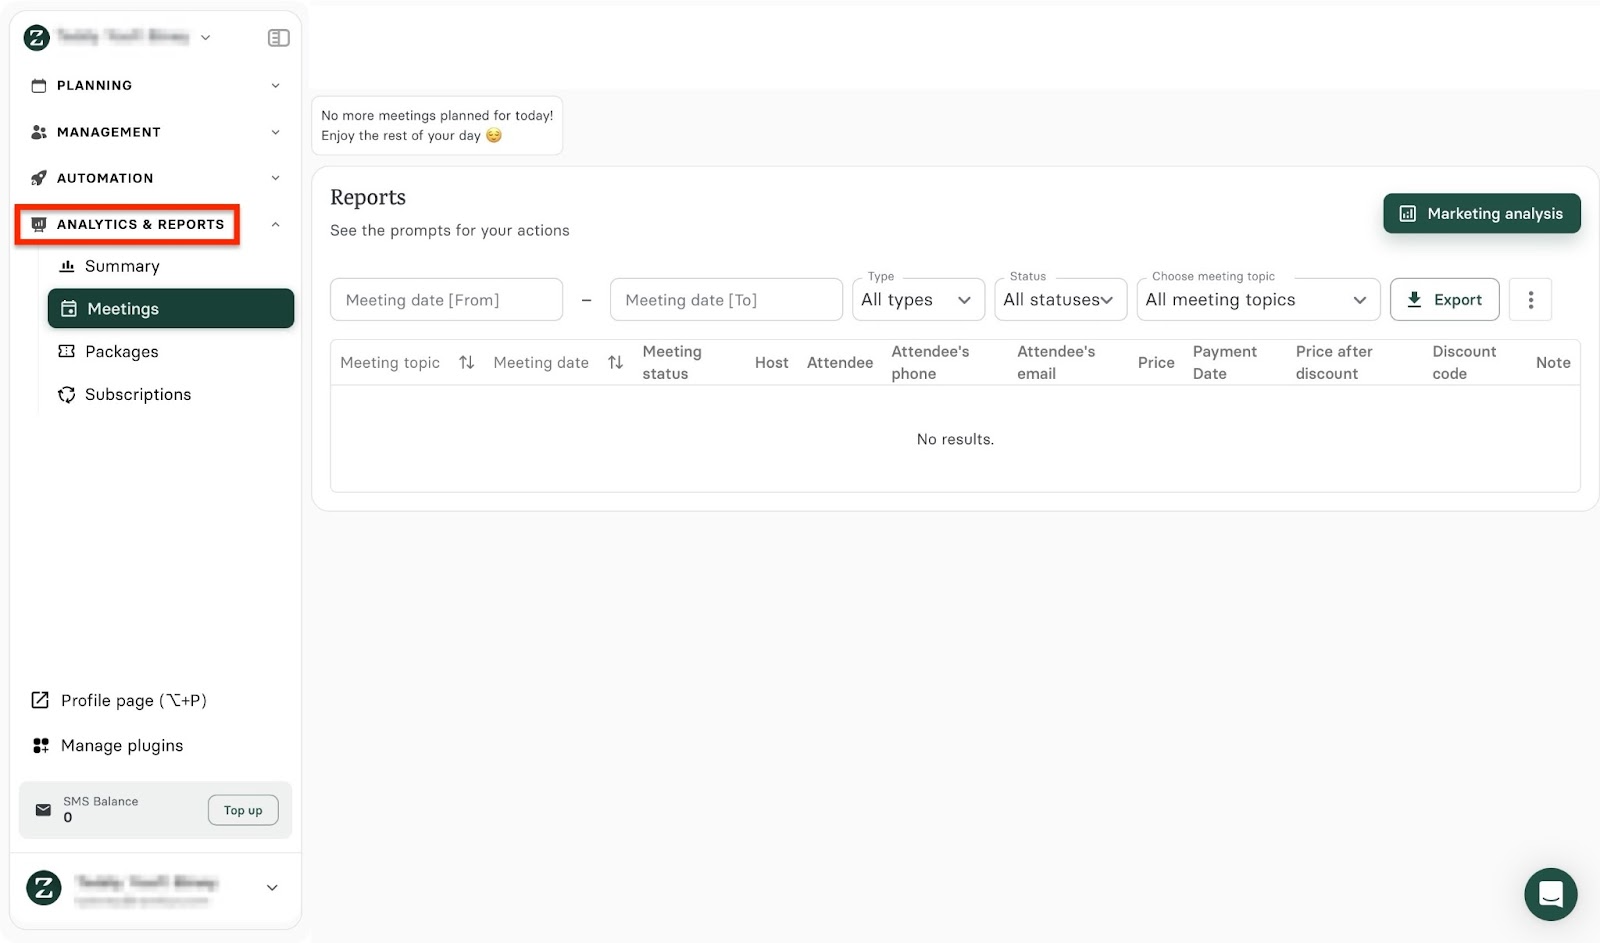
Online coaching, for instance, requires simple and effective appointment scheduling.
Let me show you in a few steps how Zencal can help you with that.
Begin by clicking “Planning” in the sidebar, then select “Meeting topic.” Next, click “Create meeting topic.”

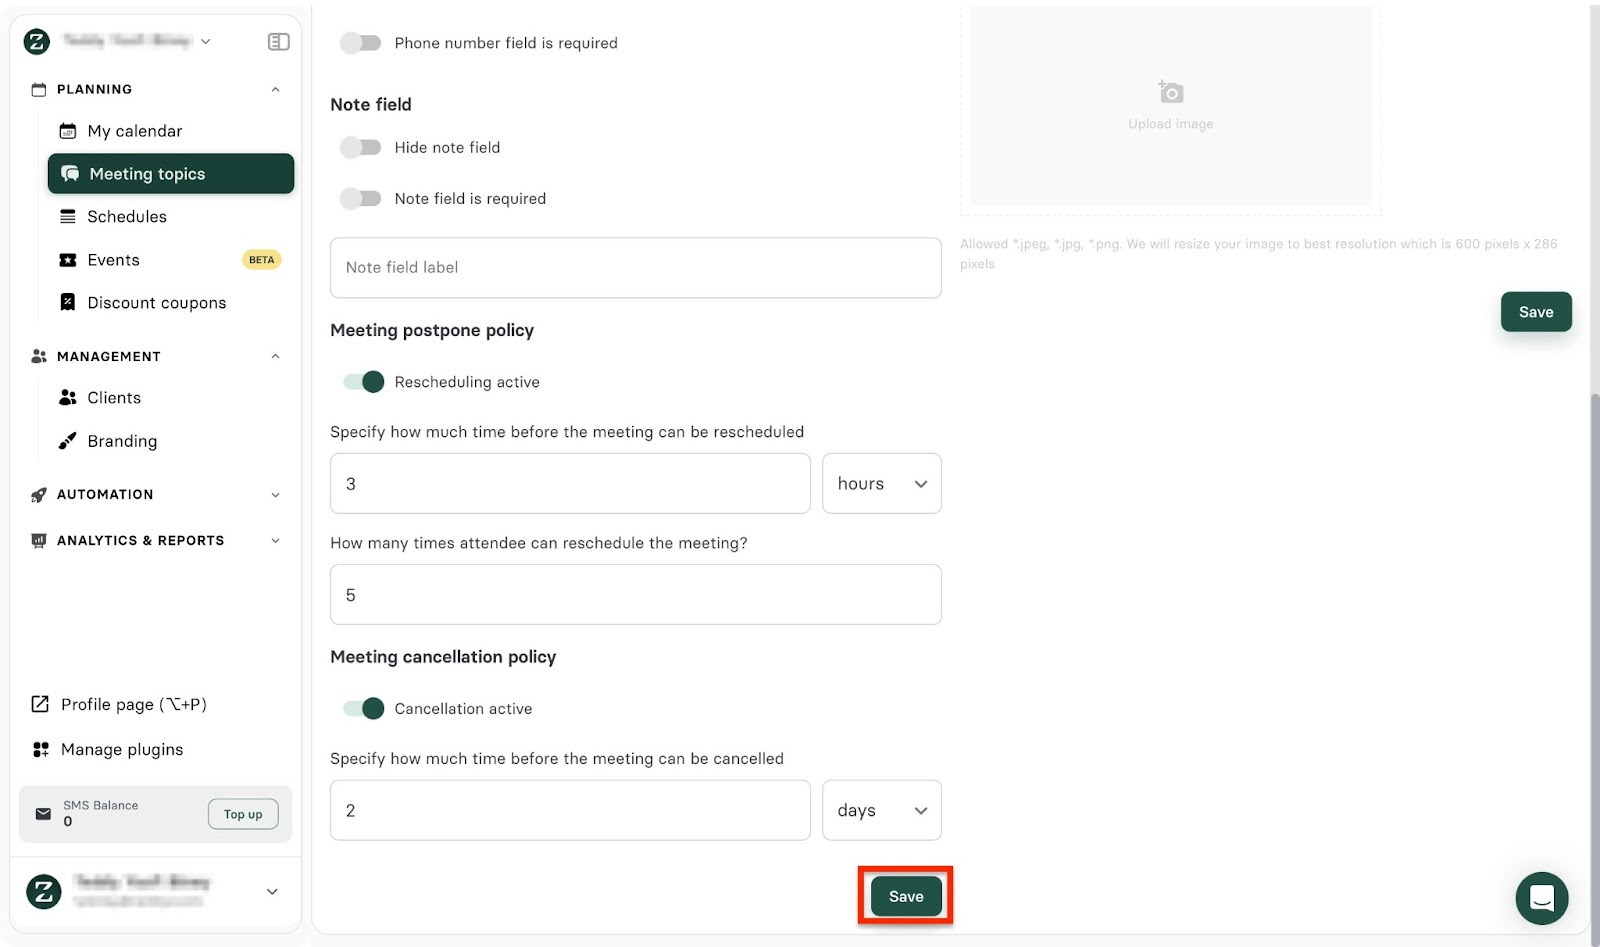
Next, add the meeting topic and toggle any of the switches to select your preferred option. Now, add an event description and click the “Save” button.

Afterward, proceed to the Advanced settings tab. Complete the form by entering the required information and selecting your preferred options.

Scroll down to add more details and click the “Save” button.
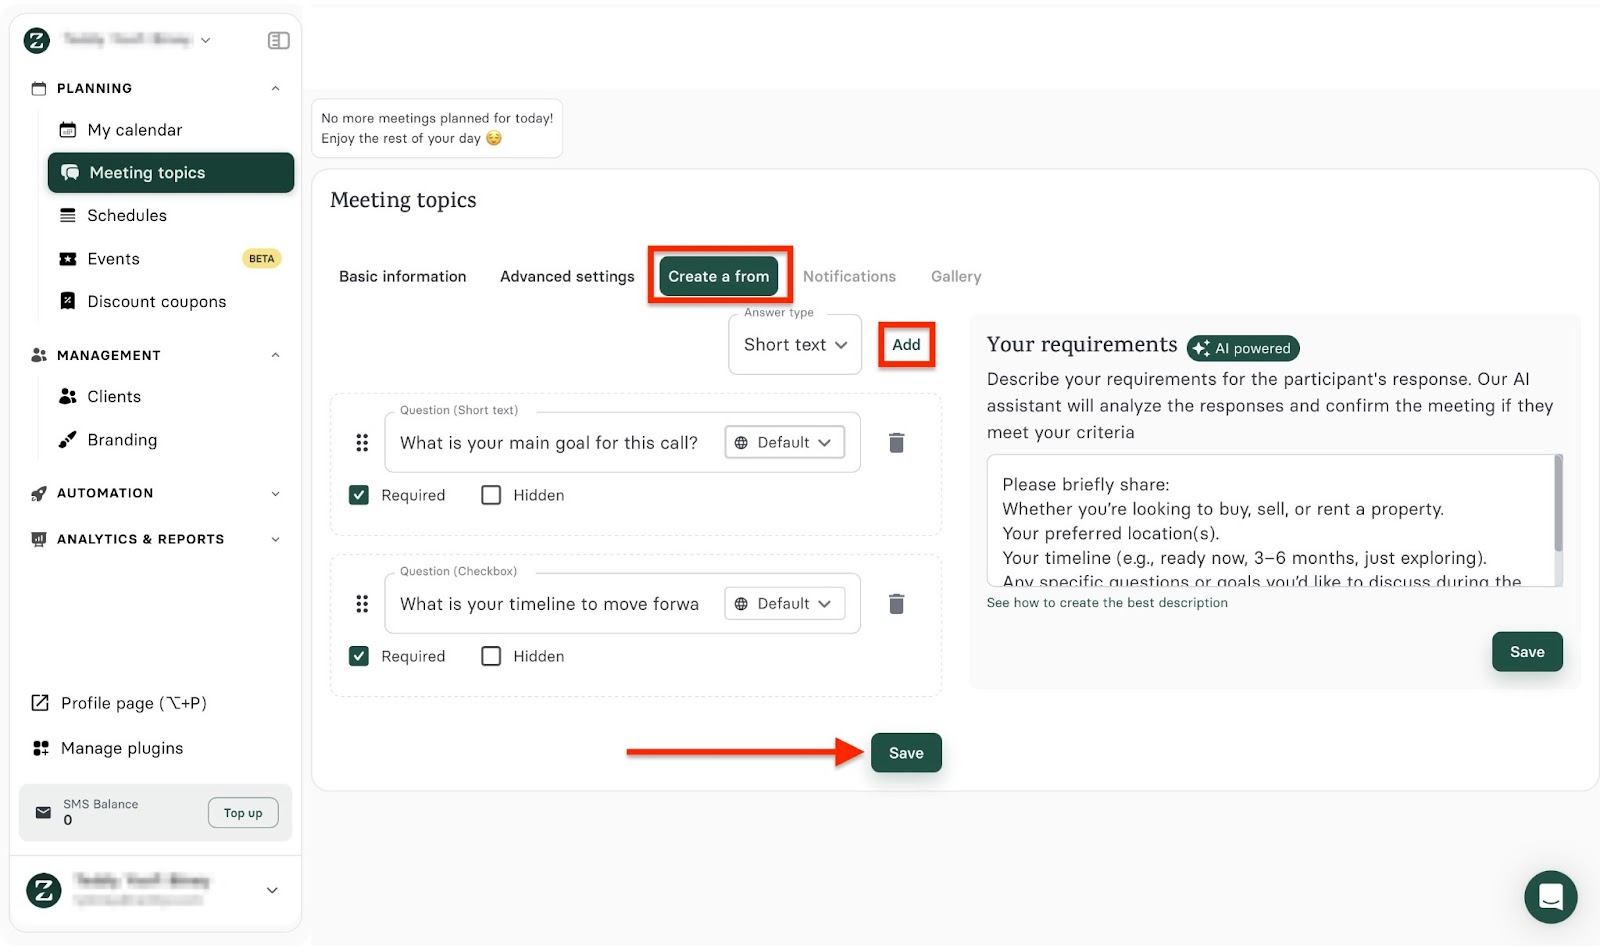
Next, select the “Create a form” tab and click “Add” to include more questions. Then, add the items on the form and describe the kind of response you want from participants. Click the “Save” button to finish.
Once you’ve done that, return to the Basic Information tab to review and save your changes. Click “Create message” to set up reminders, confirmations, or follow-ups for your participants.
In the Gallery tab window, click the “Upload photo” area to add images. The new meeting topic will be displayed in the Meeting topic window.
To preview your new meeting topic, select the URL link.

The features I loved
1. Meeting scheduling
While Zencal is great for appointment scheduling, it offers more. Take its schedule feature, for example. It allows you to create available time slots, so customers can easily select the time that works best for them.
Let me guide you through creating your first schedule on Zencal.
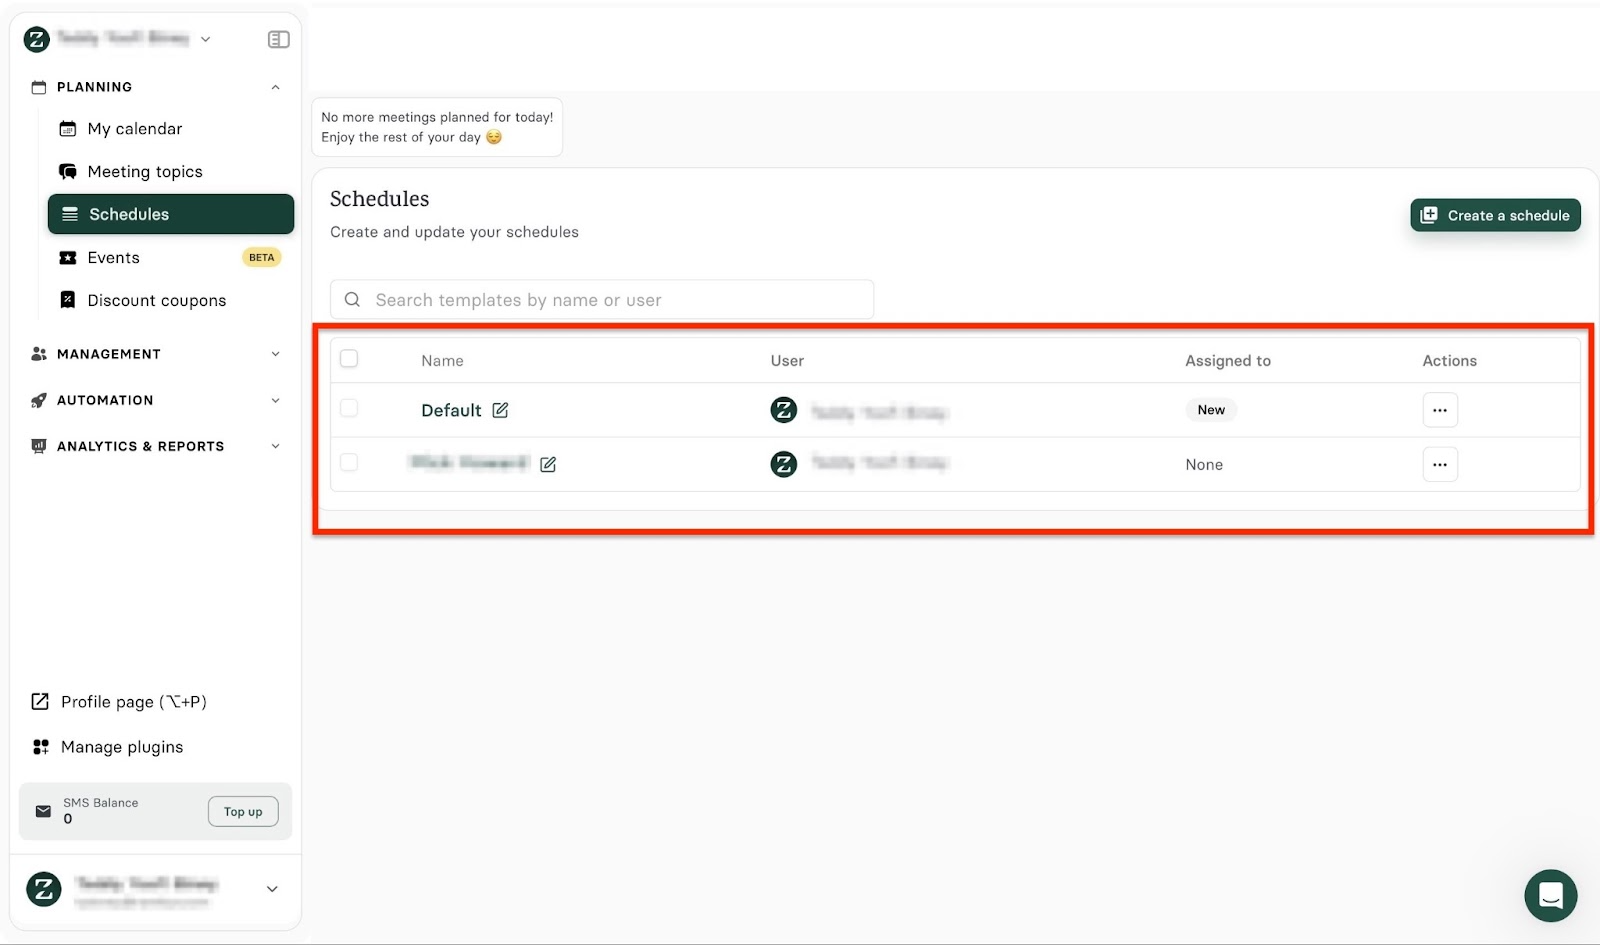
Click “Planning” in the sidebar, then select “Schedules.” Next, click “Create a schedule.”

Now, enter your name, select your preferred timezone, add custom breaks between your meetings, and click “Save.”

Then select and fill out the tab, such as “Cyclical Availability,” “Additional Dates,” “Disabled Dates,” and “Advanced Settings.” Wrap up by clicking “See schedule Preview” for an overview of your schedule.

Close and select “Schedules” in the window to exit.

Your new schedule will appear in the Schedules window.
2. Automation
Zencal’s automation feature handles scheduling, payments, and tasks automatically, eliminating the need for manual input. It’s like your own mini virtual secretary. However, you have to set it up.
Here’s a quick way to connect your native calendar to Zencal. Start by selecting “Automation” in the sidebar. Then, click “Connected calendars.”

Once you’ve done that, choose which calendar to connect to and click “Add an account.”

The calendar will be displayed in the Connected calendars window. Repeat these steps to connect more calendars.

What I liked:
- Starting from $4 to $20, the pricing is relatively cost-effective.
- It has complete scheduling tools for managing appointments, automating reminders, and calendar syncing.
What I didn’t like:
- It offers a short 14-day trial period, but you have full access to Pro features.
Best for
- Coaches needing efficient scheduling and customer management.
Pricing
- Basic: $4/month
- Pro: $10/month
- Team: $20/month

7. Zoom
Finally, Zoom ranks seventh on my list of the best online coaching platforms. Among other features that help online coaching, it has a built-in focus mode that minimizes distractions during video coaching sessions.

Zoom’s meetings feature lets you schedule meetings and view upcoming or past ones. You can add attachments, set up personal rooms, and create meeting templates.

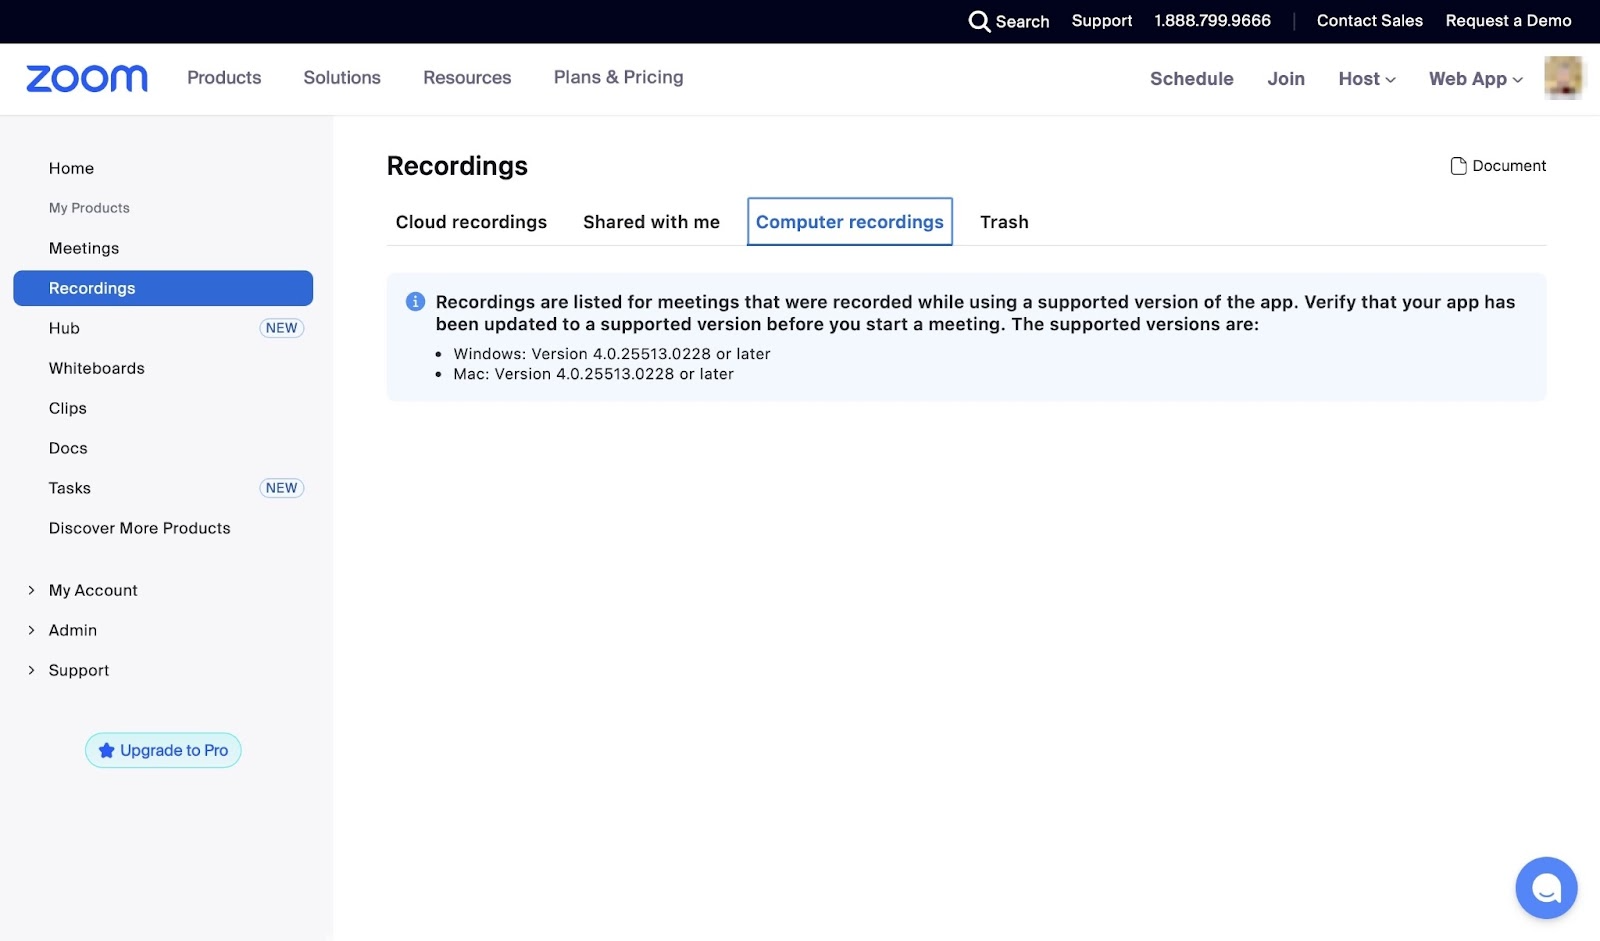
With its recordings feature, you can record your meetings to either the cloud (server) or your computer. Others can also share their meeting recordings with you. There’s a trash section you can access to retrieve deleted recordings.
Thanks to Zoom’s whiteboards feature, you can create whiteboards, templates, and new projects or import whiteboards from your computer. Others can also share whiteboards with you.

There’s also a clips feature you can use to record and share short-form videos. You can view both your clips and the ones shared with you.

Here’s how you can set up your first video meeting on Zoom.
First, select “Meetings” in the sidebar and click “Schedule a Meeting.”

Now, add the meeting topic, description, time, date, and location. Also, select the time zone and enter the names of invitees.
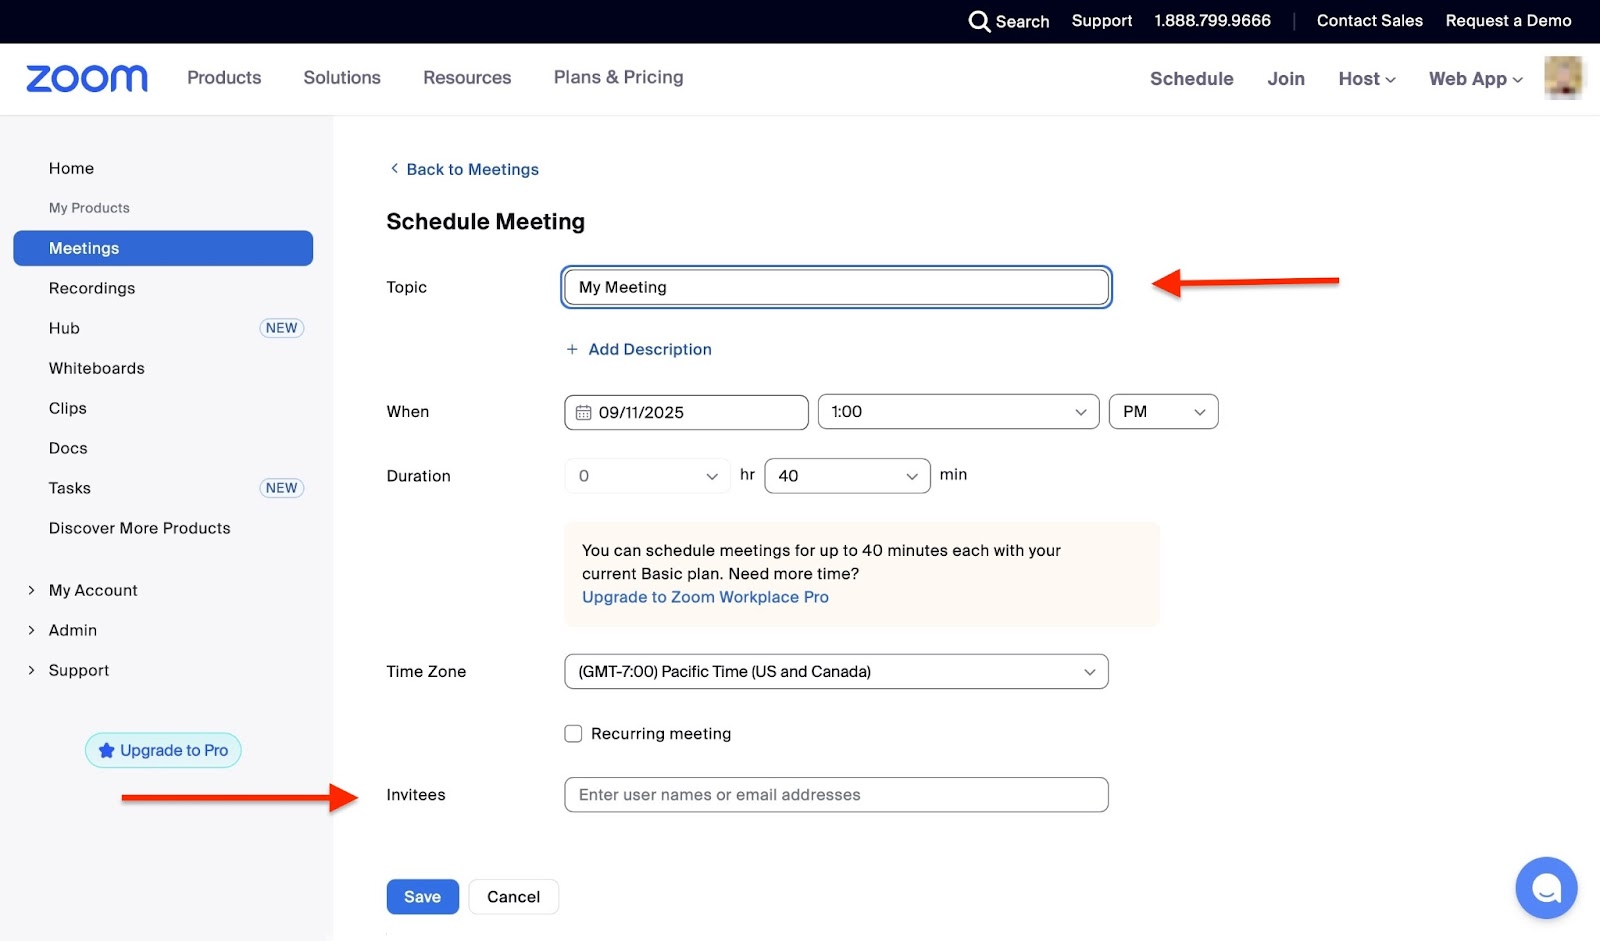
Scroll down to enter and select more details, and then choose options such as requiring a password, enabling a waiting room, or recording the session. Now, click the “Save” button.

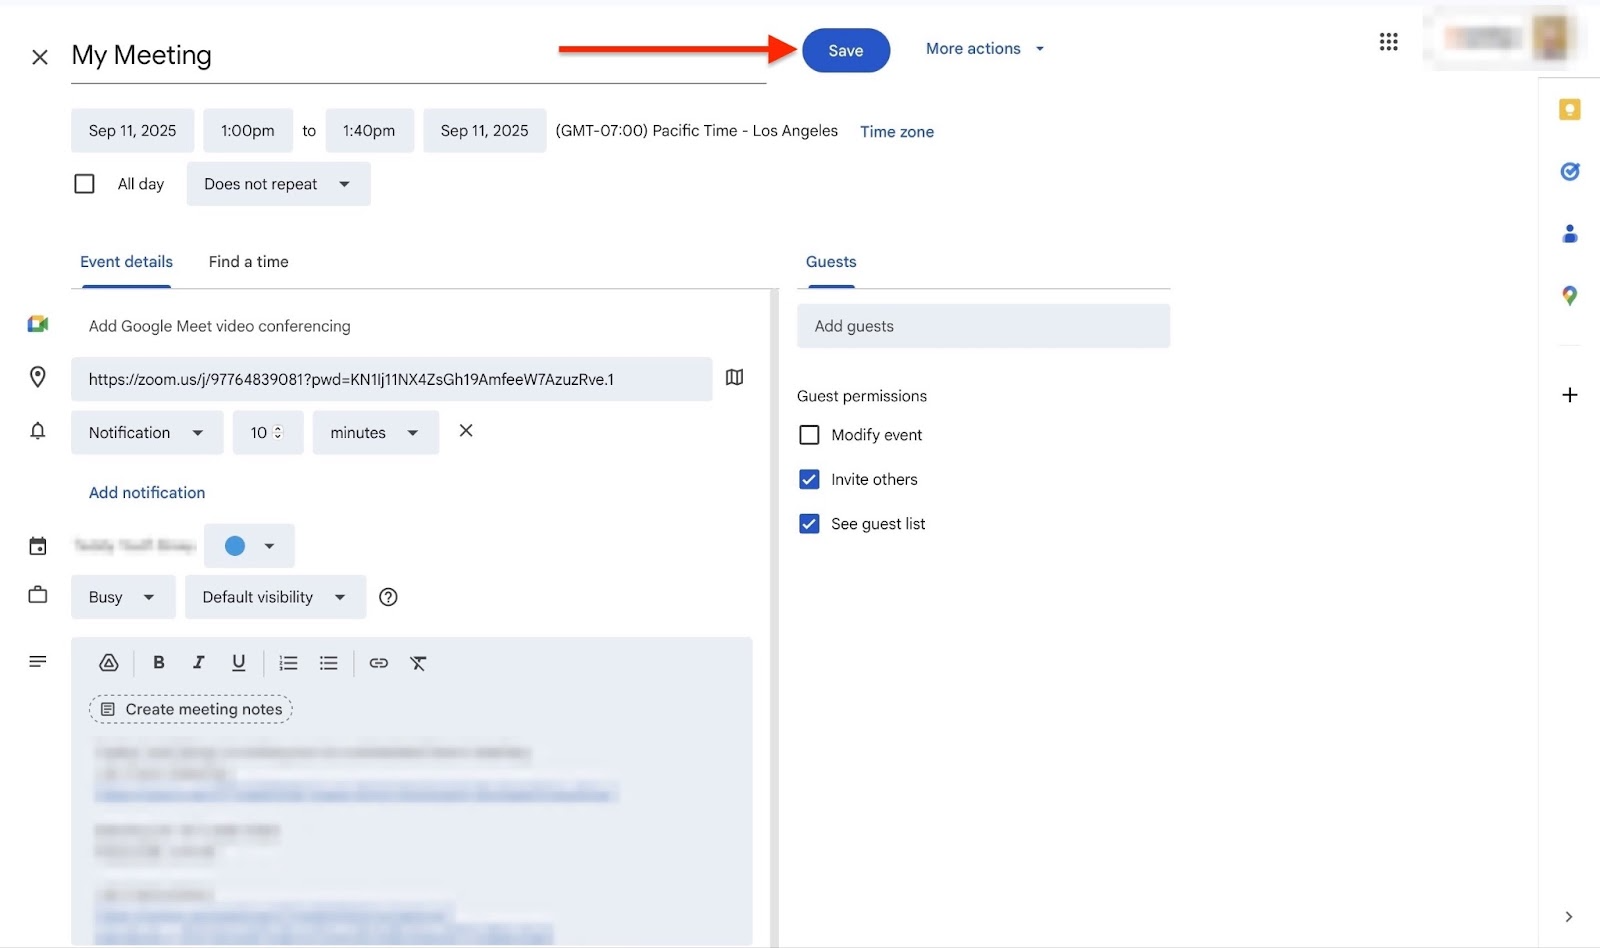
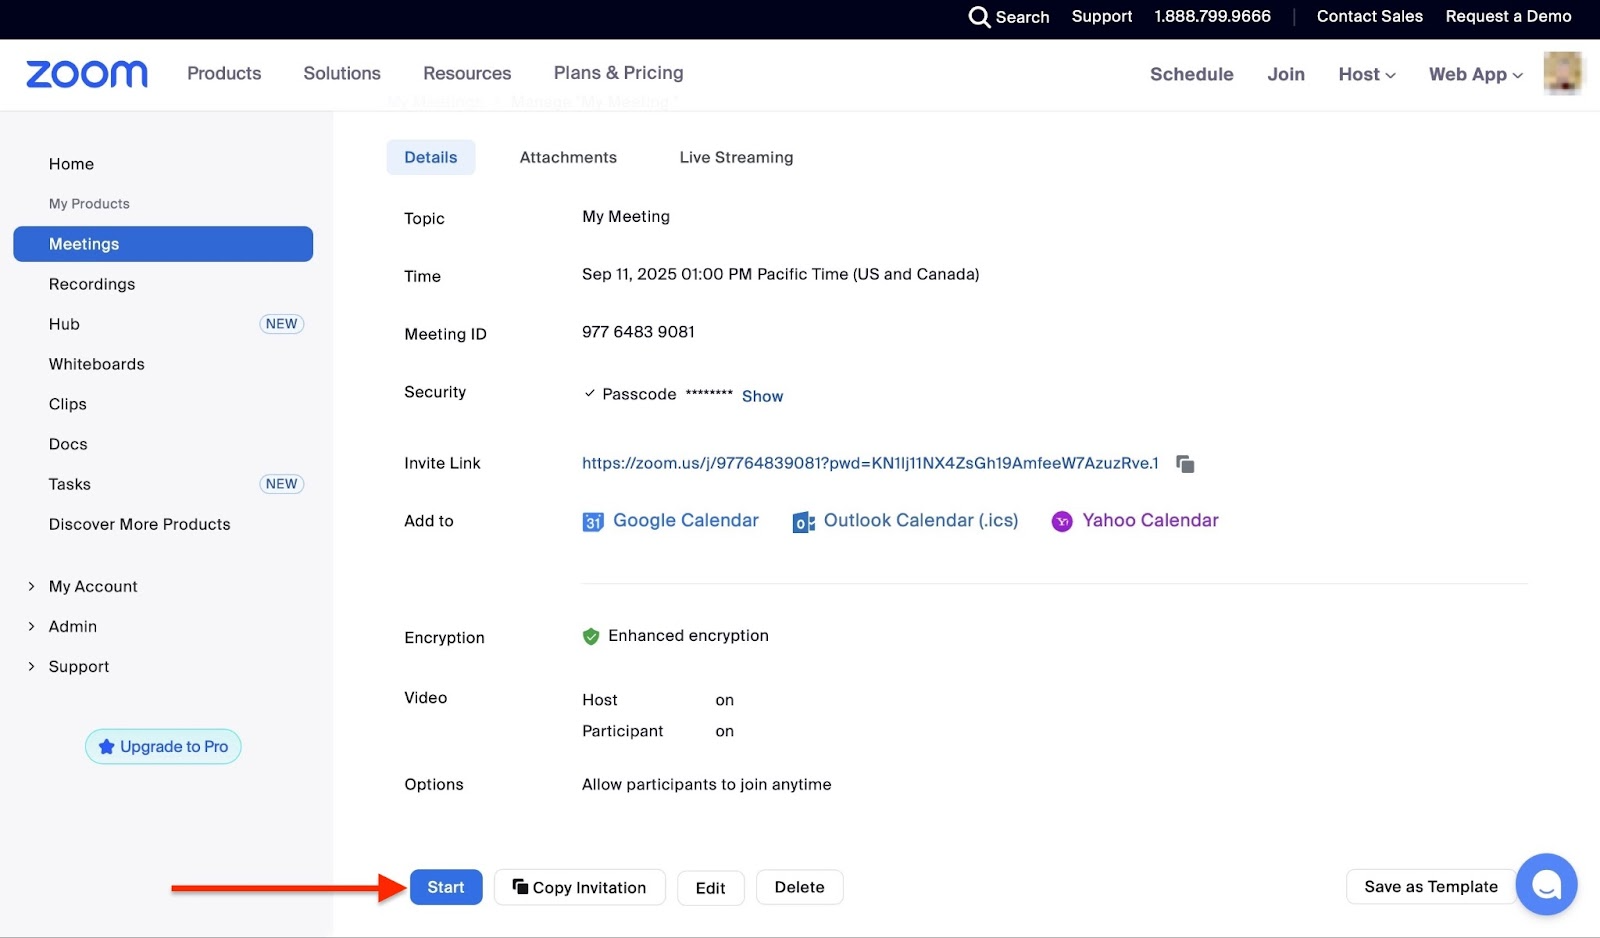
In the new window, you can view all your meeting details. To add it to your calendar, click the preferred option.

If you’re satisfied with the meeting details, click “Save” to finish adding it to your calendar.
Now, after saving, select “Copy Invitation” in the bottom tabs.
In the pop-up window, view the meeting invitation and click “Copy Meeting Invitation.” When it’s time for the session, go to the “Meetings” tab and click “Start.”
The features I loved
1. Docs
Zoom’s docs feature allows you to create and edit documents. You can select templates to make the whole process even simpler. Here’s how:
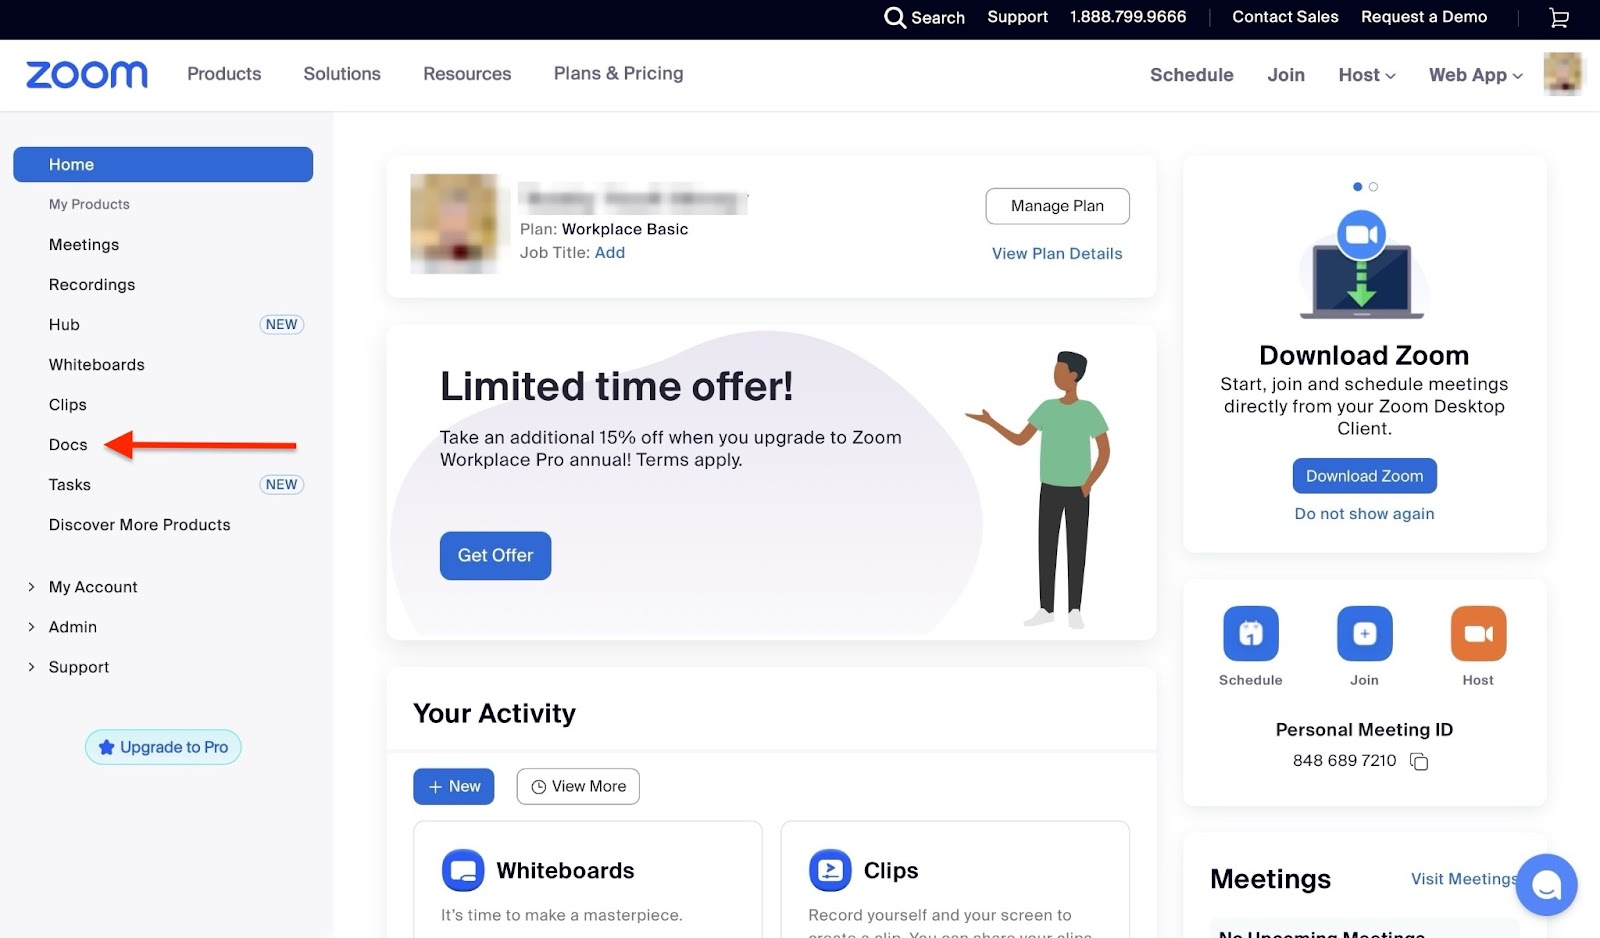
From the homepage, click “Docs” in the sidebar.
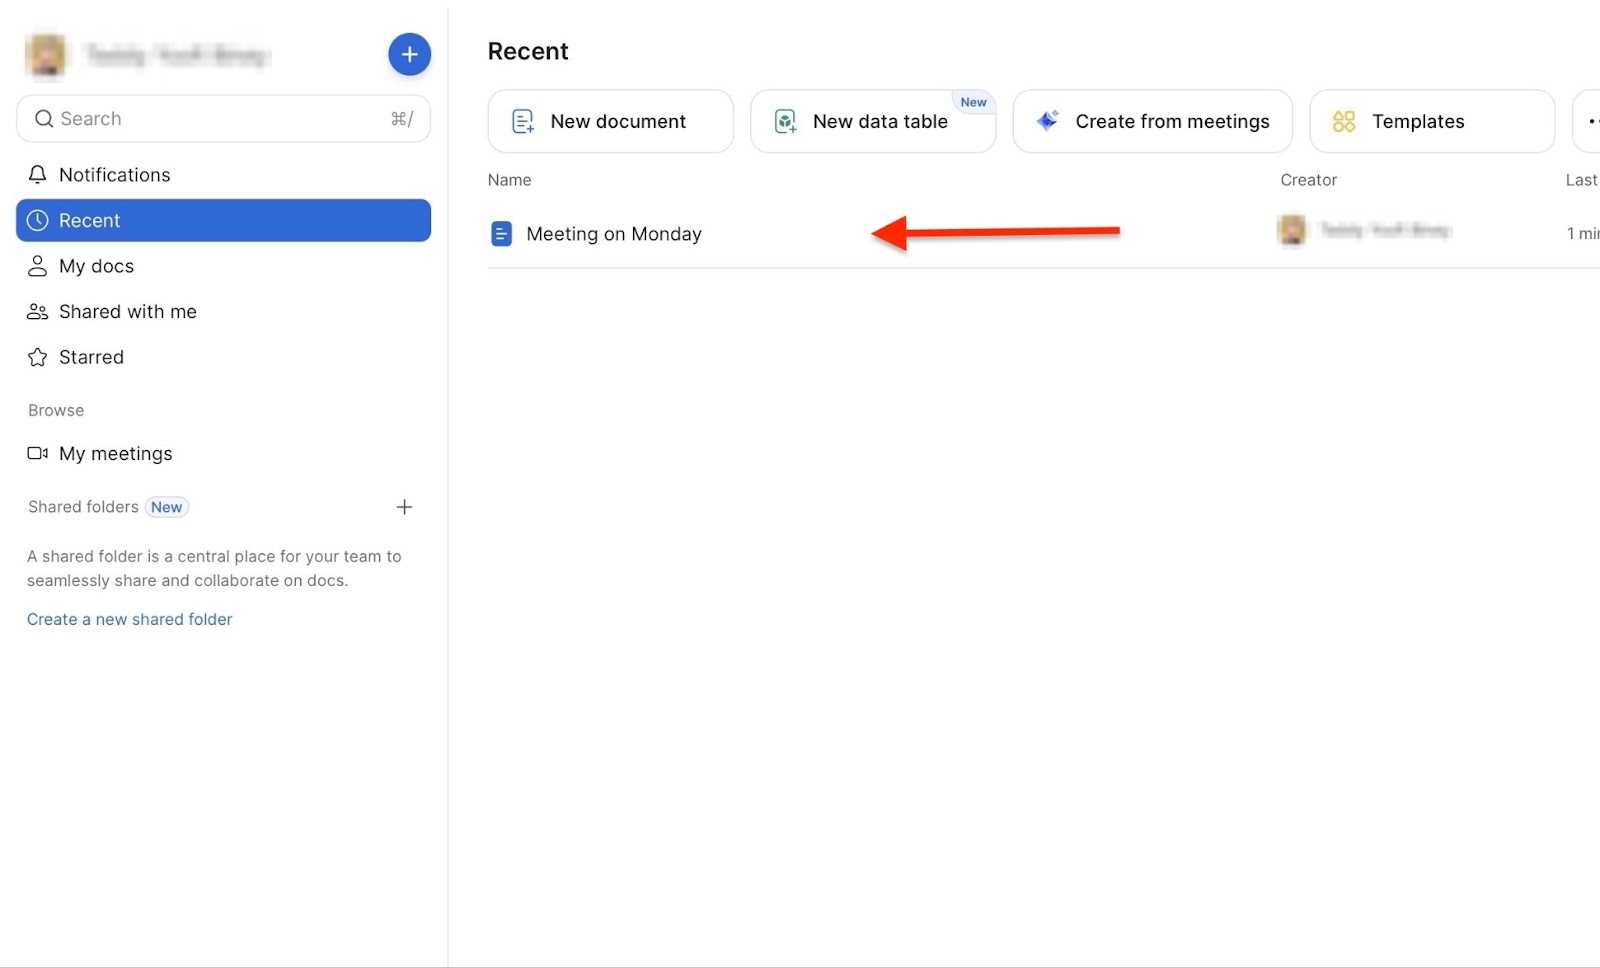
In the new window, select “New document.”

A new document editor window automatically opens. Add a heading, then click on “Kick off with templates” to select preset content.

Zoom will save your changes automatically. You can click the horizontal three-dot menu to view more options.

Simply close the new window to return to the hub feature window. Your newly created document will be listed there.
2. Whiteboards
Zoom’s whiteboard tool helps you draw, write ideas, use sticky notes, and more before, during, and after your Zoom meetings. Again, no worries, because I’ll show you how to use it.
To start, click “Whiteboards” in the sidebar.

Now, select “New whiteboard.”

Here, create, edit, and share the new whiteboard with your customers.
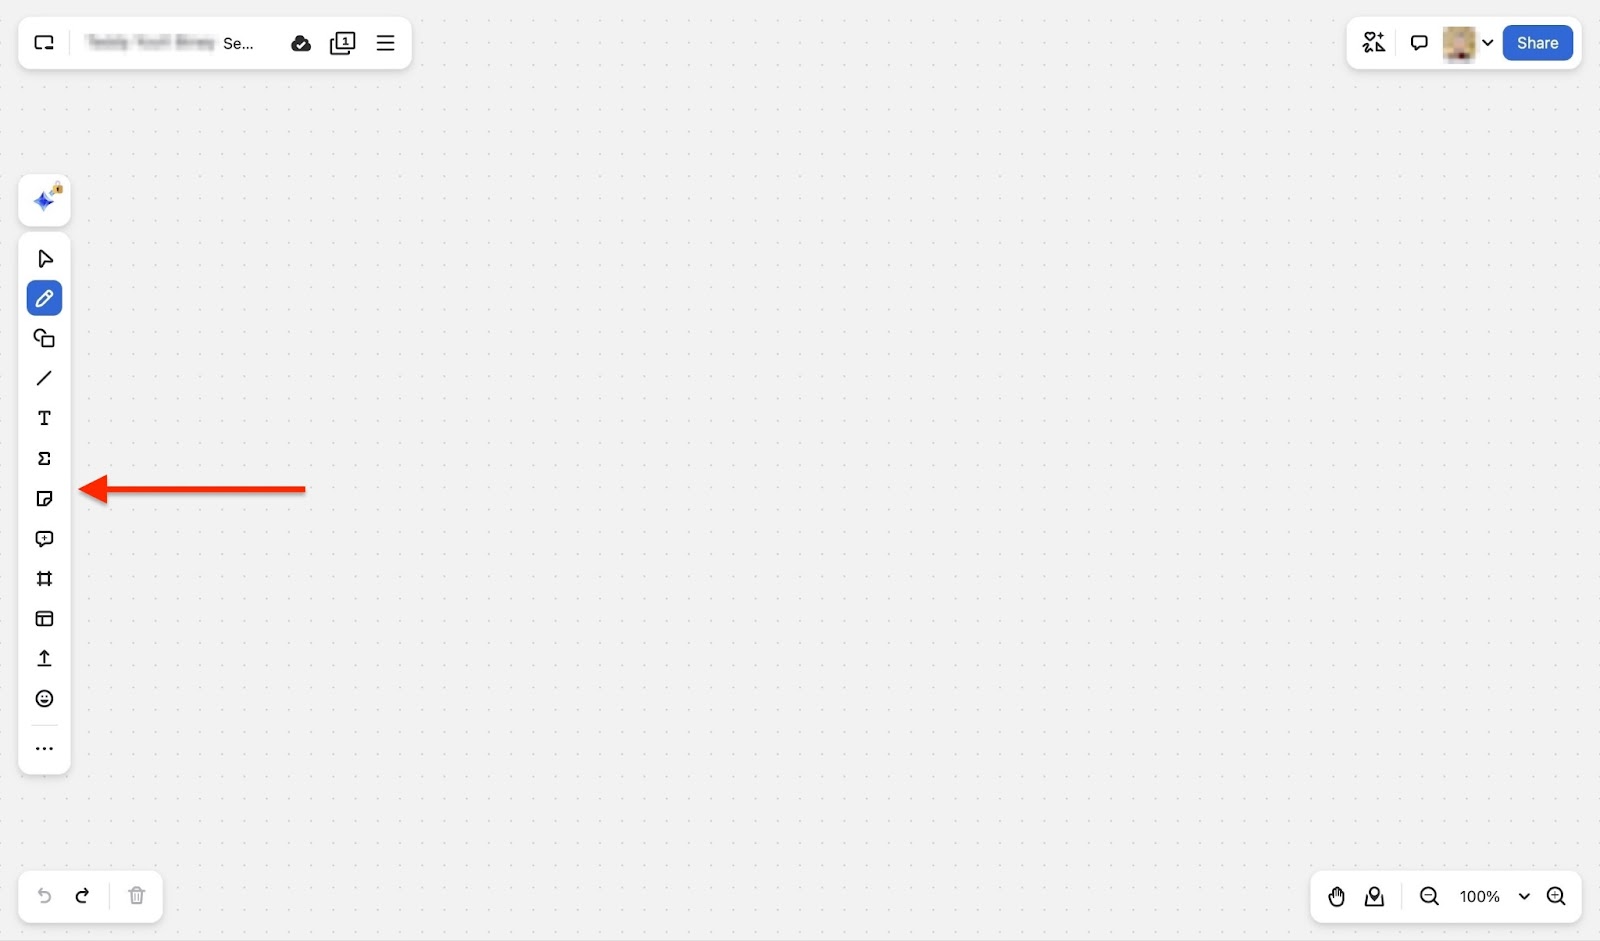
Click on the hamburger menu at the top right corner of the window, or the three-dot menu at the bottom right, to access more options.

What I liked:
- The free version works for small team meetings
- Great for video coaching sessions
- Allows you to add a meeting session to the native calendar
What I didn’t like:
- Features like docs and whiteboards require you to juggle through many new windows
Best for
Career coaches conducting live sessions and webinars.
Pricing
- Basic: $0/month
- Pro: $13.33/month
- Business: $18.33

Additional online coaching software
Here are a few more online coaching software worth considering:
- Profi — Best for larger teams and organizations, handling multiple coaches and complex client portals
- TrueCoach — Best for tailored for personal trainers and fitness coaches for workout planning
- Coach.me — Best for habit-based, accountability-focused coaching at scale
- Slack — Best for real-time team and client communication with channels and DMs
- Facebook Groups — Best for building an active community hub around your coaching brand
- Stripe — Best for seamless payment processing and subscription billing
- Typeform — Best for creating beautiful intake forms, quizzes, and client assessments
- Loom — Best for asynchronous video feedback and coaching walk-throughs
- ClickUp — Best for visual task management and progress boards with clients
- DocuSign — Best for legally binding e-signature workflows and coaching agreements
- Google Analytics — Best for tracking how coaching pages and offers perform online
- Miro — Best for collaborative whiteboarding and visual coaching sessions
- Discord — Best for voice, text, and event-driven community spaces for coaching clients
How to choose the right online coaching platforms
The online coaching field is competitive. Those who reach the top use the right online coaching platforms and tools. However, the question to ask is, what are these online coaching platforms and tools?
My list of the seven best online coaching platforms was only the beginning. I have compiled four key factors to help you choose the right online coaching platform. These include:
- Match the online coaching platform to your coaching style
- Check community features
- Assess pricing and scalability
- Factor in tool integration
Now, let’s dive a little deeper into each key point.
1. Match the coaching platform to your coaching style
To choose the right online coaching platforms, match them to your coaching style. Whether you are starting out or have been coaching online for some time now, you probably have your preferred style.
For instance, many creators choose 1:1 sessions because these sessions help them address the specific needs of their customers. In a group situation, they would not have been able to do that.
However, others may prefer group coaching programs because they reach a larger audience and focus on teaching subjects that involve fewer demonstrations. Choosing a platform that aligns with your business improves your workflows and customer satisfaction.
So, what’s your coaching style? Is it 1:1 sessions, group programs, or hybrid (which combines both online and offline coaching)?
Now, according to Market.us’ 2024 Coaching Platform Market Report, 1:1 coaching sessions accounted for a 41.9% market share; however, other alternatives are also widely adopted.

Regardless of which session format dominates the market, selecting an online coaching platform that aligns with your style and allows you to sell both subscriptions and one-time sessions will increase your chances of finding or attracting the right audience.
2. Check community features
Another key factor to consider when selecting the right online coaching platform is its community features. The coach-customer relationship remains as important as ever, but a community where customers can interact with one another is essential for learning and building trust.
Given that WifiTalents found 76% of coaches reported building trust as a key challenge in customer engagements, an online coaching platform with great community support will come in handy.

Easytools, for example, integrates with industry-leading online communities such as Circle and Discord. Founders of the online AI courses 10xDevs and Przeprogramowani, Marcin Czarkowski and Przemek Smyrdek, use this feature.

They sell these incredible online courses using Easytools and have also integrated them with Circle and Discord. This enables them to showcase their active community and attract new customers.
So check whether the online coaching platform you’re considering has a great community feature or allows smooth integration with one.
3. Assess pricing and scalability
When selecting an online coaching platform, consider both pricing and scalability. On the surface, an online coaching platform may seem affordable. However, before committing, there are checks, details, and questions about pricing that you should clarify.
For example, ask if they fit your budget and online coaching stage. Are there hidden fees for extra or premium features and customer support? Do transaction and processing fees eat into your profit margin?
Also, you want to know if you’ll be charged more as you scale from 10 to 100 customers. Clarifying these details ensures your coaching business remains profitable and scalable.
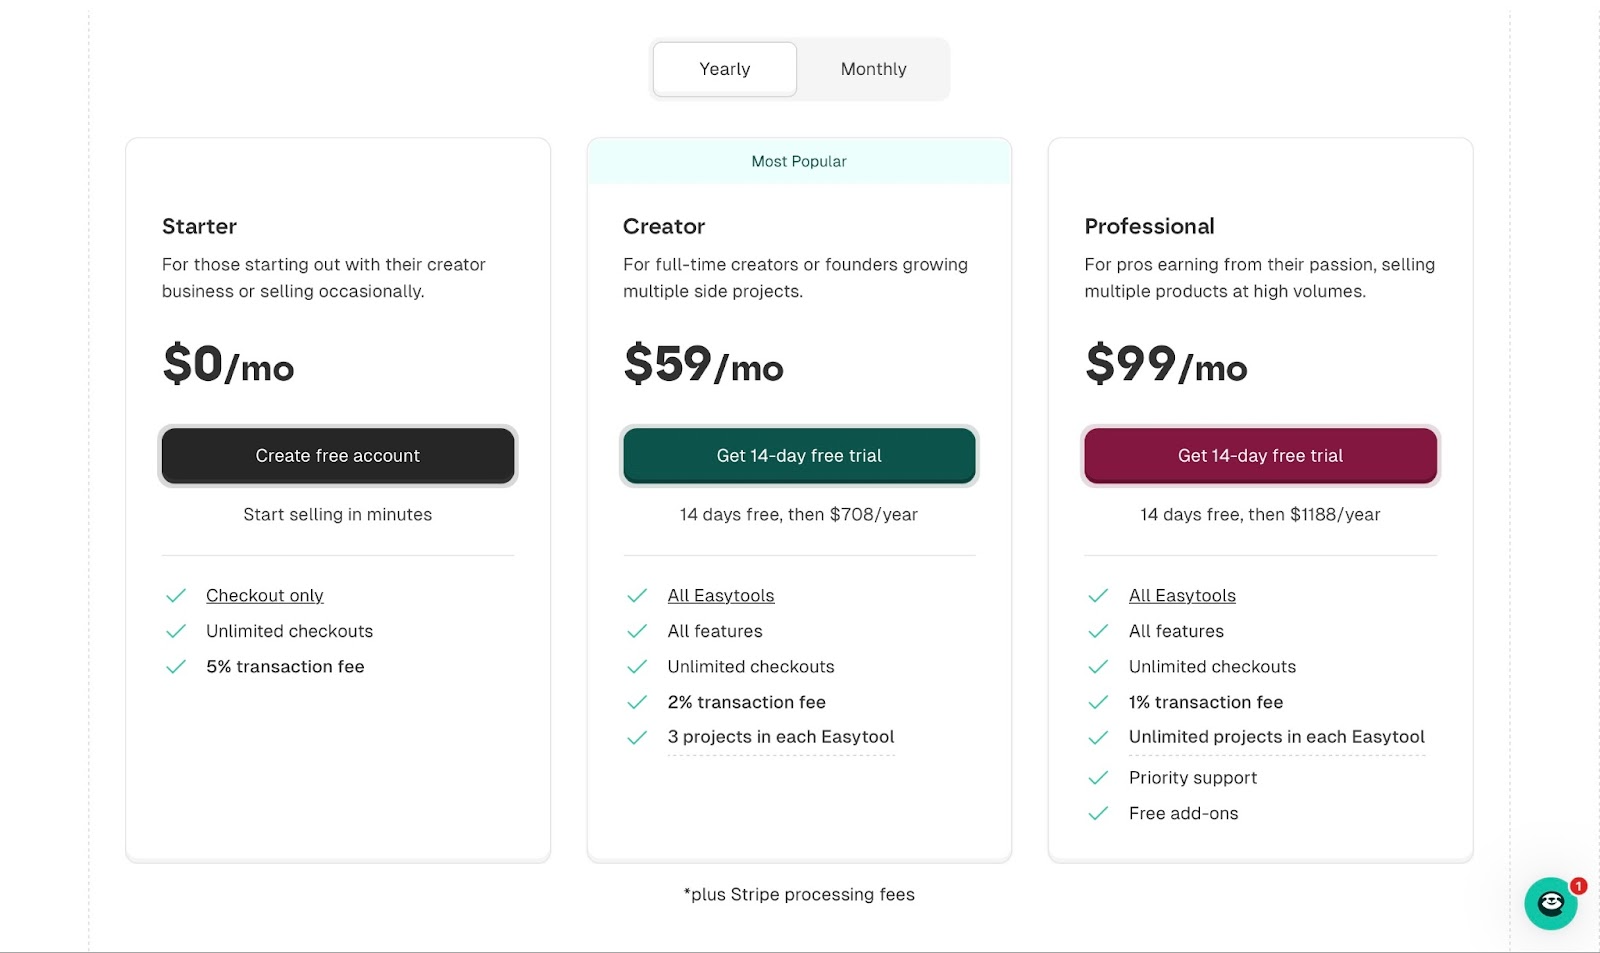
I know all of this sounds overwhelming. Platforms like Easytools simplify this, whether you’re now starting out or already established. If you want an affordable, feature-rich platform with all the tools you need to build a successful online coaching business, it’s Easytools.
Easy charges only 2% transaction fees for the Creator plan and 5% for its Starter plan. If you opt for the Professional plan, which is only $99 per month, the transaction fee is only 1%.
4. Check integrations with other tools
The final point to consider when choosing an online coaching platform is its integration with other tools. Most coaches use multiple tools out of necessity.
These include tools for email marketing, community building, payment processing, customer relationship management (CRM), content management system (CMS), and more. Your work will become frustrating and tedious if the platform you choose doesn’t allow extensive integration with these tools.
So, the right online coaching platform takes that into consideration and allows easy integration with these tools. For example, Easytools integrates smoothly with industry-leading tools like
- HubSpot and Pipedrive for CRM
- MailerLite, SendGrid, and MailChimp for email marketing
- Zapier and Make for workflow automation
- WordPress for CMS
- Zencal for appointment scheduling
- Circle and Discord for memberships and community building
- Easycoffee (Buy Me a Coffee integration) for donations
- Easycart is an enhanced version of Stripe Checkout, designed to maximize conversions, payments, and subscriptions.

If you want your workflow to be efficient with almost no time wasted juggling between tools, check the platform’s integration with the tools you’ll need.
Choose the best online coaching platform
This guide provides a detailed, step-by-step walkthrough of my seven top online coaching platforms. Easytools was first on the list, followed by Satori, CoachVantage, Canva, Notion, Zencal, and Zoom.
I also reviewed two of the features I loved for each online coaching platform on my list. Furthermore, to help you make a choice, I have discussed four key factors to consider.
I recommended that you match your style to the platform and check community features. I also advised that you access pricing and scalability, as well as check the platform’s integration with other tools.
The right choice will save you time, automate important marketing tasks, and enhance the customer experience.
